# How do I use Overleaf?
Overleaf is a powerful yet easy-to use LaTeX editor and collaboration platform that's built for experienced LaTeX users as well as those new to LaTeX.
## LaTeX users
**If you are familiar with LaTeX** then using Overleaf couldn’t be simpler because we provide full support for direct LaTeX editing and automatically compile your document for you on our servers—there’s nothing to install! All you need to do is create a document, select the **Code Editor** and begin writing your LaTeX code:
Image showing the Code Editor and Visual Editor toggle.
## New to LaTeX
**If you are new to LaTeX** and need some help to get started, our [tutorials](https://www.overleaf.com/tutorial) page lists a wide range of learning materials to jump-start your LaTeX journey. We’ve also pre-loaded a range of [templates and examples](https://www.overleaf.com/latex/templates) into Overleaf to help you create your first document.
**Another option for beginners** is to start with a [sample document](https://www.overleaf.com/docs?template=overleaf\&rich_text=true) using the **Visual Editor** and use that to explore Overleaf. The **Visual Editor** lets you write and edit your document using a rich-text, Word-like interface—no need to know or use LaTeX code. It's ideal for those who are new to LaTeX or prefer a more intuitive writing experience.
The **Code Editor,** on the other hand, is the traditional LaTeX environment where you write and edit your document using LaTeX commands.
Image showing how to use Overleaf.
We hope you enjoy using Overleaf, and if you have any comments or questions, please get in touch via our [contact page](https://www.overleaf.com/contact).
# Redesigned Overleaf editor
This guide introduces you to the redesigned Overleaf editor, highlighting key changes and improvements to enhance your writing and collaboration experience.
## Getting Started
We've redesigned our editor to improve space utilization, seamlessly integrate features, and enhance the overall experience.
The new editor is designed to feel intuitive and familiar, building on your previous use of Overleaf. The editing pane remains on the left and the PDF viewer on the right.
* You can still switch between the **Code** and **Visual** editors using the toggle at the top-left of the editing pane.
* The **Recompile** button remains at the top-left of the PDF viewer.
## Top bar
We have simplified the top bar and reorganized it so that it is easier to find what you want and increase space.
* **Overleaf Icon**: Clicking the Overleaf icon in the top-left corner will now take you back to your project dashboard.
* **Menus**: We've introduced familiar menu options like **File**, **Edit**, **View**, and **Help** to make common actions easier to find.
* **Project menu**: Clicking the drop-down menu next to the project name gives you access to project-level actions, such as downloading the source, renaming the project, making a copy, or submitting to a journal.
* **Top-Right Controls**: On the top-right, you'll find buttons for **History**, **Share**, and options to change the editor layout.
## Left bar
Access to key features has moved to a new vertical bar on the left-hand side of the screen. From top to bottom, the icons give you access to:
* **File tree**: Organize and manage your project's files and directories.
* **Search**: Quickly locate information within your project files.
* **Integrations**: Connect with external platforms, such as Papers and GitHub, to enhance workflow.
* **Review**: Utilize features like Track Changes and Comments for collaborative editing.
* **Chat**: Communicate in real-time with team members or collaborators.
At the bottom of this bar, you'll find links to **Help** and your project **Settings**.
Error logs
The error logs remain **next to the Recompile button** with a new design. Clicking the icon will open a pane displaying any LaTeX errors, warnings, and other compiler output to help you debug your project. The AI Error Assistant and other log-related options are still available in this view.
{% hint style="info" %}
As before, whenever there are errors, solve errors from the top down, resolve them as soon as possible, and check the logs regularly.
{% endhint %}
Resizing the panes
You can still use the dividers to resize or hide panes. The arrows for SyncTeX (to jump between the source code and the PDF) are still located on the divider between the editor and PDF viewer.
## Project settings
Clicking **Settings** at the bottom of the left bar opens a window with several configuration tabs. From this window, you can also quickly access your main **Account settings** and **Subscription** details.
{% tabs %}
{% tab title="Editor" %}
This tab contains options to customize your editing experience, such as auto-complete, code checking, editor language, and spell-check dictionary.
{% endtab %}
{% tab title="Compiler" %}
The **Compiler** tab allows you to change settings such as the compiler engine (e.g. pdfLaTeX, LuaLaTeX etc.), the TeX Live version, and the main document file. The advanced compiler options, accessed via the small arrow on the **Recompile** button, remain unchanged.
{% endtab %}
{% tab title="Appearance" %}
The **Appearance** tab allows you to switch between different editor and interface themes.
{% endtab %}
{% endtabs %}
We hope you enjoy the redesigned editor! Your feedback is valuable to us, and we encourage you to share your thoughts via the [feedback form](https://forms.gle/3tPYhXcBVGmUB2HXA).
# Contextual Menu
The contextual menu provides a tailored right-click experience within the source editor.
The context menu is a custom interface that appears when you interact with the source editor. It's designed to prioritize the most relevant actions based on your current task, replacing the standard browser menu to keep you focused on your project.
### How to access:
* **Right-click:** Click anywhere within the editor area.
* **Keyboard:** Press Ctrl + Click (this is the same on Windows, Linux, and macOS).
{% hint style="warning" %}
The custom menu only appears within the editor's text area. Right-clicking on the PDF previewer will still trigger standard or specific menus for those areas.
{% endhint %}
### Using your browser's native context menu:
There's currently no setting to turn off the custom context menu. If you'd rather use your browser's own right-click menu (for example, to access browser-level options like "Inspect"), hold **Shift** while right-clicking.
{% hint style="info" %}
On macOS, holding **Shift** overrides the custom menu even when using the keyboard shortcut. **Shift + Ctrl + Click** also opens the browser's native menu.
{% endhint %}
### Common Actions:
The menu provides immediate access to standard text manipulation tools. Availability of these items may change based on your project permissions (e.g., Read-only vs. Edit) or whether text is currently selected.
* **Cut / Copy / Paste:** Standard clipboard operations.
* **Delete:** Quickly remove selected text blocks.
* **Comment:** Add a line comment.

### Specialized tools
* **Jump to location in PDF:** Instantly syncs the PDF preview to the corresponding line in your source code.
* **Back to Editing:** Brings you back to the editor to make changes
* **Comment:** Make a comment on the selected line of code

{% hint style="warning" %}
The menu is context-sensitive. You may see different options depending on selection state, editor mode, permissions.
{% endhint %}
# Creating an account
{% stepper %}
{% step %}
### Start here
To start using Overleaf, go to [overleaf.com](https://www.overleaf.com/signup).
The landing page
{% endstep %}
{% step %}
### Register for an account
If you don't have an account, enter your email address and set a password in the corresponding boxes on the home page. Click **Sign up for free**, and that's it. You will be redirected to the project dashboard where you will be guided into how to create a new project. (If you already have an account you can log in using the Log In button in the top-right corner.)
{% endstep %}
{% step %}
### View your projects
After you are logged in, you should see the Overleaf Project Dashboard.
The Overleaf Project Dashboard
{% endstep %}
{% endstepper %}
{% hint style="success" icon="graduation-cap" %}
To learn more about getting started with your new Overleaf account, enroll in our free, self-paced [Getting Started with LaTeX in Overleaf](https://learn.overleaf.com/101-get-started-with-latex-in-overleaf) course.
{% endhint %}
# Getting started FAQ
Can I try Overleaf without signing up?
To start writing on Overleaf, you will first need to create an account. Then, once you are signed in, all the projects you create or upload will be automatically saved in your new account. To try it out, you can [create a new paper with the default Overleaf template](https://www.overleaf.com/docs?template=overleaf\&rich_text=true). This will prompt you to sign in or register as needed.
If you don't have an account or aren't planning to use Overleaf for writing your own documents, you can still view an Overleaf document by asking the document owner to [send you the read-only link to that document](/collaborating/sharing-a-project#link-sharing), which you'll be able to view without signing in. Note that the document's owner needs to turn on link-sharing in order to provide you with the read-only link.
If you're new to LaTeX and would like to learn more, we have a range of introductory content listed on our [tutorials page](/getting-started/latex-tutorials) in addition to the material on this site. To help you get started, take a look at our quick-start guide called [Learn LaTeX in 30 minutes](https://www.overleaf.com/learn/latex/Learn_LaTeX_in_30_minutes).
How do I save a new document I've created?
Overleaf saves your project automatically every few seconds, as you type. If you'd like to download a copy for offline use, you can download a PDF via the icon above the preview pane, or download the full set of source files from the project settings.
If you want to keep a particular version of a project for future reference, you can do this by labeling a version in the **History** menu. For more information about labeling versions, visit the [page on the History feature](/writing-and-editing/history-and-versioning).
If you've opened one project but want to see another project you've worked on, you can go to your My Projects dashboard page via the up arrow on the top left, and all your documents are listed there.
Finally, if your account has access to premium features, you will have access to the Dropbox integration, which syncs your projects to Dropbox automatically. Additional information about features available with paid subscriptions can be found on our [Plans page](https://www.overleaf.com/plans).
Is Overleaf free to use?
Yes, Overleaf is free to use. You can create, edit and share your projects with a quick sign-up and nothing to install. Our free plan includes unlimited projects, sharing with one collaborator per project, and many other features.
We also offer a range of premium plans with advanced features such as longer compile time, real-time track changes, additional collaborators, and more.
[Compare Overleaf plans and pricing](https://www.overleaf.com/user/subscription/plans).
# Your first project
When logged in, to start a new project in the project dashboard, click the **New Project** button. You will see a drop-down menu.
Main page, New Project button
Two quick options for getting started are to begin with a **Blank Project** or the **Example Project**.
## Starting with a blank project
Click **Blank project**. A box will open where you can enter the name of your new project, then click **Create**.
Chose Blank Project and provide a project name
The Overleaf Editor will open.
A blank project in the Overleaf Editor
A new document is created with some basic information already filled in. You can now start editing your .tex file. To view the changes, click **Recompile**. For more information on how to create a basic LaTeX document, see [Learn LaTeX in 30 minutes](https://www.overleaf.com/learn/latex/Learn_LaTeX_in_30_minutes).
## Starting with the example project
Another option to start a new project is to use an Example project. In the Project Dashboard page, click the button **New project** and in the drop-down menu, click **Example project.**
You will see a text box where you can enter the name of your new project. Now click **Create** and you will be redirected to the editor where a sample document will open.
The example project in the Overleaf Editor
This sample document contains an image inside a float element and a basic bibliography file. You can use this sample as a guide to begin editing your project.
### Your first LaTeX document
To learn more about the LaTeX code to include in your first project, please read: [Learn LaTeX in 30 minutes](https://www.overleaf.com/learn/latex/Learn_LaTeX_in_30_minutes).
# Recompiling your project
The LaTeX compile processes take use your source files to produce a PDF. Pressing the Recompile button kicks off the LaTeX compile.
A key part of working with LaTeX is compiling your source (`.tex`, `.bib`, images, and other files) into a PDF.
{% hint style="info" %}
You should compile frequently, and always fix any errors that you encounter as soon as they arise.
{% endhint %}
## Compiling
When you press the **Recompile** button, your source code will be compiled to produce the PDF. If there are errors in your project, these will be reported in the error logs.
If you run into trouble when compiling your project, these resources should help:
* [Fixing LaTeX errors](/troubleshooting-and-support/fixing-latex-errors)
* [Resolving PDF rendering and project loading problems](/troubleshooting-and-support/resolving-pdf-rendering-and-project-loading-problems)
* [Fixing and preventing compile timeouts](/troubleshooting-and-support/fixing-and-preventing-compile-timeouts)
## Compile options
The drop-down menu under the **Recompile** button allows you to toggle various compile options.
### Auto compile
When this option is turned on, Overleaf automatically compiles your document for you every few seconds.
### Compile mode
The LaTeX compiler can be given an instruction to produce a fast draft of the PDF, rather than a complete document. The main effect of choosing the **Fast \[draft]** option is to skip over image file processing. This means that the compile will complete more quickly, but all images will be replaced with empty boxes. This mode is helpful when working on large projects, or ones that have many image files.
### Syntax checks
Overleaf automatically checks your LaTeX code for common syntax issues as you type. These checks help catch typos and errors that could prevent your project from compiling properly. Some things Overleaf's Syntax Checks highlights include unmatched braces or brackets, undefined commands, and missing or extra `\begin \end` statements.\
\
You can read more about Overleaf's syntax checking [here](/troubleshooting-and-support/code-check).
### Compile error handling
The default mode for LaTeX compilation on Overleaf is for the compiler to attempt to produce a PDF even if there are errors. In this mode, the compiler will ignore or compensate for errors it encounters when compiling. If errors are encountered, the PDF produced may be helpful in identifying the errors.
When errors are encountered, or if you encounter a compile timeout, it is recommended to switch to [Stop on first error](/troubleshooting-and-support/stop-on-first-error) mode. In this mode, the compiler will not attempt to produce a PDF when errors are encountered, but will instead stop and report the error immediately.
### Recompile from scratch
The LaTeX compiler generates temporary helper files when it compiles your project. These files are preserved when possible between compiles, which can help speed up the compilation process. If the files are stale or contain errors from a previous compile, it is sometimes helpful to remove them. Please see [Clearing the project cache](/troubleshooting-and-support/clearing-the-project-cache).
{% hint style="success" icon="graduation-cap" %}
To learn more about compiling your document, enroll in our free, self-paced [Getting Started with LaTeX in Overleaf](https://learn.overleaf.com/101-get-started-with-latex-in-overleaf) course.
{% endhint %}
# The Main document
Every Overleaf project has a Main source document (.tex file) that is the file which is submitted to the compiler by default.
The Main document in Overleaf is the .tex file which LaTeX will be told to compile first. It is the main file of the project, which all other parts (classes, packages, chapters etc.) will be incorporated into.
## Setting the Main document
### From the Settings
{% stepper %}
{% step %}
Within your project, select the gear icon (or go to **File** > **Settings**):
Option 1: Gear icon
Option 2: File menu
{% endstep %}
{% step %}
Go to **Compiler** > **Main document**:
Main document setting location
{% endstep %}
{% step %}
Select a .tex file from the list of options.
{% endstep %}
{% endstepper %}
### From the File Tree
{% stepper %}
{% step %}
Within your project, open the .tex file that you want as the main document.
{% endstep %}
{% step %}
In the File Tree, select the three-dot icon to the right of the file name.
{% endstep %}
{% step %}
In the menu that appears, select the "Set as main document" option:
{% endstep %}
{% endstepper %}
### Best Practices
The Main document **should always be in the root directory** (outside of any folders) to ensure that all of the compilation steps will be run in the correct directory and to ensure that the required auxiliary files are available.
If the Main document is placed in a folder, several features and packages can fail to work as expected. Affected features include [jump-to-location](/navigating-in-the-editor/working-with-the-pdf-viewer/moving-between-the-editor-and-pdf), [word count](/writing-and-editing/using-word-count) and scripts like [makeglossaries](https://www.overleaf.com/learn/latex/Glossaries) etc.
The Main document must have a `\documentclass` declaration. If you provide a preamble file, input this file after the `\documentclass` declaration in your Main document.
### Compiling other files in the same project
While it is possible to place multiple independently compilable files within the same Overleaf project, it is recommended that, in most cases, an Overleaf project should correspond to a single output document. In general, related documents should not be placed in the same project. There should not be multiple "Main documents" within a project.
* Conceptually related projects can be grouped together using tags.
* Common files can be shared between projects using the "input from another project" feature.
* Multiple versions of a project can be tracked using the History feature (rather than keeping old versions of files in folders within the project).
However, there are some cases where it is helpful to be able to compile files other than the Main document within a project. To allow you to quickly compile different documents in the same project, Overleaf will compile whichever file is open in the editor as the Main document once it includes the `\documentclass[...]{...}` command. This is particularly convenient for editing with the [`subfiles` package](https://learn.overleaf.com/learn/Multi-file_LaTeX_projects#The_subfiles_package).
Any project file that contains a `\documentclass` command can be compiled when opened in the editor by selecting the **Recompile** button. This allows you to compile multiple documents inside one Overleaf project without changing the project's main file setting.
## Troubleshooting
I have files with the same names in different folders, and the wrong file is being compiled.
If the selected main file is contained in a folder and there is a file of the same name in the root directory, the file with that name in the root directory will be compiled rather than the selection. For example , if `version1/main.tex` is set as the main file but `main.tex` is also in the project, `main.tex` will be compiled. This problem is due to the way LatexMk is run on Overleaf. To avoid issues from this, give any files you will want to compile on Overleaf a unique name.
The document that I want to choose is not in the Main document list.
The Main document must have a `\documentclass` declaration. If you provide a preamble file, input this file after the `\documentclass` declaration in your Main document.
The Main document must be an editable plain text file. Therefore if a .tex file is larger than 2 MB, it's [*categorized as non-editable*](/managing-projects-and-files/adding-files-to-a-project/uploading-files-to-a-project#i-cant-edit-some-of-the-files-that-i-have-uploaded) on Overleaf, and you won't be able to set such a file as your project's Main document. You can break it up into smaller .tex files, and use `\input` or `\include` on them.
I had previously chosen a Main document but it seems to no longer compile.
A couple actions in the Overleaf Editor may result in the Main document being set to "None", even if there was a Main document selected earlier: if you have restored a previous version of your project using the History feature, or if you converted a non-.tex file into a .tex file, then you may have to reset your Main document.
## Keeping the Main document in a folder
In some cases it's possible to maintain a file and folder structure that has the Main document in a folder while avoiding the problems that usually occur with this structure on Overleaf. If the actual Main document is in a folder, a "proxy" Main document can be provided at the top level that points to the actual Main document.
{% stepper %}
{% step %}
Provide an extra `main.tex` file in the Project's top level:
{% tabs %}
{% tab title="File tree structure" %}
* `main.tex` (the proxy main document)
* paper :file\_folder:
* `manuscript.tex` (the real main document)
* `refs.bib`
* `appendix.tex`
* output :file\_folder:
* `chart.png`
* `results-table.tex`
{% endtab %}
{% endtabs %}
{% endstep %}
{% step %}
Use the `import` package to pull in the real main file from the subfolder:
{% code title="main.tex" %}
```latex
\RequirePackage{import}
\import{paper/}{manuscript.tex}
```
{% endcode %}
{% endstep %}
{% endstepper %}
The original `\inludegraphics`, `\input` etc. in `manuscript.tex` would continue to work with respect to your project file structure.
{% hint style="success" %}
In the Gallery, you can find [an example in action](https://www.overleaf.com/read/hpqnttjpvmkn).
{% endhint %}
# Selecting a TeX Live version and LaTeX compiler
You can select which version of TeX Live and which LaTeX compiler to use when compiling your project.
## How do I change a project’s TeX Live version?
Use the following steps to change a project’s TeX Live version—the TeX Live setting is *specific to each project* and does not affect any other projects you may have.
{% stepper %}
{% step %}
Select the gear icon within your project.
Option 1: Gear icon
Option 2: File menu
{% endstep %}
{% step %}
Click **Compiler** in the modal sidebar, and navigate to the **TeX Live version** drop-down menu.
{% hint style="info" %}
In most cases, the most recent version of Tex Live is recommended. Legacy versions are not recommended for new projects.
{% endhint %}
{% endstep %}
{% step %}
Select the TeX Live version required by your project, then close the menu by clicking anywhere outside the menu list.
Image showing how to choose the TeX Live version on Overleaf
{% endstep %}
{% endstepper %}
Learn more about TeX Live and considerations for selecting a TeX Live version [here](/troubleshooting-and-support/tex-live).
## Changing the compiler
Sometimes for certain languages, classes and packages it may be necessary to use a different compiler than the default `pdflatex`. With Overleaf, you can choose between pdfLaTeX, LaTeX, XeLaTeX, and LuaLaTeX.
To change the compiler:
{% stepper %}
{% step %}
Select the gear icon within your project.
Option 1: Gear icon
Option 2: File menu
{% endstep %}
{% step %}
Click **Compiler** in the modal sidebar, and navigate to the **Compiler** drop-down menu.
{% endstep %}
{% endstepper %}
### Why change compilers?
The default and most frequently used LaTeX compiler is pdfLaTeX. Other possible compiler settings are LaTeX, XeLaTeX and LuaLaTeX. In most cases, the default pdfLaTeX compiler is appropriate, but some projects require the use of one of the other compiler options.
* **LaTeX** supports only `.eps` and `.ps` image formats for use with `\includegraphics`. If all the images in your project are `.eps` files, then this compiler setting is recommended.
* **pdfLaTeX** supports `.png`, `.jpg`, `.pdf` image formats. It will convert `.eps` images to `.pdf` on-the-fly during compilation, which may prolong the compilation time required. (pdfLaTeX may not be able to handle `pstricks` well on Overleaf.)
* **XeLaTeX** and **LuaLaTeX** both support UTF-8 robustly, as well as Truetype and OpenType fonts. They are therefore recommended if you need to typeset non-Latin scripts on Overleaf, in conjunction with the `polyglossia` package. They also support all of the `.png`, `.jpg`, `.pdf` *and* `.eps` image formats. Note that XeLaTeX supports `pstricks`; but LuaLaTeX doesn't.
{% hint style="info" %}
You can extend LuaLaTeX's capabilities by embedding Lua code directly in your document.
{% endhint %}
### Producing a DVI output
The DVI (Device Independent) format is an alternative to the PDF, and is the format that is produced by default by the LaTeX compile engine. Some publishers may still request that you provide a DVI file.
On Overleaf, the final compiled output is always a PDF document. If you are required to produce a DVI file from your Overleaf project, here's what you can do:
{% hint style="warning" %}
Make sure you're using only `.eps` and `.ps` images in your project.
{% endhint %}
{% stepper %}
{% step %}
[Change the compiler](#changing-the-compiler) to **LaTeX**.
{% endstep %}
{% step %}
[Recompile](/getting-started/recompiling-your-project) your project.
{% endstep %}
{% step %}
Click on the **Logs and output files** button (next to the **Recompile** button).
{% endstep %}
{% step %}
Scroll all the way down, and click on **Other logs and output files**.
{% endstep %}
{% step %}
Download the generated `.dvi` file in the list of options.
{% endstep %}
{% endstepper %}
# Free and premium plans
Overleaf is free to use and offers essential support for writing LaTeX documents. You can create, edit and share your projects with a quick sign-up and nothing to install. Our free plan includes unlimited projects, sharing with one collaborator per project, and many other features.
We also offer a range of [premium plans](https://www.overleaf.com/user/subscription/plans) with advanced features such as Overleaf AI, longer compile time, real-time track changes, additional collaborators, and more. Overleaf premium plans offer access to additional premium features that include integrations, collaboration features, and productivity enhancements.
## Free plan
Overleaf's free plan offers essential support for writing LaTeX documents.
## Premium plans
Overleaf's [premium plans](https://www.overleaf.com/user/subscription/plans) offer access to additional [premium features](/getting-started/free-and-premium-plans/premium-features) that include integrations, collaboration features, and productivity enhancements.
# Premium features
Your [Overleaf account](/accounts-and-security/understanding-your-overleaf-account/overleaf-accounts-faqs) can be upgraded to activate premium features; this is usually through joining or starting a subscription, either individually or as part or a group or institutional license. You can find details of our individual and group subscriptions on our [Plans & Pricing page](https://www.overleaf.com/user/subscription/plans), and a list of subscribing institutions can be found [here](https://www.overleaf.com/for/institutions-using-overleaf).
## Overleaf AI
Overleaf offers a range of AI features that are available for free within daily limits. You can go beyond these limits by purchasing one of our premium plans.
* AI Features: [read more](/integrations-and-add-ons/ai-features)
## Invite more collaborators
You can invite collaborators to your project via the *Share* menu in your project (with view or edit access). Simply add their email address and an email invitation will be sent to them. You can remove collaborators at any time via the same *Share* menu. The number of collaborators you can invite depends on your plan.
| | Free | Student | Standard | Pro | Personal**†** |
| ----------------------------------------------- | --------- | --------- | --------- | --------- | ------------------------ |
| Number of collaborators (Editors and Reviewers) | 1 | 10 | 10 | unlimited | 1 |
| Number of Viewers | unlimited | unlimited | unlimited | unlimited | unlimited |
**†** The Personal plan is no longer available to new subscribers.
* Inviting collaborators: [read more](/collaborating/sharing-a-project)
## More compile time available
You have more time for compilation (to generate a PDF of your document) before receiving a timeout error message.
* Compile Timeout: [read more](/getting-started/free-and-premium-plans/plan-limits)
## Real-time track changes
The track changes mode lets you see exactly what has been changed by your collaborators, and allows you to accept or reject each individual change. The availability of the track changes on your project depends on your plan.
| | Free | Student | Standard | Pro | Personal**†** |
| --------------------------- | ---- | ------- | -------- | --- | ------------------------ |
| Is track changes available? | No | Yes | Yes | Yes | No |
**†** The Personal plan is no longer available to new subscribers.
* Track changes: [read more](/collaborating/track-changes)
## Full document history and versioning
View the entire history of your project with the ability to revert to previous versions of your document from your project history (versus only 24 hours of history availability on a free Overleaf account). No more fear of losing work or making changes you can’t undo.
* History and versioning: [read more](/writing-and-editing/history-and-versioning)
## Advanced reference search
You can search for references directly inline as you type, based on citation key, author, or title.
* Advanced reference search: [read more](/citing-and-references/adding-citations-and-references)
## Reference manager integration
You can link your ReadCube, Mendeley and Zotero accounts to your Overleaf account, allowing you to keep your Overleaf document in sync with the references stored in your external reference manager.
Once you’ve set up an integration, you can pull individual references directly from linked external reference managers straight into your project using advanced reference search. Any matching results from your reference manager and your selected .bib file will be displayed together inline, as you type your LaTeX citation commands.
* Learn how to link [ReadCube](/integrations-and-add-ons/reference-manager-integrations/readcube#how-to-link-papers-to-your-overleaf-account), [Zotero](/integrations-and-add-ons/reference-manager-integrations/zotero#how-to-link-zotero-to-your-overleaf-account) and [Mendeley](/integrations-and-add-ons/reference-manager-integrations/mendeley#how-to-link-mendeley-to-your-overleaf-account) to your Overleaf account.
## Dropbox synchronization
You can link your Dropbox account to your Overleaf account, allowing 2-way integration with Dropbox.
* Dropbox synchronization: [read more](/integrations-and-add-ons/dropbox)
## Git and GitHub integration
You can configure your Overleaf project to synchronize directly with a repository on GitHub, or you can use raw git access. This allows you to work offline and synchronize your files whenever you come back online. You can also use our Overleaf Git integration, which lets you git clone, push and pull changes between the online Overleaf editor, and your local offline git repository.
* Git integration: [read more](/integrations-and-add-ons/git-integration-and-github-synchronization/git-integration)
* GitHub Sync: [read more](/integrations-and-add-ons/git-integration-and-github-synchronization/github-synchronization)
## Symbol Palette
The Symbol Palette is a convenient tool to quickly insert math symbols into your document. It’s an account level feature, which is explained in more detail [below](#account-and-project-level-features).
* Symbol Palette: [read more](/writing-and-editing/inserting-symbols#using-the-symbol-palette)
## Priority Support
Our helpful Support team will prioritise and escalate your support requests where necessary. Please note that we do not provide additional debugging support for users on a premium plan.
* Priority Support: [read more](/troubleshooting-and-support/user-support-policy#priority-support)
## Further information
### Account and project level features
Please note that certain premium features apply at the project level, like track changes, compile time, and access to full history, and are based on the project owner’s subscription. So, when invited to collaborate on a project owned by someone with a subscription, users on the free plan can use those features within that project.
In other words, if you have an upgraded account, your fellow collaborators do not need to pay for a subscription in order to use track changes or access the full history of projects that you share with them.
Other premium features apply at the account level, and are controlled by you, the subscription holder. These are the features that include linking to external services, like Dropbox, GitHub, Git, ReadCube, Mendeley, and Zotero. The majority of these do also confer benefits to those you work with, as described below:
{% tabs %}
{% tab title="Dropbox" %}
A user with a premium subscription can link their account to Dropbox, to enable an automatic two-way sync between Overleaf and their Dropbox. This can be thought of as a 'personal' feature, as it does not allow collaborators to sync locally. For premium users who wish to enable collaborators to sync locally, we recommend the Git or GitHub sync options.
{% endtab %}
{% tab title="GitHub" %}
A user with a premium subscription can link any project they own to a GitHub repo. Once the project is linked, all users in the project can click the button to sync it. So this can be thought of as a 'per project' feature.
{% endtab %}
{% tab title="Git" %}
If the project is owned by a user with a premium subscription, all members of the project can git clone/push/pull to it. If a user has a premium subscription, they can git clone/push/pull to all projects they have access to. This is like a superset of GitHub and Dropbox permission model—it's personal, and per project.
{% endtab %}
{% tab title="ReadCube, Mendeley, & Zotero" %}
A user with a premium subscription can link their ReadCube, Mendeley, and/or Zotero accounts to their Overleaf account, and import their reference library as a .bib file. Collaborators can cite these references within the project, but only the project owner can re-sync the imported file.
{% endtab %}
{% tab title="Symbol Palette" %}
A user with a premium subscription always has access to this feature regardless of which project they are working on.
{% endtab %}
{% endtabs %}
To find out more about how to use these premium features, please see the *read more* links in the sections above.
### What happens to my projects if I downgrade to the Overleaf free plan?
* You will not lose access to any projects you own.
* You will be allowed only one collaborator on new and existing projects. If you have more than one collaborator on any of your existing projects, we recommend choosing the collaborator who will keep edit access on each project and move everyone else to view-only before downgrading. If you downgrade first, all collaborators will be moved to view-only permissions, but you’ll still be able to then assign edit access to one of the existing collaborators or invite a new collaborator with edit access.
* Any existing track changes will remain a part of the project; however, the track changes feature will be unavailable for any additional changes.
* Any other premium features (faster compiles, premium integrations, full project history, etc.) will no longer be available.
# Plan limits
## Overleaf plan limits
Overleaf is [free to use](/getting-started/free-and-premium-plans); however, our range of [premium plans](https://www.overleaf.com/plans) provide a number of [additional features](/getting-started/free-and-premium-plans/premium-features):
Free plan
Premium plans
Compile timeout
10 seconds
240 seconds
Maximum number of files per project
2000
2000
Maximum size of editable material per project
7 MB
7 MB
Maximum size of an individual editable text file
2 MB*
2 MB*
Maximum size of an individual upload
50 MB
50 MB
Maximum size of project
Unlimited†
Unlimited†
Maximum number of projects
Unlimited
Unlimited
AI daily allowance
Basic (no assistant)
Plan dependent‡
\* Some larger files may remain editable under certain circumstances. However, to ensure that a file remains editable, you should limit its size to 2 MB or less.
† There's no enforced limit on total project size. However, you may find some technical limitations when working with very large projects. We recommend a maximum project size of 500 MB, or less than 100 MB if using [GitHub sync](/integrations-and-add-ons/git-integration-and-github-synchronization/github-synchronization) or our [Git integration](/integrations-and-add-ons/git-integration-and-github-synchronization/git-integration). Users with projects over 4 GB may also experience problems with operations such as project copy. Projects above these sizes may work, but staying within these limits will give you the best experience.
‡See [the AI allowance page](/integrations-and-add-ons/ai-features#ai-allowance-by-plan) for information.
## More about our premium plans
Our [premium plans](https://www.overleaf.com/plans) include the Standard, Pro, and Student plans. We also offer plans for groups and organizations. As well as a longer compile timeout, they provide additional features such as [project history](/writing-and-editing/history-and-versioning), [track changes](/collaborating/track-changes) and integrations with [Git](/integrations-and-add-ons/git-integration-and-github-synchronization/git-integration) and [GitHub](/integrations-and-add-ons/git-integration-and-github-synchronization/github-synchronization), [Dropbox](/integrations-and-add-ons/dropbox), [ReadCube](/integrations-and-add-ons/reference-manager-integrations/readcube), [Zotero](/integrations-and-add-ons/reference-manager-integrations/zotero) and [Mendeley](/integrations-and-add-ons/reference-manager-integrations/mendeley).
The Standard, Pro and Student plans also allow subscribers to invite more than one collaborator to their projects: 10 for Standard and Student subscriptions, and an unlimited number for Pro subscriptions.
See the [plans page](https://www.overleaf.com/plans) for an overview of the available plans, and see our [Subscriptions, payments, and billing](/subscriptions-payments-and-billing/subscriptions-payments-and-billing) documentation for information about managing your current plan.
# LaTeX tutorials
Some resources to help you learn, including various tutorials, web sites and articles.
## How do I get started with LaTeX?
If you are wondering where to start your Overleaf and LaTeX journey, you could start by checking out these resources:
* [Overleaf LaTeX tutorials](#overleaf-latex-tutorials)
* [Overleaf webinars](#overleaf-webinars)
* [Community video tutorials](#community-video-tutorials)
After you have gained confidence/awareness of LaTeX we recommend the Overleaf article [What’s in a Name: A Guide to the Many Flavours of TeX](https://www.overleaf.com/learn/latex/Articles/What's_in_a_Name%3A_A_Guide_to_the_Many_Flavours_of_TeX) because its explanation of TeX-related terminology might assist your onward LaTeX-learning journey.
## Overleaf LaTeX tutorials
### **Learn LaTeX in 30 minutes**
Overleaf’s [Learn LaTeX in 30 minutes](https://www.overleaf.com/learn/latex/Learn_LaTeX_in_30_minutes) is an introductory tutorial that does not assume any prior experience with LaTeX and guides you through creating your first LaTeX document. It contains numerous LaTeX examples, almost all of which have links to open the LaTeX directly in Overleaf—enabling you to gain confidence and experience by editing and exploring the code.
### **Dr. John Lees-Miller’s 3-part** LaTeX **tutorial series**
Dr. Lees-Miller, a co-founder of Overleaf, wrote a [free 3-part tutorial](https://www.overleaf.com/learn/latex/Free_online_introduction_to_LaTeX_\(part_1\)) to help new users get started using LaTeX. Use the following links to jump to topics of interest:
* [Part 1: The Basics](https://www.overleaf.com/learn/latex/Free_online_introduction_to_LaTeX_\(part_1\))
* [Part 2: Structured Documents & More](https://www.overleaf.com/learn/latex/Free_online_introduction_to_LaTeX_\(part_2\))
* [Part 3: Not Just Papers: Presentations & More](https://www.overleaf.com/learn/latex/Free_online_introduction_to_LaTeX_\(part_3\))
### Overleaf webinars
Our [archive of recorded webinars](https://www.overleaf.com/events/webinars) not only shows how to make the most of your Overleaf account but also contains an [introduction to LaTeX and Overleaf](https://digital-science.zoom.us/webinar/register/WN_CutYcfIrRdOkITWhHhAvuQ) with further recordings for [intermediate](https://digital-science.zoom.us/webinar/register/WN_CThcU7MdT-mwgH1Fk0Zxlw) and [more experienced users](https://digital-science.zoom.us/webinar/register/WN_Ec_9y0ivTTy9J857jHu21A).
## Community video tutorials
In addition to content produced by Overleaf, we are delighted to see video tutorials being created by members of the LaTeX community. Here is a selection of some you may wish to view.
### **Dr. Trefor Bazett**
Readers may be interested in Dr. Bazett’s [Introduction to LaTeX (Part I)](https://youtu.be/Jp0lPj2-DQA) and other videos in his [LaTeX tutorials playlist](https://www.youtube.com/playlist?list=PLHXZ9OQGMqxcWWkx2DMnQmj5os2X5ZR73), including videos sponsored by Overleaf, such as [Introduction to LaTeX (Part II)](https://youtu.be/-HvRvBjBAvg):
### **Dr. Vincent Knight**
[Dr. Vincent Knight](https://www.cardiff.ac.uk/people/view/98654-knight-vincent), Senior Lecturer in the School of Mathematics, Cardiff University, has prepared [a series of short videos](https://www.youtube.com/playlist?list=PLnC5h3PY-znyDQKn3knfXfekZLgWyL7QW) which introduce Overleaf and help you get started with producing your first LaTeX document.
### **Additional YouTube videos**
Naturally, searching YouTube using [LaTeX tutorial for beginners](https://www.youtube.com/results?search_query=latex+tutorial+for+beginners+) yields numerous videos to be filtered according to your requirements.
## Other resources
### Overleaf templates
Another good place to start is opening and exploring one of Overleaf’s pre-loaded templates and examples—ideal for helping you create your first project. Choose from one of the following suggestions:
* “I’m writing a project report/homework assignment”: then we recommend taking a look at our [project and report templates](https://www.overleaf.com/latex/templates/tagged/report) or [homework templates](https://www.overleaf.com/latex/templates/tagged/homework).
* “I’ve heard LaTeX can produce great presentations—I want to give that a try”: take a look at our [presentation templates](https://www.overleaf.com/latex/templates/tagged/presentation).
* “I’ve used LaTeX before but can’t remember the commands”: we’ve preloaded a [Quick Guide to LaTeX](https://www.overleaf.com/latex/templates/a-quick-guide-to-latex/fghqpfgnxggz) which contains lots of commands to get you going!
### Tutorials on CTAN (Comprehensive TeX Archive Network)
A [search on CTAN](https://ctan.org/topic/tut-latex?lang=en) yields a list of tutorials including the popular and long-established [(Not So) Short Introduction to LaTeX](https://ctan.org/pkg/lshort), which is available in many languages.
### Websites
* [**learnlatex.org**](https://www.learnlatex.org/): after landing on the home page, select your preferred language to access free tutorials covering a wide range of topics.
* [**tug.org**](https://tug.org/): the web site of the TeX Users Group (TUG). Contains a vast amount of information on TeX, LaTeX, and related software.
{% hint style="success" %}
**learnlatex.org** provides a page [listing various sources of documentation](https://www.learnlatex.org/en/lesson-16) for LaTeX (and related) software and where you can turn to for help with LaTeX questions or problems typesetting your documents. If you encounter LaTeX problems whilst using Overleaf, feel free to [contact us](https://www.overleaf.com/contact) with details of the Overleaf project you need help with.
{% endhint %}
{% hint style="success" %}
**tug.org** also has a page with links to [sources of help and documentation](https://tug.org/interest.html#doc).
{% endhint %}
# Understanding your Overleaf account
Your Overleaf account is where your projects are saved. It also provides you with an identity within Overleaf for sharing and joining collaborations.
* Your Overleaf account might be on the **free plan** or can become associated with a [subscription](https://www.overleaf.com/user/subscription/plans) and gain access to premium features.
* If your Overleaf account is part of a subscription that has enabled managed users, your account remains managed by your group administrator and cannot be moved. See [our information for managed users](/accounts-and-security/understanding-managed-accounts) to learn more.
* If your Overleaf account is not managed, you can leave a subscription and revert to the free plan without losing access to your projects or current collaborations.
## Each user has their own account
In Overleaf, every individual user has their own Overleaf account. It is not appropriate or secure for you to share your account with someone else by adding an email address that you do not own to your Overleaf account, or by sharing your login and password with someone else. To collaborate on Overleaf, you should use the [project sharing features](/collaborating/sharing-a-project). If more than one person on your team needs access to the [premium features](/getting-started/free-and-premium-plans/premium-features), please consider a [group subscription](https://www.overleaf.com/learn/how-to/Managing_a_group_subscription).
### Account settings
You can view your account settings in the **Account** > **Account Settings** area, accessed from the Project Dashboard. You can also access this page from the url: [www.overleaf.com/user/settings](https://www.overleaf.com/user/settings).
In the Account Settings page you can:
* add additional email addresses;
* change your primary email account;
* check on the status of various integrations (premium features);
* update your account information;
* delete your account.
See [this article](/accounts-and-security/keeping-your-account-secure) for more information on keeping your Overleaf account secure.
{% hint style="info" %}
If you have a managed account, you cannot add or modify your account's email addresses and you will be restricted to specific login options. To learn more about Overleaf managed user accounts, see our [information for managed users](/accounts-and-security/understanding-managed-accounts).
{% endhint %}
### Changing email addresses on your account
If you become a member of an institution, it’s easy to add your institutional email address to your account. Likewise, if you leave an institution, it’s easy to remove that address from your account. This way, your Overleaf account can travel with you. Just make sure the primary email address on your Overleaf account is one where you can still receive mail so you can continue to access your account and receive important notifications
### Subscriptions
Your Overleaf account can join a subscription to receive [premium features](/getting-started/free-and-premium-plans/premium-features). If you join an Overleaf Pro group subscription, your account may become managed by the subscription administrator. Overleaf managed accounts have restrictions that are described in [our information for managed users](/accounts-and-security/understanding-managed-accounts). If your Overleaf account is not managed, when you join or leave a group subscription, you can still keep the same account. You can also keep the same Overleaf account as you join or leave institutions, or change emails.
### Your subscription information
You can view your subscription status in the **Account** > **Subscription** area accessed from the Project Dashboard. You an also access this page from the url: [www.overleaf.com/user/subscription](https://www.overleaf.com/user/subscription). This page provides information about your current subscription status.
If you are the manager or administrator of a group or institutional subscription, you will be able to access the subscription management tools from here.
If you are a member of an institution that offers an Overleaf Commons or institutional subscription, but have not yet joined the subscription, please see [this page](/subscriptions-payments-and-billing/commons-subscription) to learn more about how to join your institution's Overleaf Commons subscription.
### Managed Overleaf accounts
Managed Overleaf accounts are user accounts that are managed by your group or organization. They’re designed to help organizations ensure their work remains secure and accessible to them, even if someone leaves the organization. Overleaf group subscription administrators and managers can read more on our page [User Management in Overleaf](https://docs.overleaf.com/groups/user-management/managed-user-accounts). End users can find out more by reading [Understanding Managed Overleaf Accounts](/accounts-and-security/understanding-managed-accounts).
# Overleaf accounts FAQs
Some frequently asked questions about Overleaf accounts
My subscription is ending—will I be able to access my Overleaf account?
If you are on an individual subscription, Standard Group, or Overleaf Commons subscription, your account is yours and remains accessible to you whether you have a subscription or not. If your subscription ends, your account will be placed on the "free plan." On the free plan you will continue to be able to access your account, all your projects, and all your current collaborations. You will not be removed from any projects that were shared with you, and your collaborators will be kept in your projects as viewers.\
\
If your subscription was providing you with a Single Sign-on (SSO) login option, you may need to set an Overleaf-specific password to log into your account after leaving your subscription.\
\
If your account is a managed account on a professional group plan, your account may be deleted by your account administrator if the subscription is ending. Learn more by reading [Understanding Managed Accounts](/accounts-and-security/understanding-managed-accounts).
I am cancelling or changing my subscription, what happens to my Overleaf account?
Your Overleaf account is separate from the subscription that it is participating in. You can cancel or change your subscription, and this should not affect your access to your Overleaf account or your projects. After changing or cancelling your subscription, you should retain access to your account and your projects.\
\
If your Overleaf account is no longer participating in a subscription, it will revert to the free plan. After leaving a subscription, the same Overleaf account can join another subscription.\
\
While Overleaf accounts can, in general, leave and rejoin subscriptions easily, an exception to this is if your Overleaf account is a *managed account*. Managed accounts, unless they are released by the subscription administrator, are not portable to other subscriptions and may be deleted by the subscription administrator. Learn more about[ managed accounts.](/accounts-and-security/understanding-managed-accounts)
I would like to upgrade. Do I need a new account?
In most cases, you do not need to create a new Overleaf account to join a subscription. You can upgrade your existing account by adding a subscription. For institutional subscriptions, you may need to add an institutional email address to your current account and verify it in order to join the subscription.\
\
If you are joining a professional group with managed accounts, learn more by reading [Understanding Managed Accounts](/accounts-and-security/understanding-managed-accounts). I created two Overleaf accounts. Can I merge them?
Although there is not a direct way to merge two Overleaf accounts, you can transfer ownership of your projects from one account to another. Once you transfer all projects to one account, you can delete the other account and add that email address to the remaining account.
However, note that this won't work for projects shared with you. For these, you'll have to ask the project owner to share them again with the other account.
The process is to transfer ownership of all your projects to one account, delete the account that you've emptied, and add the email address of the deleted account to the remaining account.
In the instructions below, **Account A** is the account you wish to keep, and Account B is the account you will eventually delete.
The steps are:
1. Log in to Account B and [share all the projects](/collaborating/sharing-a-project) with Account A (using the email address of Account A). The share button is in the top right in each project's editor window.
2. Log in to Account A and accept the shared projects.
3. Log back in to Account B and [transfer ownership](/collaborating/transferring-project-ownership) of the projects to Account A.
4. Go to the list of projects of Account B and make sure that none of them shows "You" as the owner.
5. [Delete Account B](/accounts-and-security/deleting-your-account).
6. Log in to Account A and [add the email address](/accounts-and-security/email-address-and-login-options) of the deleted account to the remaining account.
I tried to create an account and received a message: "This email is already registered." What should I do?
If you are trying to create an account and receive the message "This email is already registered," it means this email has been used either as a primary or secondary email address on an existing Overleaf account. If it was used as the primary email, you can recover the password for that existing account by requesting that a password reset link be sent to that email address [here](https://www.overleaf.com/user/password/reset).
I can't find some of my projects. What should I do?
If you can't find a particular project, first check the All Projects, Archived Projects, and Trashed Projects areas. [Archiving, deleting, and leaving projects](/managing-projects-and-files/archiving-deleting-and-leaving-projects)
It can sometimes seem that projects are lost when they are actually under a different Overleaf account. Please try logging in using other email addresses that you may have registered under.
Please [contact Overleaf support](https://www.overleaf.com/contact) for additional help in locating any projects that seem to be lost.
I am joining a group subscription. Do I need to create a new account or transfer my data?
In most cases, you do not need to create a new Overleaf account to join a group subscription. You can upgrade your existing account by accepting the invitation to join the group.\
\
If you are joining a professional group with managed accounts, learn more by reading [Understanding managed accounts](/accounts-and-security/understanding-managed-accounts).
My institution is providing an Overleaf Commons subscription. Do I need to create a new account with my institutional email?
You do not need to create a new Overleaf account to join an Overleaf Commons subscription. You can add your institutional email to your existing Overleaf account. [Learn more](/subscriptions-payments-and-billing/commons-subscription) about joining a Commons subscription.
How do I update my profile information?
You can update your first name, last name, and optionally provide a department and role in your [Account Settings](https://www.overleaf.com/user/settings).\
\
Your first and last name are shown to collaborators in projects when you are editing at the same time and in comments that you leave or respond to.\
\
Your role and department information are not shown to collaborators, but may be shown to administrators of subscriptions that you join.
# Email address and login options
This page describes how to manage your email addresses and login options.
For most Overleaf accounts, users can update the email addresses associated with their accounts and control which methods they use to log in to their account. If you join a Professional group subscription, your Overleaf account may become managed by the subscription administrator. Overleaf managed accounts have restrictions that are described in our [information for managed users](/accounts-and-security/understanding-managed-accounts).
* If your Overleaf account is a managed account, you will not be able to add or modify your account's email addresses and will also be restricted to specific login options.
* If your Overleaf account is not managed, it's important to keep your Overleaf emails up-to-date and to configure appropriate login options to ensure that you can access your Overleaf account.
{% columns %}
{% column %}
{% content-ref url="/pages/DxwZdjgmIXu96YNVE42d" %}
[Managing your email addresses](/accounts-and-security/email-address-and-login-options/managing-your-email-addresses)
{% endcontent-ref %}
{% content-ref url="/pages/Vpdl7UvhY4ofTG2Lcpfc" %}
[Logging in with institutional SSO](/accounts-and-security/email-address-and-login-options/logging-in-with-institutional-sso)
{% endcontent-ref %}
{% content-ref url="/pages/qylJeWOdCzsviN4pCGcm" %}
[Email addresses and login FAQs](/accounts-and-security/email-address-and-login-options/email-addresses-and-login-faqs)
{% endcontent-ref %}
{% endcolumn %}
{% column %}
{% content-ref url="/pages/cNALJDVl5TrR43HAwSMN" %}
[Login options](/accounts-and-security/email-address-and-login-options/login-options)
{% endcontent-ref %}
{% content-ref url="/pages/NqRTa1RwOHzVdDThBTNL" %}
[Logging in with Group SSO](/accounts-and-security/email-address-and-login-options/logging-in-with-group-sso)
{% endcontent-ref %}
{% endcolumn %}
{% endcolumns %}
# Managing your email addresses
This page explains why it's important to ensure **all email addresses** associated with your Overleaf account are **kept up-to-date**.
Your *primary* email address is an extremely important piece of information that you provide when registering for an Overleaf account but, for the reasons noted below, you are also encouraged to add one or more *secondary* email addresses to your Overleaf account. We explain why Overleaf asks you to provide email addresses, what they are used for and how to manage them via your Overleaf [Account Settings page](https://www.overleaf.com/user/settings).
## Your primary email address is important
The primary email address associated with your Overleaf account is important because:
* This is the email address you can use to log in with your Overleaf-specific password.
* This is the email address that your collaborators will see when you accept a sharing invitation or join a group subscription.
* This is the email address that will be sent security and collaboration notifications from Overleaf.
Ensuring that your primary email address is one that you can access and that can receive emails from Overleaf is an important part of keeping your account secure.
If you have an old or inaccessible email account as your primary email address, you risk losing access to your Overleaf account, or losing track of which Overleaf account you have saved important documents under.
While you can configure your account to allow login using institutional single sign-on (SSO), ORCID, or Google, **only your primary email address** can be used to log in using the **Log in with your email** option.
If you need to reset the Overleaf password associated with your primary email address, you can request that a password reset link be sent to your primary email address using the [password reset request form](https://www.overleaf.com/user/password/reset).
Because the password reset link will be sent to your primary email address, it is important to designate an email that you can access and that is able to receive emails from Overleaf.
## Secondary email addresses are helpful
Adding one or more secondary email addresses to your Overleaf account is helpful for several reasons:
* If you lose access to your account and your primary email address, your secondary emails provide a way of verifying the ownership of your Overleaf account. **Note that this is true only for secondary emails added after March 22, 2024.**
* Adding secondary email addresses to your Overleaf account prevents you from accidentally creating additional Overleaf accounts using those emails.
* Secondary email addresses may allow you to enroll in an institutional Overleaf Commons subscription, or log in to your Overleaf account using institutional SSO.
* If you are invited to collaborate on a project via a secondary email, you will be notified about this on your Projects dashboard.
## Changing email addresses associated with your account
For Overleaf accounts that are not managed by an organization, you can add email addresses and change your primary email address in your [user settings](https://www.overleaf.com/user/settings).
To do this, you'll need to first add a new email address by clicking **Add another email**.

You can then provide your email address, optionally specifying the institution affiliated with that address if applicable.

For email addresses that are not associated with an institutional SSO, after clicking the **Add new email** button, check your email inbox for the confirmation message and follow the steps in it to confirm your address. (You may need to check in your Spam, Updates or Promotions mail folders for the email.) Email addresses that are associated with an institution that provides single sign-on will trigger a prompt to be shown to log in to the institutional SSO to confirm.
Note that you can only log in to your Overleaf account with an Overleaf-specific password with the primary email address. If you would like to change your login email address, make sure to click on the **Make Primary** button next to your chosen email address after adding it in **Account Settings**. Email addresses associated with an institutional single-sign on login option do not need to be set as the primary email address in order to log in with institutional SSO.
# Login options
Overleaf provides several different ways for you to access your Overleaf account. This allows you to set up secure login options while ensuring that you do not lose access to your Overleaf projects.
Managed user accounts do not have the ability to set all the available login options.
## Logging in with an email and password
Your primary email address can be used to log in to your account with an Overleaf-specific password on our main login page ().
If you need to set or reset your Overleaf-specific password, you can request that a password-reset link be emailed to your primary email address using [Overleaf's password reset request form](https://www.overleaf.com/user/password/reset).
If you set an Overleaf-specific password, please ensure that it is a strong password that you have not used for any other service. Use of a password manager is recommended.
## Logging in with institutional or organizational SSO
If you are part of an institution or organization that has an Overleaf subscription that provides a single sign-on option, you can link your SSO identity with your Overleaf account and use Overleaf's [institutional login page](https://www.overleaf.com/institutional-login) to access your account.
Overleaf's [institutional login documentation page](/accounts-and-security/email-address-and-login-options/logging-in-with-institutional-sso/institutional-sso-faqs) describes how to enable and use this option.
## Logging in with a Google or ORCID account
You can set up a Google or ORCID-based login at registration time, or set this up at any time by visiting your [Account Settings](https://www.overleaf.com/user/settings) page.
You can find options to link your Google and ORCID accounts to enable logging in through those services in the **Linked Accounts** section under **Integrations**.
## Logging in with X (formerly known as Twitter)
Using a Twitter-based login to access your Overleaf account is no longer supported. If you have previously set up a Twitter-based login and can no longer access your Overleaf account, please get in touch with us using the form on our [contact page](https://www.overleaf.com/contact) or by email: .
# Logging in with institutional SSO
An authentication option for Overleaf Commons subscriptions.
This page describes one of Overleaf’s login options, institutional single sign-on (SSO), which is offered by some Overleaf Commons subscribers and is implemented using the SAML2 standard.
For more information about login options, please see [Email address and login options](/accounts-and-security/email-address-and-login-options#overleaf-login-options). Information about SSO for Professional groups can be found [here](https://docs.overleaf.com/groups/overleaf-group-single-sign-on/setting-up-group-sso).
{% hint style="info" %}
Overleaf Commons single sign-on is a “site wide” SSO implementation that differs from Overleaf Group SSO. If you are a group administrator or responsible for configuring SSO for a group, please see our [Overleaf Group SSO](https://docs.overleaf.com/groups/overleaf-group-single-sign-on/setting-up-group-sso) guides for more information.
{% endhint %}
## Logging in with institutional SSO
{% stepper %}
{% step %}
### Visit the Overleaf home page
Select the "Log in" button at the top right of the homepage.
{% endstep %}
{% step %}
### Choose the "Log in with SSO" button
Image showing Overleaf login option
{% endstep %}
{% step %}
### Provide your institutional email address
Enter your institutional email and select "**Log in"**.
{% endstep %}
{% step %}
### Log in at your institution
You will then be redirected to your institution’s login page, where you can enter your institutional credentials.
{% endstep %}
{% step %}
### Access your Overleaf account
Once logged in through your institution you will be able to access your projects on the project dashboard.
{% endstep %}
{% endstepper %}
# Institutional SSO FAQs
Some questions and answers about institutional logins.
Does my university or organization provide institutional SSO?
If your university or organization supports institutional SSO, entering your institutional email address (an address with a university or organizational domain) at the Overleaf SSO login page will redirect you to your institution’s single sign-on page.
Many [Overleaf Commons subscribers](https://www.overleaf.com/for/institutions-using-overleaf) provide a public portal page. If your institution provides a public portal page, you can use the institutional SSO login link provided there.
How do institutions set up SSO?
Overleaf institutional SSO is an option available to Overleaf Commons subscribers. Overleaf SSO uses a SAML 2.0 standard implementation, and is a registered Service Provider in eduGAIN, InCommon Federation and UK Access Management Federation (UKAMF).
* Learn more about Commons SSO configuration from our [admin documentation pages](https://docs.overleaf.com/commons/).
* If you are an administrator for an existing Overleaf Commons subscription and you would like to know more, please get in touch with the [Overleaf Success Team](mailto:success@overleaf.com).
How do I add an institutional SSO option to my Overleaf account?
One way to add an institutional SSO option to your account is to first log in to your account the way you usually do, visit your [Account Settings](https://www.overleaf.com/user/settings), and add your institutional email address. If your university or organization provides an institutional SSO option, you will be prompted to log in through their SSO portal to authenticate and confirm your affiliation. After that, you can begin logging in with institutional SSO.
How do I join the Commons subscription offered by my institution?
Universities and organizations that provide an institutional SSO login option use this to enroll users in their subscription. When you log in with institutional SSO, if you are eligible to participate in your university or organization’s Overleaf Commons subscription, your account will be automatically enrolled.
Please be sure to continue to log in using institutional SSO to stay on your institution’s subscription. For institutions that provide this login method, users who have not logged in using institutional SSO recently may be (temporarily) removed from the subscription.
If you haven't logged in using SSO for a while, and you have been removed from the subscription, but you believe you are still entitled, please try logging back in via SSO to attempt to re-enroll yourself. If you're still having trouble please reach out to your IT team.
I see "Set up SSO for your Account" when I try to log in with SSO. What should I do?
This message is shown if there is an existing Overleaf account under the email associated with your SSO login, but you have not used SSO to log in to this account in the past.\
\
Because this is your first time accessing your account with SSO, you need to first verify your ownership of that account by logging in using a method you have used previously, or by setting an Overleaf-specific password (which confirms your access to the primary email address on the account).\
\
If you still remember your Overleaf-specific password (not your SSO password), you can follow the prompt that is shown with this message to log in with your primary email address and Overleaf password.
If you have forgotten your Overleaf password, you need to reset that before being able to link your account to SSO. Please follow these steps:
1. Submit your email address to this form:
2. You will receive an email from that will allow you to set your Overleaf-specific password.
3. Log in to your Overleaf account using your email and new password.
4. On your [Account settings page](https://www.overleaf.com/user/settings), follow the prompts to link your Overleaf Account to SSO.
Going forward, please use the SSO option to log in, as this confirms your affiliation with your institution.
I am leaving my institution, what should I do?
It is important to [configure a different login option](/accounts-and-security/email-address-and-login-options) if you will soon be unable to log in with your institutional SSO. If you are leaving your institution, please make sure that your primary email address on Overleaf is one that you can access—this will allow you to easily set an Overleaf-specific password and retain access to your Overleaf account.
How does Overleaf use my institutional email?
Overleaf will occasionally send notifications to users to let them know when changes are made to their account settings (see [Keeping your account secure](/accounts-and-security/keeping-your-account-secure)). When you register for an Overleaf account using institutional SSO, or link to your existing account, your institution will send an email address to Overleaf to allow these notifications to happen.
Overleaf will send email notifications to your account's primary email address.
Why can’t I confirm my friendly email alias?
Some institutions allow users to create a friendly email alias. For example, the default email may be a something like , but the alias may be the more human-friendly .
Depending on how the institution handles email aliases like these, it can happen that only the default email is available to Overleaf during SSO sign in.
In the process of confirming your friendly email through SSO, you may find that the default email is added to your Overleaf account. In this case, the friendly email may still be unconfirmed. To avoid the prompts to confirm your alias, you will have to remove the alias from your Overleaf account and keep only the default email address.
In this case, you can still accept invites to projects that are sent to your alias email address, but only the default email address sent to us by your institution will be visible in your account settings.
I received an email from Overleaf saying that I could log in with a different email address. What does this mean?
It can sometimes happen that the email provided to Overleaf from your institution looks different than your institutional SSO ID. For example, you may log in through your institution with , but receive an email from Overleaf saying that you can log in with .
Often, the email address provided to Overleaf by your institution will match your SSO ID. In some cases it may be a different address, such as a friendly email alias, or a different address that you have configured as your default email address in your institutional SSO account.
When logging in through institutional SSO, you should continue to use your standard SSO ID. Overleaf also provides the option of configuring an Overleaf-specific password, allowing you to log in with a combination of the primary email of your Overleaf account, and a strong password of your choosing. If you have not set an Overleaf-specific password or forgotten it, you can request that a reset password link be sent to your primary email address here: .
Please note that institutional SSO is the recommended login method for users who are affiliated with an institution that provides this option.
Why can’t I add my SSO login as my email address in Overleaf?
There are a few reasons why you might see a warning or error when you are trying to add your SSO login or default institutional email (something like ).
1. You may have accidentally registered this same address under a different account.
2. Your institution may be returning a different email address to Overleaf when you sign in.
Some institutions allow users to create a friendly email alias. For example, your SSO login id and default email may be a something like , but the alias may be the more human-friendly .
Depending on how the institution handles email aliases like these, it can happen that the alias is sent to Overleaf during SSO sign in. In this case, although you login to SSO using your user id (such as ), your email address in Overleaf will be the alias address (such as ). In this case, you should retain your email alias as your confirmed institutional email. You can verify that your email has been confirmed by checking your [Overleaf Account Settings](https://www.overleaf.com/user/settings).
If you suspect that you have accidentally created two Overleaf accounts and are having trouble accessing one of them, please contact for assistance.
How can I remove an email address's SSO linkage?
You can remove SSO in your Account Settings with the **Unlink SSO** option:
Select **Unlink** in the modal that appears to confirm your decision:
{% hint style="warning" %}
Unlinking SSO will remove you from the corresponding Commons subscription, unless you relink SSO using an email address associated with the same institution.
{% endhint %}
# Institutional email reconfirmation
Reconfirming your email establishes your institutional affiliation.
Overleaf users may be asked to reconfirm their institutional email addresses from time to time. This page answers common questions about the institutional email reconfirmation process. If you have any additional questions or concerns, please [let us know](https://www.overleaf.com/contact).
Why am I being asked to reconfirm my email address?
Reconfirming your email addresses helps to ensure that the email addresses associated with your Overleaf account are still valid.
Having a valid primary email address helps make sure that you receive important notifications about your account, as well as invitations to join collaborations and group subscriptions.
Making sure that all of your email addresses are valid can help with account recovery and security.
Verifying your institutional email address helps our institutional subscribers (Overleaf Commons) keep accurate information about how many people are using the subscription and who is still entitled to use their subscription. This helps them make decisions about renewal, and about planning webinars and resource sharing related to LaTeX and Overleaf.
What happens if I don’t reconfirm my email address?
If you don’t reconfirm your email address, the email address will revert to the "unconfirmed" state. This means that you may be removed from a license provided by the institution associated with that email address.
Being removed from a subscription will not affect your access to your account or your projects. However, it will affect the number of edit-access collaborators you can have per project. When you leave a subscription, your Overleaf account is placed on the free plan, and you will no longer receive the professional features that come with a Commons subscription. If you are still eligible for this subscription, you will be re-enrolled when you confirm your email address.
If you do not reconfirm your email address, and do not remove the unconfirmed address, you will continue to see prompts in your dashboard asking that you reconfirm.
My email address isn’t valid anymore, but I still use it to log into Overleaf. What should I do?
We strongly recommend that you use a valid email address for your primary email address. To change your primary email address, first add a secondary email address and confirm it. Then make your secondary email address the primary address, and delete the old invalid email address. Detailed instructions for this are provided [here](/accounts-and-security/email-address-and-login-options).
I cannot confirm my email address. What should I do?
Any email address that cannot be confirmed should be removed from your account. If your primary email address cannot be confirmed, please choose or add a secondary email address which is confirmable and that can be used as your primary email address. Detailed instructions for changing your email address are provided [here](/accounts-and-security/email-address-and-login-options).
I am not receiving the email with the confirmation code. What should I do?
For institutions that do not provide an institutional login, email addresses are confirmed via a 6-digit code provided in a confirmation email that Overleaf will send to you.
Sometimes confirmation emails can be placed in the "Junk", "SPAM" or "Clutter" folder by your email client or server. If you do not see the confirmation email in your inbox, please check any junk or promotions folders. In some rare instances, institutional email servers may block these emails and prevent their receipt. If you suspect this may be happening, please [let us know](https://www.overleaf.com/contact).
I haven’t seen any reconfirmation notifications. Should I be concerned?
Currently Overleaf is only sending notifications to users from certain institutions. If you are not seeing a reconfirmation message, then you do not need to worry about reconfirming your email address.
Users who log in through their institution (using single sign-on/SSO) are reconfirming their email address automatically when they log in. Because of this, users who use an institutional login may not see a reconfirmation prompt, as their email has already been reconfirmed.
Why does Overleaf ask me to add additional email addresses?
In Overleaf, email addresses are used as login identifiers. We recommend that in addition to the primary email address, you also provide at least one secondary email address to help with account recovery in the event that you lose access to your primary email address.
Adding additional secondary email addresses helps to avoid accidentally creating additional Overleaf accounts, and also makes it easier to accept invitations to work on collaborations.
Adding an institutional email address may allow you to join an institutional subscription.
Why am I seeing a reconfirmation prompt when other users are not?
The prompt is shown to users who have not confirmed their address for a certain length of time. The prompt is not shown to all users at an institution at the same time. If someone has recently added their institutional email address, or recently logged in using SSO, they may not see the prompt.
I reconfirmed my email address. Why have I been removed from my institution’s subscription?
If your status has changed at your institution, you may no longer be eligible to participate in your institution’s subscription. This can sometimes happen upon graduation, retirement, or when changing departments. To find out about your institution’s subscription, please check your institution’s Overleaf portal page (a list of most pages is found [here](https://www.overleaf.com/for/institutions-using-overleaf)). If you have further questions, please [let us know](https://www.overleaf.com/contact).
Why did I receive the error message “this email is already registered” when I tried to add another email address to my Overleaf account?
This message means that you have at some point created (perhaps accidentally) another Overleaf or ShareLaTeX account using that email address.
For most users, we recommend having one Overleaf account - this has the benefit of having all projects in one place, and avoids confusion. Several email addresses can be added to an Overleaf account.
[This page](https://docs.overleaf.com/accounts-and-security/email-address-and-login-options/logging-in-with-institutional-sso/pages/yxSiFsvZJqQjh9Siznec#i-created-two-overleaf-accounts.-can-i-merge-them) provides suggestions for how to recover and merge an extra Overleaf account. Please contact support if you need help following these guidelines.
# Logging in with Group SSO
An option for Overleaf Group Professional subscriptions
This page is for **members** of an Overleaf Pro group subscription, where your group administrator has enabled single sign-on (SSO) as a login option. It describes how to link your Overleaf account to your group single-sign on identity and use it to log in to your Overleaf account.
{% hint style="info" %}
For now, only group members (not managers) can use SSO. Additionally, you must first create your Overleaf account and set an Overleaf-specific password before you can link your account to SSO. Just-in-time (JIT) provisioning from SSO login is not available for group SSO.
{% endhint %}
## Linking your Overleaf account and SSO identity
If you’re a member of a group (on a Pro group plan) with single sign-on enabled, you will receive an email inviting you to set up SSO for your Overleaf account.
Clicking on the button in the email you received will start the linking process for you. If you have trouble using the button, you can paste the URL from the email into the address bar of your browser.
Following the steps that are presented to you will bring you to your identity provider login. After logging in for the first time, you will then be able to login with SSO.
## Logging in to your Overleaf account
Once you’ve linked your Overleaf account to your single sign-on identity, you can log in to your Overleaf account using single sign-on.
Go to the Overleaf SSO login and enter your email address. This will redirect you to your group's single sign-on page. After successful authentication, you will then be directed to your Overleaf project home page.
SSO login page
## Unlinking group SSO
Your administrator may turn off SSO temporarily. This will suspend your ability to login with SSO and may, in some cases, mean you need to relink your Overleaf account to your SSO identity in order to login with SSO again.
# Troubleshooting Group SSO login problems
This page suggests possible solutions for some of the errors that can be encountered when attempting a Group SSO login.
This email address isn't set up for SSO.
You may see this error if you have not linked your Overleaf account to your Group SSO identity. Before you can log in using SSO, you need to establish the connection between your Overleaf account and your SSO login. You can view more information on how to log in with Group SSO [here](/accounts-and-security/email-address-and-login-options/logging-in-with-group-sso).
User not in an authorized group, or similar errors
If you see an error that relates to authorization or access to Overleaf, it may be that your SSO identity has not been granted access to Overleaf. This is an issue that can be addressed by your IT Services team or someone who has access to the Overleaf application in your Identity Provider.
Server error
If you see an Overleaf error page, it may be that your SSO identity is missing some data that is expected by the configuration set up by your group administrator. Please report this problem to your group administrator and [Overleaf support](https://www.overleaf.com/contact).
Not receiving SSO setup email
The email notifications from Overleaf come from `welcome@overleaf.com`. Sometimes these emails can get sent to your Spam or Promotions folders instead of your Inbox. If you can’t find a notification from Overleaf, please check the Spam and other folders and ensure that you have not flagged these emails as spam or unwanted. If you can’t find the messages in folders that you can access, please check with your IT Services team to make sure that your inbox can receive all messages from `welcome@overleaf.com`. If you continue to have trouble receiving these emails, please [get in touch](https://www.overleaf.com/contact).
# Email addresses and login FAQs
I see an error that says this email is already registered, what do I do?
If you see this message, the email that you are trying to add has already been added to a different Overleaf account. Users can sometimes create an additional account when quickly accepting an invitation to join a project or when signing in from a new location.
If you see this message, you should recover this other account by logging in using that email address. If you do not know the password for this other account, you can request that a password reset email be sent to that address using [this form](https://www.overleaf.com/user/password/reset).
If you've created more than one Overleaf account, we suggest that you merge your accounts and add your email addresses to your merged account. Suggestions for merging Overleaf accounts can be found [here](https://docs.overleaf.com/accounts-and-security/email-address-and-login-options/pages/yxSiFsvZJqQjh9Siznec#i-created-two-overleaf-accounts.-can-i-merge-them).
I can't log in with my login method any longer, what can I do?
If you registered with your institutional single sign-on (SSO) identity, your Google account, ORCID, or Twitter, you can set an Overleaf-specific password and log in with your primary email and password at any time.
If you need to set or reset your Overleaf-specific password, you can request that a password reset link be emailed to your primary email address using Overleaf's [password reset request form](https://www.overleaf.com/user/password/reset).
I forgot my password and I cannot access my primary email, how can I access my Overleaf account?
If you cannot access your Overleaf account and no longer have access to your primary email, please get in touch with [Overleaf Support](/troubleshooting-and-support/user-support-policy). You can also reach us via the form on our [contact page](https://www.overleaf.com/contact) or by email: .
# Changing your password
If you are able to log in to your Overleaf account, you can change your **Overleaf password** on your [Account Settings page](https://www.overleaf.com/user/settings).\
\
If you are unable to access your Account Settings, or if you have not set an Overleaf password previously, you can request a password reset link be sent to your primary email address using this form: .
If you continue to have trouble accessing your Overleaf account, [please get in touch](https://www.overleaf.com/contact).
# Deleting your account
This page describes when and how you can delete your Overleaf account.
{% hint style="warning" %}
If you are using a managed Overleaf account, only your account administrator can delete your account. If you are not sure if your Overleaf account is managed or want to learn more about managed accounts, see our [information for managed users](/accounts-and-security/understanding-managed-accounts).
{% endhint %}
Overleaf accounts that are not managed by someone else can be deleted at any time. If you no longer wish to use your Overleaf account and would like to remove all data associated with your account, please follow the instructions below.
## Deleting your Overleaf account
Log into your Overleaf account and navigate to your **Account Settings** at . Please ensure you are signed in to the account you wish to delete by checking the email addresses associated with the account that you have logged into. To delete the account you are logged into, scroll to the bottom of the page and click **Delete your account.**
Deleting your account from your Account Settings
Note that this will permanently delete all of the Overleaf projects owned by your account (including older projects from ShareLaTeX and Overleaf v1). Projects shared with you from other accounts will not be deleted.
If you have used Writefull via Overleaf, you will also have a separate Writefull account. To delete your Writefull account, please contact .
If you are not able to delete your account this way, you may email us at .
(For further details, see our [Privacy Policy](https://www.overleaf.com/legal#Privacy).)
### Multiple accounts
If you are consolidating two Overleaf accounts and want to delete one of them, there are a few things to take care of first:
* **Transfer your owned projects.** Any projects owned by the account you want to delete must be transferred to the account you're keeping before deletion. Deleting an account permanently deletes all projects it owns.
* **Re-share projects from your other account.** If projects from the account you're keeping were shared with the account you're deleting, make sure to share them with your remaining account so you don't lose access.
* **Check for an active subscription.** An account that has an active Overleaf subscription cannot be deleted. You will need to cancel the subscription before proceeding. If you need help with this, contact us at [support@overleaf.com](mailto:support@writefull.com)
Once all projects have been transferred and any subscription has been resolved, you can follow the steps above to delete the account.
# Understanding managed accounts
Some Professional groups require managed accounts.
{% hint style="info" %}
If you’re an administrator looking for support with Managed Users, please visit our [page for admins](/groups/user-management/managed-user-accounts).
{% endhint %}
Managed Overleaf accounts are user accounts that are managed by your group or organization. They’re designed to help organizations ensure their work remains secure and accessible to them, even if someone leaves the organization. For this reason, managed user accounts should only be used for working on projects for the organization that owns the account.
## How do I know if my Overleaf account is managed?
You can easily check if your Overleaf account is managed. It’ll be highlighted at the top of your [Account settings](https://www.overleaf.com/user/settings) page.
## What’s the difference between a managed user account and an unmanaged user account?
If your account is managed, there are a few key things you will not be able to do:
* Delete your account
* Change the account email address
* Have a secondary email address (or add a secondary address)
* Link your account to ORCID or IEEE single sign-on (SSO)
* Start a new subscription or join another subscription using the same email address
* Use AI features unless enabled by your administrator
Your group administrator will have admin rights over your account. Administrators and managers will be able to:
* Delete your account
* Reassign ownership of your projects to another group member if your account is deleted
### **AI features and managed accounts**
{% hint style="info" %}
This information is for managed users. If you are an admin see our [controlling feature availability](https://docs.overleaf.com/accounts-and-security/spaces/FkLpFt1iQKGbutGQMi1h/pages/lsVFGzbUehP5TxqooLJ8#ai-features-feature-availability#ai-features) documentation.
{% endhint %}
If your organization has disabled AI features, you won't be able to use Overleaf's AI tools—including Error Assist, language suggestions, and the AI assistant—even if your plan would normally include them.
This applies to your activity on all Overleaf projects, regardless of who owns the project or which plan they're on.
If you think AI features should be available to you, contact your group administrator. They can enable AI features for your organization.
#### Using AI on projects you've been invited to
Whether you can use AI on a project depends on your own account settings—not the project owner's.
* If your organization has disabled AI features, you can't use AI tools in any project, including ones owned by someone outside your organization.
* If your organization has enabled AI features, you can use AI in projects you have access to, within your plan's daily allowance.
* If you are a collaborator on a project owned by someone who's organization has diasbled AI tools, you will not be able to use AI on this project.
## Keep work and personal projects separate
It’s important to only use your managed Overleaf account for your group or organization’s work. If your group admin or a group manager deletes your account, they will be able to transfer the ownership of all of your Overleaf projects. This includes any personal files in your account.
It’s easy to keep your personal files separate. You can set up a separate Overleaf account under a personal email address and [transfer ownership of your personal projects](/collaborating/transferring-project-ownership) to this account.
## Stopping an individual subscription
Users who agree to have a managed account can't have an individual subscription associated with that Overleaf account.
If you need to cancel an individual subscription to enable you to join a managed group, please contact [Overleaf support](https://www.overleaf.com/contact). We can stop your subscription and issue a pro-rated refund for the unused portion of your latest payment.
# Keeping your account secure
The security of your Overleaf account and project data is important to you, and it's also important to us.
Overleaf provides a number of features to keep you informed about any changes to your account. If you have any questions about suspicious activity on your account, please [contact us](https://www.overleaf.com/contact).
## Requests for sensitive account information
Employees of Overleaf will never ask you to provide your password or complete billing information to us via our support channels. If you receive such a request, it will not have come from us and is not legitimate. You can treat any such messages as phishing attempts.
## Resetting your password
If you believe your Overleaf account password may have been compromised, or would like to change it for any other reason, follow these steps:
1. If you know your current Overleaf password, you can change the password on your [Account Settings page](https://www.overleaf.com/user/settings).
2. You can reset your password by entering your account's primary email address at our [password reset page](https://www.overleaf.com/user/password/reset). If there's an Overleaf account with a matching primary email address, we'll send an email with instructions to reset your password. If you don't receive the password reset instructions within a few minutes, please check your spam/junk folders, as well as any filters you may have set up, for any messages from `welcome@overleaf.com`.
3. We recommend that you set (or reset) a strong password that is not shared with any other site. Using a free password manager is a good approach.
If you use another method for logging in to Overleaf, for example Institutional Login, "Log in with ORCID", or similar, you can manage your password through those services.
## Checking for other active sessions on your account
If you are concerned that someone else may have access to your account, click on **Account** > **Account Settings** from your Dashboard page. Scroll down to the **Sessions** section and click on **Manage your sessions**. Click the **Clear Sessions** button below to log out of all sessions besides your current session. You may also want to reset your password on the [Account Settings page](https://www.overleaf.com/user/settings).
## Email notifications about changes to your account
We'll send you email notifications about certain changes to your account settings. Make sure that the primary email associated with your Overleaf account is up-to-date, accessible to you, and can receive emails from `welcome@overleaf.com`. To change add or update your email address, use the instructions at [Changing email addresses associated with your account](/accounts-and-security/email-address-and-login-options#changing-email-addresses-associated-with-your-account).
Here are some examples of changes to your account settings that result in an email notification:
* Changing your account's primary email address
* Adding a secondary email address to your account
* Linking your Overleaf account with a third-party service such as Google, ORCID, Dropbox, or GitHub
* Linking your Overleaf account with an institutional single sign-on provider (available if you're a member of selected institutions)
* Clearing your Overleaf account's active sessions
{% hint style="danger" %}
If you receive an email notification for an account change that you don't recognize, please [contact us](https://www.overleaf.com/contact) right away so we can investigate. It's also good practice to [reset your password](#resetting-your-password) and check for any active sessions if you are notified of activity that you do not recognize.
{% endhint %}
## Your responsibilities
While Overleaf provides features to help you keep your account secure, you must use your Overleaf account in a secure way in order to keep your projects and personal identification safe. Overleaf's [Terms of Service](https://www.overleaf.com/legal) note that you are responsible for maintaining and protecting all of your stuff.
Do not share your Overleaf account
Every Overleaf user **must** have their own individual account.
Sharing an Overleaf account is not the correct way to collaborate on a project or to provide premium features to multiple users.
To collaborate with others on a document, use Overleaf's [sharing options](/collaborating/sharing-a-project). If you are part of a team using Overleaf, each team member gets their own account. Team members' accounts might join a [group subscription](/subscriptions-payments-and-billing/group-subscription) to gain access to premium features which allow multiple collaborators.
Take care using shared devices
If you are using a shared device in your home, lab, library, or other location, please make sure to sign out of your Overleaf account when you are done with your work.
Use a secure login method
Overleaf offers multiple login methods. If you are using the email and password-based login method, you must use a strong password. We recommend using a password manager and setting up a unique password for your Overleaf account.
Overleaf also provides [options](/accounts-and-security/email-address-and-login-options#overleaf-login-options) to log in with Google or ORCID. For some types of subscriptions, Overleaf offers Single Sign-On (SSO) options.
Make sure you can access your primary email address
Important security notifications and password-reset links are sent to your primary email address. It is essential that your primary email address is always set to be one that you can access. If you are leaving an institution or changing your email address, be sure to [update the primary email address](/accounts-and-security/email-address-and-login-options#your-primary-email-address-is-important) on your Overleaf account before you lose access to your current email address.
Allow emails from welcome@overleaf.com
As described above, you may receive important email notifications about your account. If you mark emails from `welcome@overleaf.com` as spam or junk, you may not receive important notifications about your Overleaf account. We ask that you be sure to check that these emails are not being sent to your spam or junk folder, and that you do not mark these as spam.
# Managing your personal information
## How to change your email preferences
If you want to give or withdraw your consent to receive emails, you can visit [Email Preferences](https://www.overleaf.com/user/notification-preferences) or do the following steps:
1. Log in to your account at [www.overleaf.com](https://www.overleaf.com/)
2. Click **Account** **>** **Account Settings** in the bottom left
3. Scroll down to **Email Preferences**
4. Check the box to subscribe:
* **Newsletter** - Every few months we send a newsletter.
* **Notifications on project activity** - Notifications for project activity such as comments, replies, and track changes
{% hint style="success" %}
You will still receive important emails, such as project invites and security notifications (password resets, account linking, etc).
{% endhint %}
## How to download your information
You can download a copy of all of your Overleaf projects at any time as follows:
1. Log in to your account at [www.overleaf.com](https://www.overleaf.com/)
2. Go to your **Projects** dashboard via the top right menu
3. Open each of your projects and download a zip file from the **Menu** in the top left
This will provide you with a zip file for each project containing all of your content in LaTeX format. You can also download zip files with previous versions of your projects using the **History** menu.
If you would like to download the latest version of multiple projects, you can also do this from your **Projects** page by checking the boxes for the projects you would like to download and clicking the download button in the top right. Please see [Downloading a project](/managing-projects-and-files/downloading-a-project) for more detailed information.
## How to delete your information
{% hint style="warning" %}
If your Overleaf account is a member of a group subscription with the [Managed Accounts](/accounts-and-security/understanding-managed-accounts) feature enabled, you will not be able to delete your account yourself. Please contact your organization’s administrator if you wish to delete your account.
{% endhint %}
You can delete your Overleaf account, which will result in the deletion of your Overleaf projects and associated personal data, at any time as follows:
1. Log in to your account at [www.overleaf.com](https://www.overleaf.com/)
2. Click **Account** **>** **Account Settings** in the bottom left
3. Confirm your password if prompted
4. Click the **Delete your account** link at the bottom of the **Account Settings** page
More detailed instructions are available on our [Deleting your account](/accounts-and-security/deleting-your-account) page.
{% hint style="warning" %}
Before deleting your account, you may want to download a copy of your Overleaf projects (see [**How to download your information**](#how-to-download-your-information) above) because if you follow the above steps, you won't be able to access them again.
{% endhint %}
This process will result in the deletion of your Overleaf account and associated personal data, although we’ll keep a record of your request and other information in compliance with applicable law. If you’ve made any of your Overleaf projects public, we’ll also retain a record of your association with that content. Note that it may take some additional time following the deletion of your account for your stuff to be completely deleted from our archives, although it won’t be accessible during this period.
If you have used Writefull via Overleaf, you will also have a separate Writefull account. To delete your Writefull account, please contact .
# Overleaf data processors
Overleaf may engage the entities listed below to assist it in connection with its products and services, including to provide hosting and infrastructure services and customer and technical support and which may therefore involve the processing of personal data. Where you are an institution or organization, and we are processing that personal data as your “processor” (as defined in the GDPR), such entities will be considered “subprocessors”.
| Third Party Service Provider Name | Location | Function |
| --------------------------------- | -------- | ---------------------- |
| Algolia | US | Data processing |
| Amazon Web Services | US | Hosting |
| Anthropic | US | Data processing |
| BugSnag | US | Application operations |
| Customer.io | US | User communication |
| FrontApp | US | Support |
| Google Cloud Platform | US | Hosting |
| GrowthBook | US | Application operations |
| Heroku | US | Hosting |
| Kount Inc | US | Payment processing |
| MailChimp | US | Service messages |
| MongoDB Atlas | US | Hosting |
| OpenAI | US | Data processing |
| PayPal | US | Payment processing |
| Recurly | US | Payment processing |
| Redis | US | Application operations |
| SendGrid | US | Service emails |
| Sentry | US | Application operations |
| SheerID | US | User verification |
| Stripe | US | Payment processing |
As part of a global organization, various Overleaf group companies may also be involved in connection with the development and delivery of its products and services, including as customer contracting entities and service providers, namely: Digital Science UK Ltd (UK), Digital Science & Research Solutions Ltd (UK), Digital Science & Research SRL (Romania), DS Digital Science GmbH (Germany), Digital Science & Research Solutions Inc (US), ThinqLab Ltd (UK) and Writefull BV (Netherlands).
Please refer to [our Privacy Policy](https://www.overleaf.com/legal#Privacy) or the data processing terms\* we have agreed with you, as applicable, for further information. Not all service providers will be used for every user.
\*Note to organizations: if we do not already have a data processing agreement in place with you, one can be executed by following [this link](https://eu.docusign.net/Member/PowerFormSigning.aspx?PowerFormId=a9bf6ead-e5f9-4809-be36-c1728a19c07e\&env=eu\&acct=db2a35aa-12e2-4017-b74a-bb8e4a1d199e\&v=2).
To receive notifications when this page is updated, please [subscribe here](http://eepurl.com/hAG6ir).
Date: May 2026
# Overleaf Labs
This is where we share our latest experiments and "work in progress" features.
{% hint style="warning" %}
Features in Overleaf Labs are experimental. They may change, evolve, or be removed at any time based on user feedback.
{% endhint %}
Welcome to Overleaf Labs! Labs is where we share early-stage experiments and work-in-progress features. We invite you to try them out, tell us what you think, and help us decide what to build next.
Labs experiments are different from our standard features. They are released earlier in the development cycle—sometimes as rough prototypes—so that we can gather real-world feedback before committing to a full release. You should expect rough edges.
To see all current experiments and opt in, visit the [Labs sign-up page](https://www.overleaf.com/labs/participate).
## What to expect from a Labs experiment
* Experiments are opt-in. You will not be enrolled automatically.
* An experiment can be changed or removed at any time, without notice.
* Each experiment includes a feedback link. We read everything you send.
* If an experiment goes well, it may progress to a full beta or release feature.
* If an experiment does not go well, it may be quietly retired.
{% hint style="danger" %}
Labs experiments are provided as-is, without any guarantee of stability. We recommend avoiding them for critical or deadline-sensitive projects.
{% endhint %}
### Risks and limitations
Because Labs features are experimental, there are some risks to be aware of:
* An experiment may occasionally behave unexpectedly or have unintended interactions with other features.
* Some experiments may affect how your project compiles or how collaborators see your document.
* Experiments are not covered by our standard support guidance. We will do our best to help, but we cannot guarantee a resolution for issues caused by experimental features.
Each experiment on the [Labs sign-up page](https://www.overleaf.com/labs/participate) notes any specific risks relevant to that experiment. Please read these before opting in.
## How to join or leave an experiment
All current experiments are listed in the [Labs sign-up page](https://www.overleaf.com/labs/participate). Each experiment has its own opt-in toggle. You can leave any experiment at any time using the same control—your work and settings will not be affected.
## Providing feedback
Each experiment has a dedicated feedback survey, linked from its entry on the experiment. Please use the survey to share your experience—both positive and negative feedback is genuinely useful. If you have urgent concerns (for example, you think an experiment has caused data loss), please [contact Support](https://www.overleaf.com/contact) directly as well as filing feedback.
# Live Experiments
Current experiments available via the Labs program.
{% hint style="danger" %}
Labs experiments are provided as-is, without any guarantee of stability. We recommend avoiding them for critical or deadline-sensitive projects.
{% endhint %}
These experiments are not final features and may change or be removed. See our [Labs documentation page](/accounts-and-security/overleaf-labs) for more information.
{% hint style="warning" %}
The following documentation may not reflect the experiment in its current form. We try to keep it as up to date as possible but some features change fast!
{% endhint %}
BibTeX visual editor
The BibTeX visual editor is an in-editor panel that lets you view, create, edit, and delete bibliography (.bib) file entries without needing to write raw BibTeX code.
## Managing your entry list
The entry list shows all your parsed BibTeX entries in a simple table. You can sort the list by key, type, author, title, or year to find exactly what you're looking for.
### Adding and editing entries
To add a new reference, just click the Add entry button. If you want to change an existing one, click on its row to open the entry form. This form includes all the standard BibTeX fields you might need.
### Importing references
You can easily bring in new data by clicking the Import button. You can either paste raw BibTeX text or upload a file, and we'll merge those entries into your current project.
### Deleting entries
If you need to tidy up your file, you can delete multiple entries at once using the checkboxes:
* **Select individual entries**: Use the checkbox next to any row.
* **Select everything on a page**: Click the checkbox in the header. If you've only selected a few items, clicking this will select the rest of the page for you.
When you've selected your entries, a Delete button will appear in the toolbar. Click it to remove all selected entires.
{% hint style="success" %}
Your selections stay active even when you navigate to a different page.
{% endhint %}
## Permissions
Your ability to edit depends on your project permissions. If you have Owner or Collaborator (with edit access) status, you can add, change, or delete entries. Read-only users can see the list but won't be able to make changes.
Rolling TeX Live releases (advanced)
This experimental version is primarily for testing changes to TeX Live, packages, and previewing new accessibility features before they’re compiled into our annual TeX Live release.
Note that these images change month to month and are untested by our team. Important projects should continue to be built on our yearly release to avoid issues that may occur when the monthly build changes.
{% hint style="info" %}
Once you have joined, you will need to [select a the rolling TeX Live version](/getting-started/recompiling-your-project/selecting-a-tex-live-version-and-latex-compiler).
{% endhint %}
Find out more on our [TeX Live documentation page](/troubleshooting-and-support/tex-live).
Python Script Runner
The Python Script Runner lets you write and run Python scripts directly in your Overleaf project. Any files your script generates—figures, CSVs, or other outputs—are saved to the file tree and are available to use in your LaTeX document.
## Activate the Python Script Runner
To use the Python Script Runner, open any `.py` file from your project's file tree. The editor switches to Python mode and a **Run** button appears.
If your project doesn't have a `.py` file yet, create one using the **New file** button in the file tree.
## Write and run a script
1. Open a `.py` file from the file tree.
2. Write your Python code in the editor.
3. Select **Run** to execute the script.
To stop a script while it's running, select **Stop**.
## Understand the output panel
When you run a script, the output panel opens below the editor. It shows:
* **Standard output:** text printed by your script, such as the result of `print()` statements
* **Errors:** if your script fails, the output panel shows what went wrong. There are two types:
* **Environment errors:** for example, a package that isn't available in the runner. Check the list of [supported packages](https://pyodide.org/en/stable/usage/packages-in-pyodide.html) before importing.
* **Code errors:** syntax mistakes or runtime errors in your script, such as a `NameError` or `TypeError`
## Use files from the file tree as inputs
Your script can read files already in your project—for example, a `.csv` you've uploaded:
```python
import csv
with open("data.csv") as f:
reader = csv.reader(f)
for row in reader:
print(row)
```
## Save output files to the file tree
Any files your script writes are saved to the project file tree automatically. For example, a figure saved with `plt.savefig("output.png")` will appear in the file tree and can be included in your LaTeX document using `\includegraphics{output.png}`.
## Supported packages and Python version
The Python Script Runner uses [Pyodide](https://pyodide.org/en/stable/usage/packages-in-pyodide.html) 0.29.3, which runs Python 3.13.2. A full list of supported packages is available on the [Pyodide packages page](https://pyodide.org/en/stable/usage/packages-in-pyodide.html).
## Known limitations
* Scripts run in your browser using your local system resources. Large or computationally expensive scripts may be slow or cause the tab to become unresponsive.
* Only packages available in Pyodide are supported. Packages that require native code or are not in the Pyodide distribution cannot be installed.
## Give feedback
The Python Script Runner is an early experiment and your feedback helps shape where it goes. Share what's working, what isn't, and what you'd like to see using our [feedback survey](https://forms.gle/RSQTZWfFd5AvzZX4A).
If you think the experiment has caused data loss or a serious issue, please also [contact Support](https://www.overleaf.com/contact) directly.
## Leave the experiment
You can leave this experiment at any time from the [Labs page](https://www.overleaf.com/labs/participate). Your projects and settings will not be affected.
New Project Sharing Experience - Manage access
Introducing a more streamlined way to share your projects. Dive into each of your collaborator's permissions in the Manage access menu.
{% stepper %}
{% step %}
#### Set up sharing
There are two access methods:
* **Email invite** – directly invite a collaborator using their email address.
1. Type the email(s), or choose from a list of previous collaborators.
2. Select the permission level you'd like to assign them.
3. Click **Invite**.
* **Link sharing** – send or embed a link.
1. Turn on link sharing for the project by selecting **Via sharing links** from the dropdown menu:
2. You can revoke link sharing at any time by switching back to **Only invited people**.
3. Permissions for collaborators who have already joined the project are retained. You can update their permissions through the [Manage access](#manage-access) menu.
4. Click the **Copy** button next to either the **edit** (read-and-write) link or the **view** (read-only) link:
5. Share the link anywhere by pasting from your clipboard.
{% endstep %}
{% step %}
#### Manage access
Once an invite has been sent, or a collaborator has joined from a link, the button appears. Use this to fine-tune individual permissions:
1. Click **Manage access**.
2. Choose the corresponding toggle next to each collaborator to update.
1. If the collaborator has already joined the project, you will see options to change their role to **Owner**, **Editor**, **Reviewer**, or **Viewer**. You can also **Remove** their access to the project:
2. If the invite is still pending, you will see the options to **Resend** or **Revoke** the invite:
{% endstep %}
{% endstepper %}
New Project Sharing Experience - Request access
Don't have the access you want for a project? Request it right from the toolbar.
{% stepper %}
{% step %}
#### Open the project
Open any project you have previously joined.
{% hint style="info" %}
Note: The owner of the project needs to be enrolled in the Labs experiment ([New project sharing experience](https://www.overleaf.com/labs/participate)).
{% endhint %}
{% endstep %}
{% step %}
#### Click the Request access button
Depending on your existing access you will have the following options:
* **Viewer** - Users with **Viewer** permissions will be able to request **Reviewer** or **Editor** permissions.
* **Reviewer** - Users with **Reviewer** permissions will be able to request **Editor** permissions.
{% endstep %}
{% endstepper %}
### Managing requests
{% stepper %}
{% step %}
#### Notification
The project owner will be notified of the access request by a badge on the Share menu for the project and by email.
{% endstep %}
{% step %}
#### Update permissions
Use the **Manage access** menu to accept or decline the request.
{% endstep %}
{% step %}
#### Confirmation
The project owner will get confirmation of the updated access within the Share menu. The requestor will receive an email notification with the owner's decision.
{% endstep %}
{% endstepper %}
# Writing and editing
Overleaf has features that can reduce the amount of LaTeX code from scratch needed and provide key information about your project:
{% columns %}
{% column %}
{% content-ref url="/pages/MXnQkEYPFWTBFFPJN9wP" %}
[Inserting images](/writing-and-editing/inserting-images)
{% endcontent-ref %}
{% content-ref url="/pages/zV5tH2RTnftfVbmeW9Xa" %}
[Generating and inserting tables](/writing-and-editing/generating-and-inserting-tables)
{% endcontent-ref %}
{% content-ref url="/pages/BbMZTr4iirUt3BVfBI2h" %}
[Inserting symbols](/writing-and-editing/inserting-symbols)
{% endcontent-ref %}
{% endcolumn %}
{% column %}
{% content-ref url="/pages/vTtqGJNukhRNSqE4pPKX" %}
[History and versioning](/writing-and-editing/history-and-versioning)
{% endcontent-ref %}
{% content-ref url="/pages/oWEsM2Q3UBZUpKImYczG" %}
[Using Word Count](/writing-and-editing/using-word-count)
{% endcontent-ref %}
{% endcolumn %}
{% endcolumns %}
# Inserting images
## Inserting images
Generally there are a few steps to inserting images and figures in Overleaf:
1. Provide the image file.
2. Provide the LaTeX code for including the image in the document.
3. Provide additional code or options for treating the image as a figure that can be captioned and referenced.
## Uploading images and writing LaTeX code
You can add images or figures by uploading the required files and then writing the LaTeX code to display them.
{% content-ref url="/pages/jEhcEMwgDZf9tNXqz1bs" %}
[Uploading images](/writing-and-editing/inserting-images/uploading-images)
{% endcontent-ref %}
{% content-ref url="/pages/UfGLoFZUJ5jNjLyDvId1" %}
[LaTeX code for including images in your document](/writing-and-editing/inserting-images/latex-code-for-including-images-in-your-document)
{% endcontent-ref %}
## Simpler ways to add images
You can use the Insert Figure button, copy and paste an image, or drag and drop an image from your local device to add a figure to your document.
{% content-ref url="/pages/gXhDoBzWTbnlCDRe7TLL" %}
[Using the Insert figure button](/writing-and-editing/inserting-images/using-the-insert-figure-button)
{% endcontent-ref %}
{% content-ref url="/pages/ANhkXBgwYsu3wMXS9GZ7" %}
[Pasting images into your project](/writing-and-editing/inserting-images/pasting-images-into-your-project)
{% endcontent-ref %}
# Uploading images
When editing documents on Overleaf, it's straightforward to upload images. This article explains how to upload images to your projects from your computer or from a URL, and how to include them in your typeset documents.
### Simple image upload
{% stepper %}
{% step %}
To upload an image, in the editor go to the upper left corner and click the upload icon .
{% endstep %}
{% step %}
A dialogue box will pop up for you to upload your files. There you can either drag and drop your files or click either *Select files* or *Select a folder* to open a file browser.
{% endstep %}
{% step %}
Navigate to and select the images to upload. You can upload several files at once.
{% endstep %}
{% step %}
After the upload process is complete you will see the files in the left panel.
{% endstep %}
{% endstepper %}
Now you can use your images within your LaTeX file; see the example below.
{% columns %}
{% column width="50%" %}
{% code overflow="wrap" %}
```latex
\documentclass{article}
\usepackage[utf8]{inputenc}
\usepackage{graphicx}
\title{A project with images}
\author{Overleaf}
\date{}
\begin{document}
\maketitle
\section{Introduction}
\begin{figure}[htp]
\centering
\includegraphics[width=4cm]{InsertingImagesEx5}
\caption{An image of a galaxy}
\label{fig:galaxy}
\end{figure}
\end{document}
```
{% endcode %}
{% endcolumn %}
{% column %}
{% endcolumn %}
{% endcolumns %}
Notice that only the file name of the image is passed as parameter in `\includegraphics[width=4cm]{InsertingImagesEx5}` .
For more information about picture manipulation in LaTeX see the [further reading](#further-reading) for links to other documentation pages.
## Uploading images to a folder
If your project includes several images you might need to put them in a separate folder to keep everything organized.
{% stepper %}
{% step %}
To create folders in Overleaf, go to the upper left corner of your editor and click the folder icon
{% endstep %}
{% step %}
An input box will appear. Set a name for your folder and click *Create*.
{% endstep %}
{% step %}
Now you can see the folder in your left panel. You can drag and drop already uploaded files, even between folders in your left panel.
{% endstep %}
{% endstepper %}
To upload files directly into a folder, click that folder then click on ***New*** and follow the instructions in the [previous section](#simple-image-upload).
Once you have some files in your folder you can use them within your document, see the example below.
{% columns %}
{% column %}
{% code overflow="wrap" %}
```latex
\documentclass{article}
\usepackage[utf8]{inputenc}
\usepackage{graphicx}
\title{A project with images}
\author{Overleaf}
\date{}
\graphicspath{{Images/}}
\begin{document}
\maketitle
\section{Introduction}
\begin{figure}[htp]
\centering
\includegraphics[width=4cm]{InsertingImagesEx5}
\caption{An image of a galaxy}
\label{fig:galaxy}
\end{figure}
\end{document}
```
{% endcode %}
{% endcolumn %}
{% column %}
{% endcolumn %}
{% endcolumns %}
The command `\graphicspath{ {Images/} }` tells LaTeX that the images are stored in *Images*, now you only have to use the file name instead of the full path in `\includegraphics`
For more information on image management in LaTeX look in [further reading](#further-reading) for links.
## Quick guide
### Quick guide to uploading one or more images into your Overleaf project:
In the top left corner of the editor click on the upload icon, then you can either drag and drop the files or click *Select files(s)* to browse in your local directories. After the uploading process is complete, you can use these images in your document.
### Quick guide to uploading images into a folder:
To create a new folder in the editor click the folder icon, set a name for your folder and click *create*. Now click your newly created folder and follow the process described in the previous paragraph to upload images, or drag and drop already uploaded images into your folder.
## Further reading
Learn more about image manipulation in LaTeX:
* [Positioning images and tables](https://learnwiki.overleaf.com/learn/Positioning_images_and_tables)
* [Lists of tables and figures](https://learnwiki.overleaf.com/learn/Lists_of_tables_and_figures)
# LaTeX code for including images in your document
{% hint style="info" %}
In these instructions, it is assumed that your image has already been uploaded to your Overleaf project.
{% endhint %}
This page explains how to include images in the most common formats, how to shrink, enlarge and rotate them, and how to reference them within your document. We will start with an example to demonstrate how to import a picture.
```latex
\documentclass{article}
\usepackage{graphicx}
\graphicspath{ {./images/} }
\begin{document}
The universe is immense and it seems to be homogeneous,
in a large scale, everywhere we look at.
\includegraphics{universe}
There's a picture of a galaxy above
\end{document}
```
LaTeX cannot manage images by itself, so we need to use the `graphicx` package. To use it, we include the following line in the preamble: `\usepackage{graphicx}`.
The command `\graphicspath{ {./images/} }` tells LaTeX that the images are kept in a folder named `images` under the directory of the main document.
The `\includegraphics{universe}` command is the one that actually includes the image in the document. Here `universe` is the name of the file containing the image without the extension, then `universe.PNG` becomes `universe`. The file name of the image should not contain white spaces nor multiple dots.
{% hint style="warning" %}
The file extension is allowed to be included, but it's a good idea to omit it. If the file extension is omitted it will prompt LaTeX to search for all the supported formats. For more details see the section about [generating high resolution and low resolution images](/writing-and-editing/inserting-images#generating-high-res-and-low-res-images).
{% endhint %}
[Open an images example in Overleaf](https://www.overleaf.com/project/new/template/19397?id=65443742\&templateName=Inserting+Images\&latexEngine=pdflatex\&texImage=texlive-full%3A2020.1\&mainFile=)
## The folder path to images
When working on a document which includes several images, it's possible to keep those images in one or more separated folders so that your project is more organized.
The command `\graphicspath{ {images/} }` tells LaTeX to look in the `images` folder. The path is ***relative*** to the current working directory—so, the compiler will look for the file in the same folder as the code where the image is included. The path to the folder is relative by default, if there is no initial directory specified, for instance
```latex
%Path relative to the .tex file containing the \includegraphics command
\graphicspath{ {images/} }
```
This is a typically straightforward way to reach the graphics folder within a file tree, but can leads to complications when `.tex` files within folders are included in the main `.tex` file. Then, the compiler may end up looking for the images folder in the wrong place. Thus, **it is best practice to specify the graphics path to be relative to the main `.tex` file**, denoting the main `.tex` file directory as `./` , for instance:
```latex
%Path relative to the main .tex file
\graphicspath{ {./images/} }
```
as in the introduction.
The path can also be ***absolute***, if the exact location of the file on your system is specified. For example, if you were working on a local LaTeX installation on your own computer:
```latex
%Path in Windows format:
\graphicspath{ {c:/user/images/} }
%Path in Unix-like (Linux, Mac OS) format
\graphicspath{ {/home/user/images/} }
```
Notice that this command requires a trailing slash `/` and that the path is in between double braces.
You can also set multiple paths if the images are saved in more than one folder. For instance, if there are two folders named `images1` and `images2`, use the command:
```latex
\graphicspath{ {./images1/}{./images2/} }
```
[Open an images example in Overleaf](https://www.overleaf.com/project/new/template/19397?id=65443742\&templateName=Inserting+Images\&latexEngine=pdflatex\&texImage=texlive-full%3A2020.1\&mainFile=)
For additional information on some of the options that are available for the \includegraphics command, see [Advanced LaTeX image topics](/writing-and-editing/inserting-images/advanced-latex-image-topics).
# Using the Insert figure button
{% hint style="warning" %}
Before using any of these figure-creation methods, make sure your main LaTeX file has loaded the `graphicx` package by writing `\usepackage{graphicx}` within its [preamble](/getting-started/latex-tutorials).
{% endhint %}
You can use the following steps to insert a figure into an Overleaf LaTeX document.
1. Choose which editor you want to use: Visual Editor or Code Editor.
2. Select the Insert Figure button () to display a list of options for inserting figures:
## Upload from computer
This option creates a figure using a graphics file uploaded from your device.
To use this option:
1. Upload a graphic using one of these methods:
* drag and drop a graphics file onto the modal window (within the area shown).
* paste an image into the modal window (within the area shown).
* manually select a file located on your device
2. Give the graphics file a name.
3. (Optional) Choose a project folder in which to save the file.
4. Decide whether to use a figure caption.
5. Decide whether to include a label (used for [referencing the figure](https://www.overleaf.com/learn/latex/Inserting_Images%23Labels_and_cross-references#Labels_and_cross-references)).
6. Set the image width (as a fraction of `\linewidth`).
7. Select **Insert figure** to upload the graphic and automatically generate a LaTeX `figure` environment based on your choices.
## From project files
This option creates a figure using one of the graphics files previously uploaded to your current project.
To use this option:
1. Choose a graphic contained in your project.
2. Decide whether to use a figure caption.
3. Decide whether to include a label (used for [referencing the figure](https://www.overleaf.com/learn/latex/Inserting_Images%23Labels_and_cross-references#Labels_and_cross-references)).
4. Set the image width (as a fraction of `\linewidth`).
5. Select **Insert figure** to automatically generate a LaTeX `figure` environment based on your choices.
## From another project
This option lets you create figures using graphics files contained in another one of your Overleaf projects. As shown in the animated screenshot below, you select a project then choose a file previously *uploaded* to that project, or a file *output* (generated) by that project—for example, a PDF graphic generated by [externalizing TikZ graphics](https://learn.overleaf.com/learn/Questions/I_have_a_lot_of_tikz,_matlab2tikz_or_pgfplots_figures,_so_I%27m_getting_a_compilation_timeout._Can_I_externalise_my_figures%3F#How_to_externalize_TikZ_graphics). See the section [Select from output files](https://learn.overleaf.com/learn/Kb/How_to_insert_figures_in_Overleaf#Select_from_output_files) for a video clip showing how to use an output file created by another project.
To use this option:
1. Choose a project containing graphics files you’d like to use in your current project.
2. Select one of that project’s graphics:
* an **image file** *uploaded to* that project, or
* an [**output file**](https://learn.overleaf.com/learn/Kb/How_to_insert_figures_in_Overleaf#Select_from_output_files) *generated by* that project.
3. Give the graphics file a name.
4. (Optional) Choose a project folder in which to save the file.
5. Decide whether to use a figure caption.
6. Decide whether to include a label (used for [referencing the figure](https://www.overleaf.com/learn/latex/Inserting_Images%23Labels_and_cross-references#Labels_and_cross-references)).
7. Set the image width (as a fraction of `\linewidth`).
8. Select **Insert figure** to automatically generate a LaTeX `figure` environment based on your choices.
### **Select from output files**
Instead of choosing a file that you have uploaded to another project, you can choose to include a file that is generated by another project when that other project is compiled.
This is an advanced option that allows you to offload some of the compilation work required to generate some image types.
The video clip below walks you through the process of incorporating a figure into your current project, utilizing a file generated from another project that creates [externalized TikZ graphics](https://www.overleaf.com/learn/latex/Questions/I_have_a_lot_of_tikz%2C_matlab2tikz_or_pgfplots_figures%2C_so_I'm_getting_a_compilation_timeout._Can_I_externalise_my_figures%3F#How_to_externalize_TikZ_graphics).
{% embed url="" %}
## From URL
This option lets you create figures using graphics added (downloaded) to your project via a URL.
To use this option:
1. Paste a [direct download link](https://en.wikipedia.org/wiki/Direct_download_link) (URL) into the **Image URL** field.
2. Give the graphics file a name.
3. (Optional) Choose a project folder in which to save it.
4. Decide whether to include a figure caption.
5. Decide whether to include a label (used for [referencing the figure](https://www.overleaf.com/learn/latex/Inserting_Images%23Labels_and_cross-references#Labels_and_cross-references)).
6. Set the image width (as a fraction of `\linewidth`).
7. Select **Insert figure** to automatically generate a LaTeX `figure` environment based on your choices.
The following video clip demonstrates using a [Google Drive download URL](https://learn.overleaf.com/learn/Kb/How_can_I_upload_files_from_Google_Drive%3F). It also shows how to change the figure size and give it a caption.
{% embed url="" %}
# Pasting images into your project
{% hint style="danger" %}
Before pasting an image into your project, make sure your main LaTeX file has loaded the `graphicx` package by writing `\usepackage{graphicx}` within its [preamble](/getting-started/latex-tutorials).
{% endhint %}
You can paste single images into **Visual Editor** and **Code Editor** (but only **Visual Editor** provides an image preview). Pasting multiple images is not currently supported.
You can:
* Name the file used to save the pasted image.
* Choose the project folder in which to save it.
* Decide whether to use a figure caption.
* Decide whether to include a label (used for referencing the table).
* Configure the image width (as a fraction of `\linewidth`).
Any image you paste is saved as a `.png` file in your Overleaf project. It's then incorporated into your document using automatically generated LaTeX code. **Visual Editor** will provide a preview of the pasted image but **Code Editor** will display the LaTeX code only.
# Changing image size and rotating the picture
If we want to further specify how LaTeX should include our image in the document (length, height, etc), we can pass those settings in the following format:
```latex
\begin{document}
Overleaf is a great professional tool to edit online documents,
share and backup your \LaTeX{} projects. Also offers a
rather large help documentation.
\includegraphics[scale=1.5]{overleaf-logo}
```
The command `\includegraphics[scale=1.5]{overleaf-logo}` will include the image `overleaf-logo` in the document while the extra parameter `scale=1.5` will do exactly that, scale the image 1.5 times its real size.
You can also scale the image to a specific width and height.
```latex
\begin{document}
Overleaf is a great professional tool to edit online documents,
share and backup your \LaTeX{} projects. Also offers a
rather large help documentation.
\includegraphics[width=5cm, height=4cm]{overleaf-logo}
```
As you probably have guessed, the parameters inside the brackets `[width=5cm, height=4cm]` define the width and the height of the picture. You can use [different units](/writing-and-editing/inserting-images/advanced-latex-image-topics#commonly-used-latex-units-and-lengths) for these parameters. If only the *width* parameter is passed, the height will be scaled to keep the aspect ratio.
The length units can also be relative to some elements in the document. If you want, for instance, to make a picture the same width as the text:
```latex
\begin{document}
The universe is immense and it seems to be homogeneous,
in a large scale, everywhere we look at.
\includegraphics[width=\textwidth]{universe}
```

Instead of `\textwidth` you can use any other default LaTeX length: `\columnsep`, `\linewidth`, `\textheight`, `\paperheight`, etc. See the [reference guide](/writing-and-editing/inserting-images/advanced-latex-image-topics#commonly-used-latex-units-and-lengths) for a further description of these units.
There is another common option when including a picture within your document, which is to rotate it. This can be easily accomplished in LaTeX:
```latex
\begin{document}
Overleaf is a great professional tool to edit online,
share and backup your \LaTeX{} projects. Also offers a
rather large base of help documentation.
\includegraphics[scale=1.2, angle=45]{overleaf-logo}
```
The parameter `angle=45` rotates the picture 45 degrees counter-clockwise. To rotate the picture clockwise, use a negative number.
# Positioning figures
The previous section explained how to include images in your document, but the combination of text and images may not look as expected. To change this, you need to introduce a new *environment*.
```latex
In the next example the figure will be positioned
right below this sentence.
\begin{figure}[h]
\includegraphics[width=8cm]{Plot}
\end{figure}
```

The `figure` environment is used to display pictures as floating elements within the document. This means you include the picture inside the `figure` environment and you don't have to worry about its placement. LaTeX will position it in a such way that it fits within the flow of the document.
Sometimes we need to have more control over the way figures are displayed. An additional parameter can be passed to determine the figure positioning. In the example, `begin{figure}[h]`, the parameter inside the brackets set the position of the figure to ***here***. The following table lists the possible positioning values.
| Parameter | Position |
| --------- | ---------------------------------------------------------------------------------------------------------------------------------------------------------------------- |
| `h` | Place the float *here*, i.e., *approximately* at the same point it occurs in the source text (however, not *exactly* at the spot). |
| `t` | Position at the *top* of the page. |
| `b` | Position at the *bottom* of the page. |
| `p` | Place on a special *page* for floats only. |
| `!` | Override internal parameters LaTeX uses for determining "good" float positions. |
| `H` | Places the float at precisely the location in the LaTeX code. Requires the `float` package, though may cause problems occasionally. This is somewhat equivalent to h!. |
In the next example you can see a picture at the `t`op of the document, despite being declared below the text.
```latex
In this picture you can see a bar graph that shows
the results of a survey which involved some important
data studied as time passed.
\begin{figure}[t]
\includegraphics[width=8cm]{Plot}
\centering
\end{figure}
```
The additional command `\centering` will center the picture. The default alignment is *left*.
### Wrapping text around figures
It's also possible to **wrap** the text around a figure. This will make it look better when the document contains small pictures.
```latex
\begin{wrapfigure}{r}{0.25\textwidth} %this figure will be at the right
\centering
\includegraphics[width=0.25\textwidth]{mesh}
\end{wrapfigure}
There are several ways to plot a function of two variables,
depending on the information you are interested in. For
instance, if you want to see the mesh of a function so it
easier to see the derivative you can use a plot like the
one on the left.
\begin{wrapfigure}{l}{0.25\textwidth}
\centering
\includegraphics[width=0.25\textwidth]{contour}
\end{wrapfigure}
On the other side, if you are only interested on
certain values you can use the contour plot, you
can use the contour plot, you can use the contour
plot, you can use the contour plot, you can use
the contour plot, you can use the contour plot,
you can use the contour plot, like the one on the left.
On the other side, if you are only interested on
certain values you can use the contour plot, you
can use the contour plot, you can use the contour
plot, you can use the contour plot, you can use the
contour plot, you can use the contour plot,
you can use the contour plot,
like the one on the left.
```
For the commands in the example to work, you have to import the [`wrapfig` package](https://ctan.org/pkg/wrapfig?lang=en). To use `wrapfig`, include the following line in the document preamble:
```latex
\usepackage{wrapfig}
```
This makes the `wrapfigure` environment available and we can place an `\includegraphics` command inside it to create a figure around which text will be wrapped. Here is how we can specify a *wrapfigure* environment:
```latex
\begin{wrapfigure}[lineheight]{position}{width}
...
\end{wrapfigure}
```
The `position` parameter has eight possible values:
The uppercase version allows the figure to float. The lowercase version means *exactly here*.
| Lower case | Upper Case | Values |
| ---------- | ---------- | ------------------------------------------------------ |
| r | R | right side of the text |
| `l` | `L` | left side of the text |
| `i` | `I` | inside edge–near the binding (in a *twoside* document) |
| `o` | `O` | outside edge–far from the binding |
Now you can define the `wrapfigure` environment by means of the commands `\begin{wrapfigure}{l}{0.25\textwidth} \end{wrapfigure}`. Notice that the environment has two additional parameters enclosed in braces. Below, the code is explained in more detail:
`{l}`
This defines the alignment of the figure. Set **l** for left and **r** for right. Furthermore, if you are using a book or any similar format, use **o** instead for the outer edge and **i** for the inner edge of the page.
`{0.25\textwidth}`
This is the width of the figure box. It's not the width of the image itself. That must be set in the `\includegraphics` command. Notice that the length is relative to the text width, but normal units can also be used (cm, in, mm, etc.). See the [reference guide](#reference-guide) for a list of units.
`\centering`
In this example the image will be centered by using its container as a reference, instead of the whole text.
## Learn More
* For a more complete article about image positioning, see [Positioning images and tables](https://learn.overleaf.com/learn/Positioning_images_and_tables) on Overleaf's [Learn LaTeX](https://www.overleaf.com/learn)
* [Open an images example in Overleaf](https://www.overleaf.com/project/new/template/19397?id=65443742\&templateName=Inserting+Images\&latexEngine=pdflatex\&texImage=texlive-full%3A2020.1\&mainFile=)
* [How do I insert an image at a specific point in the document?](https://www.overleaf.com/learn/latex/Questions/How_do_I_insert_an_image_at_a_specific_point_in_the_document%3F) on Overleaf's [Learn LaTeX](https://www.overleaf.com/learn)
# Captioning and referencing figures
## Captioning, labeling and referencing
Captioning images to add a brief description and labeling them for further reference are two important tools when working on a lengthy text.
### Captions
Let's start with a caption example:
```latex
\begin{figure}[h]
\caption{Example of a parametric plot ($\sin (x), \cos(x), x$)}
\centering
\includegraphics[width=0.5\textwidth]{spiral}
\end{figure}
```
Just add the `\caption{Some caption}` and write the text to be displayed inside the braces . The placement of the caption depends on where you place the command. If it's above the `\includegraphics` command, then the caption will be on top of the figure. If it's below, then the caption will also be set below the figure.
Captions can also be placed right after the figures. The `sidecap` package uses similar code to that used in the previous example to accomplish this.
```latex
\documentclass{article}
\usepackage[rightcaption]{sidecap}
\usepackage{graphicx} %package to manage images
\graphicspath{ {images/} }
\begin{SCfigure}[0.5][h]
\caption{Using again the picture of the universe.
This caption will be on the right}
\includegraphics[width=0.6\textwidth]{universe}
\end{SCfigure}
```
There are two new commands:
`\usepackage[rightcaption]{sidecap}`
As you may expect, this line will import a package named `sidecap`, but there is an additional parameter: `rightcaption`. This parameter establishes the placement of the caption at the right of the picture. You can also use `leftcaption`. In book-like documents, `outercaption` and `innercaption` are also available. The names of these are self-descriptive.
`\begin{SCfigure}[0.5][h] \end{SCfigure}`
The above example defines an environment similar to `figure`. The first parameter is the width of the caption relative to the size of the image, as declared in `\includegraphics`. The second parameter `h` works exactly as in the `figure` environment. See the [placement](#positioning) section for more information.
For more advanced management of caption formatting, check the [further reading](#further-reading) section for references.
### Labels and cross-references
{% hint style="warning" %}
When using cross-references your LaTeX project must be compiled twice, otherwise the references, the page references and the table of figures won't work—Overleaf takes care of that for you.
{% endhint %}
Figures, like many other elements in a LaTeX document (equations, tables, plots, etc.), can be referenced within the text. Just add a `\label` to the `figure` or `SCfigure` environment, then later use that label to refer to the picture.
```latex
\begin{figure}[h]
\centering
\includegraphics[width=0.25\textwidth]{mesh}
\caption{a nice plot}
\label{fig:mesh1}
\end{figure}
As you can see in the figure \ref{fig:mesh1}, the
function grows near 0. Also, in the page \pageref{fig:mesh1}
is the same example.
```
There are three commands that generate cross-references in this example.
`\label{fig:mesh1}`
This will set a label for this figure. Since labels can be used in several types of elements within the document, it's a good practice to use a prefix, such as `fig:` in the example.
`\ref{fig:mesh1}`
This command will insert the number assigned to the figure. It's automatically generated and will be updated if you insert another figure before the referenced one.
`\pageref{fig:mesh1}`
This prints out the page number where the referenced image appears.
The `\caption` is mandatory to reference a figure.
Another great characteristic in a LaTeX document is the ability to automatically generate a *list of figures*. This is straightforward.
```latex
\listoffigures
```

This command only works on captioned figures since it uses the caption in the table. The example above lists the images in this article.
# Advanced LaTeX image topics
## Commonly used LaTeX units and lengths
When including images using the `\includegraphics` command, it is sometimes required to provide measurements and length when adjusting the size or positioning. The table below summarizes some of the most frequently used LaTeX units and lengths.
Unit or length
Definition
pt
the default length unit, about 0.3515mm
mm
a millimeter
cm
a centimeter
in
an inch
ex
the height of an x in the current font
em
the width of an m in the current font
\columnsep
distance between columns
\columnwidth
width of the column
\linewidth
width of the line in the current environment
\paperwidth
width of the page
\paperheight
height of the page
\textwidth
width of the text
\textheight
height of the text
\unitlength
units of length in the picture environment
## Compilers and image types
**latex**
When compiling with "latex", you can only use EPS images, which are a vector format.
**pdflatex**
If you are compiling using "pdflatex" to produce a PDF, then you can use a number of image formats:
```latex
JPG: Best choice to insert photos
PNG: Best choice to insert diagrams (if a vector version could not be generated) and screenshots
PDF: Even though we are used to seeing PDF documents, a PDF can also store images
EPS: EPS images can be included using the epstopdf package (you just need to install the package, you
don't need to use \usepackage{} to include it in your document.)
```
**Vector format or bitmap format?**
Images can be in either vector format or bitmap format. Generally you don't need to worry about it, but if you do happen to know the format the image is in, you can use that information to choose an appropriate image format to include in your LaTeX document. If you have an image in vector format, you should go for PDF or EPS. If you have it in bitmap format, you should go for JPG or PNG, as storing bitmap pictures in PDF or EPS takes a lot of disk space.
[Open an images example in Overleaf](https://www.overleaf.com/project/new/template/19397?id=65443742\&templateName=Inserting+Images\&latexEngine=pdflatex\&texImage=texlive-full%3A2020.1\&mainFile=)
## Providing high-res and low-res images
So far while specifying the image file name in the `\includegraphics` command, we have omitted file extensions. However, that is not necessary, though it is often useful. If the file extension is omitted, LaTeX will search for any supported image format in that directory, and will search for various extensions in the default order (which can be modified).
This is useful in switching between development and production environments. In a development environment (when the article/report/book is still in progress), it is desirable to use low-resolution versions of images (typically in .png format) for fast compilation of the preview. In the production environment (when the final version of the article/report/book is produced), it is desirable to include the high-resolution version of the images.
This is accomplished by:
* Not specifying the file extension in the *\includegraphics* command, and
* Specifying the desired extension in the preamble.
Thus, if we have two versions of an image, venndiagram.pdf (high-resolution) and venndiagram.png (low-resolution), then we can include the following line in the preamble to use the .png version while developing the report:
```latex
\DeclareGraphicsExtensions{.png,.pdf}
```
The command above will ensure that if two files are encountered with the same base name but different extensions (e.g., venndiagram.pdf and venndiagram.png), then the .png version will be used first, and in its absence the .pdf version will be used. This is also a good idea if some low-resolution versions are not available.
Once the report has been developed, to use the high-resolution .pdf version, we can change the line in the preamble specifying the extension search order to:
```latex
\DeclareGraphicsExtensions{.pdf,.png}
```
Improving on the technique described in the previous paragraphs, we can also instruct LaTeX to generate low-resolution .png versions of images on the fly while compiling the document if there is a PDF that has not been converted to PNG yet. To achieve that, we can include the following in the preamble after: `\usepackage{graphicx}`
```latex
\usepackage{epstopdf}
\epstopdfDeclareGraphicsRule{.pdf}{png}{.png}{convert #1 \OutputFile}
\DeclareGraphicsExtensions{.png,.pdf}
```
If venndiagram2.pdf exists but not venndiagram2.png, the file venndiagram2-pdf-converted-to.png will be created and loaded in its place. The command *convert #1* is responsible for the conversion and additional parameters may be passed between *convert* and *#1*. For example: *convert -density 100 #1*.
There are some important things to keep in mind though:
* For the automatic conversion to work, you need to call *pdflatex* with the `--shell-escape` option.
* For the final *production* version, you must comment out the `\epstopdfDeclareGraphicsRule`, so that only high-resolution PDF files are loaded. You'll also need to change the order of precedence.
[Open an images example in Overleaf](https://www.overleaf.com/project/new/template/19397?id=65443742\&templateName=Inserting+Images\&latexEngine=pdflatex\&texImage=texlive-full%3A2020.1\&mainFile=)
## Further reading
For more information see:
* [Positioning images and tables](https://learn.overleaf.com/learn/Positioning_images_and_tables)
* [Lists of tables and figures](https://learn.overleaf.com/learn/Lists_of_tables_and_figures)
* [Single sided and double sided documents](https://learn.overleaf.com/learn/Single_sided_and_double_sided_documents)
* [Lengths in LaTeX](https://learn.overleaf.com/learn/Lengths_in_LaTeX)
* [floatrow package for advanced caption managing of floating elements (tables and figures)](https://texdoc.org/serve/floatrow/0)
* [sidecap package documentation, for side-figure captions](ftp://ctan.tug.org/tex-archive/macros/latex/contrib/sidecap/sidecap.pdf)
* [**epstopdf** package documentation (EPS to PDF conversion)](https://ctan.org/pkg/epstopdf?lang=en)
# Generating and inserting tables
This page explains how to generate, edit, and insert LaTeX tables in Overleaf. In practice, there are four options to create tables:
1. Using the [**Insert Table** button](#using-insert-table-to-generate-a-table) in the **Visual Editor** (or **Code Editor**) toolbar
2. [Pasting tables into your project](/writing-and-editing/generating-and-inserting-tables/pasting-tables-into-your-project) from another document while using **Visual Editor**
3. Writing the [LaTeX code for the table](https://www.overleaf.com/learn/latex/Tables) in **Code Editor**
4. Using **Overleaf**’s [LaTeX table generator](/writing-and-editing/generating-and-inserting-tables/ai-table-generator)
If you’re a confident LaTeX user you'll likely use option 3, which offers the most flexibility for generating tables. In that case, our detailed guidance on [how to create tables using LaTeX](https://www.overleaf.com/learn/latex/Tables) will serve you well.
If you’re new to LaTeX, both the AI-powered LaTeX table generator and the toolbar in **Visual Editor** (option 1) provide excellent starting points. This page will focus on using the Visual Editor toolbar, from which you can switch between Visual Editor and Code Editor to observe the underlying table code.
{% hint style="success" icon="graduation-cap" %}
You may also want to enroll in the free, self-paced course [Structuring and Formatting Essentials](https://learn.overleaf.com/102-structuring-and-formatting-essentials) to learn more about creating tables with Overleaf.
{% endhint %}
## Using Insert Table to generate a table
{% stepper %}
{% step %}
Switch to **Visual Editor** using the toggle above the editor pane (or remain in **Code Editor** if you are comfortable editing LaTeX code).
{% endstep %}
{% step %}
Select the **Insert table** button on the toolbar:
{% endstep %}
{% step %}
Click on **Select size** (see [AI Table Generator](/writing-and-editing/generating-and-inserting-tables/ai-table-generator) to learn how to **Insert from a text prompt or image**).
{% endstep %}
{% step %}
Using the pop-up selector, highlight the required number of rows and columns, then click the bottom-right selected cell to insert an empty table. Here, we insert a blank 3 x 3 table:
{% endstep %}
{% step %}
The empty table is now ready for you to edit. You can do this in **Code Editor** if you’re comfortable with LaTeX table code, or continue with **Visual Editor**, which provides additional table formatting functionality that’s currently unavailable in **Code Editor**.
{% tabs %}
{% tab title="Code Editor" %}
{% code title="Empty 3x3 table" %}
```latex
\begin{table}
\centering
\begin{tabular}{ccc}
& & \\
& & \\
& & \\
\end{tabular}
\caption{Caption}
\label{tab:placeholder}
\end{table}
```
{% endcode %}
{% endtab %}
{% tab title="Visual Editor" %}
Empty 3x3 table
{% endtab %}
{% endtabs %}
{% endstep %}
{% endstepper %}
{% hint style="success" icon="graduation-cap" %}
To learn more about how to incorporate the AI Table Generator in your writing, enroll in our free, self-paced course [Leveraging Overleaf AI](https://learn.overleaf.com/leveraging-overleaf-ai).
{% endhint %}
## FAQs about tables
Can the Visual Editor preview tables created in the Code Editor?
It depends on the table and its code, but the Visual Editor will try to preview as much as possible. Complex tables, such as those created using LaTeX packages, journal article templates, or custom user commands (macros), may be partially, or entirely displayed as LaTeX code when viewed in the Visual Editor.
If the table cannot be previewed, e.g., it contains LaTeX markup errors, you will see the following message:
Does the Visual Editor preview borders applied using \LaTeX code?
Borders created within the tabular environment using `|` in the table’s specification, or `\hline` in the table body will be previewed in **Visual Editor**, as demonstrated by the next example.
```latex
\documentclass{article}
\begin{document}
\begin{table}
\centering
\begin{tabular}{c|c|c}
R1C1&R1C2& \\
\hline
R2C1& & \\
\hline
R3C1 &R3C2 &R3C3\\
\end{tabular}
\caption{This is my table caption.}
\label{tab:mynewtable}
\end{table}
\end{document}
```
[Open this example in Overleaf and switch to Visual Editor.](https://www.overleaf.com/docs?engine=pdflatex\&snip_name=Creating+table+borders+with+LaTeX+code\&snip=%5Cdocumentclass%7Barticle%7D%0A%5Cbegin%7Bdocument%7D%0A%5Cbegin%7Btable%7D%0A%5Ccentering%0A%5Cbegin%7Btabular%7D%7Bc%7Cc%7Cc%7D%0A+++++++++R1C1%26R1C2%26+%5C%5C%0A+++++++++%5Chline%0A+++++++++R2C1%26++%26+%5C%5C%0A+++++++++%5Chline%0A+++++++++R3C1+%26R3C2+%26R3C3%5C%5C%0A%5Cend%7Btabular%7D%0A++++%5Ccaption%7BThis+is+my+table+caption.%7D%0A++++%5Clabel%7Btab%3Amynewtable%7D%0A%5Cend%7Btable%7D%0A%5Cend%7Bdocument%7D)
Open the code above, then switch to **Visual Editor** to see the following preview:
Does the Visual Editor support the booktabs package?
**Visual Editor** has some support for horizontal rules provided by the [`booktabs` package](https://ctan.org/pkg/booktabs?lang=en). The following example uses the `booktabs` package commands `\toprule`, `\midrule`, and `\bottomrule`.
```latex
\documentclass{article}
\usepackage{booktabs}
\usepackage{hologo} % for the XeTeX logo
\begin{document}
\begin{table}
\begin{tabular}{lcc}
\toprule
\TeX{} engine&Year released&Native UTF-8\\
\midrule
pdf\TeX&1996&No\\
\hologo{XeTeX}&2004&Yes\\
Lua\TeX&2007&Yes\\
LuaHB\TeX&2019&Yes\\
\bottomrule
\end{tabular}
\end{table}
\end{document}
```
[Open this example in Overleaf and switch to Visual Editor.](https://www.overleaf.com/docs?engine=pdflatex\&snip_name=Previewing+a+booktabs+table+in+Visual+Editor\&snip=%5Cdocumentclass%7Barticle%7D%0A%5Cusepackage%7Bbooktabs%7D%0A%5Cusepackage%7Bhologo%7D+%25+for+the+XeTeX+logo%0A%5Cbegin%7Bdocument%7D%0A%5Cbegin%7Btable%7D%0A%5Cbegin%7Btabular%7D%7Blcc%7D%0A%5Ctoprule+%0A++++%5CTeX%7B%7D+engine%26Year+released%26Native+UTF-8%5C%5C%0A%5Cmidrule+%0A++++pdf%5CTeX%261996%26No%5C%5C+%0A++++%5Chologo%7BXeTeX%7D%262004%26Yes%5C%5C+%0A++++Lua%5CTeX%262007%26Yes%5C%5C%0A++++LuaHB%5CTeX%262019%26Yes%5C%5C+%0A%5Cbottomrule%0A%5Cend%7Btabular%7D%0A%5Cend%7Btable%7D%0A%5Cend%7Bdocument%7D)
Open the code above, then switch to **Visual Editor** to see the following preview:
What if I want more formatting options?
There are many ways to configure tables that aren’t yet possible using **Visual Editor** generated tables. For more complex formatting you’ll need to use LaTeX code. Read our detailed guidance on [how to create tables using LaTeX](https://www.overleaf.com/learn/latex/Tables).
## Learn More
* [Tables](https://www.overleaf.com/learn/latex/Tables)
* [Positioning images and tables](https://www.overleaf.com/learn/latex/Positioning_images_and_tables)
# AI Table Generator
{% hint style="info" %}
We don’t store any of your prompts, images, or text, nor do we use any of your data to train our language models. As this feature uses GPT, your prompts and images *will be* sent to the OpenAI GPT API. The OpenAI’s API service doesn’t use your data to train its models, unlike some versions of ChatGPT. To learn more, visit [OpenAI’s Privacy page](https://openai.com/enterprise-privacy) (section ‘API Platform FAQ’).
{% endhint %}
Our AI can generate LaTeX tables from natural language prompts or an image you upload. You can try this for free. For higher daily use, upgrade to a Standard or Pro plan.
{% stepper %}
{% step %}
**Access this feature by clicking on the table icon in the toolbar.**
{% endstep %}
{% step %}
**Enter your table requirements as a prompt or drag and drop a table image.**
The image you upload can be a simple screenshot; for example, from a spreadsheet with your own data, or from an existing article.
{% endstep %}
{% step %}
**Click 'Generate'**
Overleaf AI then automatically generates the LaTeX code for your table.
{% endstep %}
{% step %}
**Click ‘Insert’ to add the table to your source code.**
If needed, click ‘Regenerate’ to refine the result.
{% endstep %}
{% endstepper %}
{% hint style="success" icon="graduation-cap" %}
To learn more about how to use the Table generator in your writing, enroll in our free, self-paced course [Leveraging Overleaf AI](https://learn.overleaf.com/leveraging-overleaf-ai).
{% endhint %}
# Edit or customize an inserted table
## Get to know the table editor menu
In **Visual Editor**, select one or more of your table’s cells to display the table editor menu:
Some menu icons remain greyed out (inactive) until you select a suitable range of cells required to complete those actions. For example, you can only merge cells after you’ve selected two or more cells in a row.
Here’s a short summary of the icons and drop-down menus.
*  Delete or move the table caption.
*  Change the table borders.
*  Set the alignment of a column or merged cell.
*  Adjust column width.
*  Merge cells in a row.
*  Delete rows or columns.
*  Insert rows and columns.
*  Delete the entire table. To restore an accidentally deleted table, use the **Undo** button () on the toolbar located above the Visual Editor and Code Editor.
*  Get help.
## How to edit table cells
There are two ways to start editing a cell:
1. Double-click on the cell you want to edit.
2. Use the tab or arrow keys to navigate to a particular cell, then press **Enter**.
Here are some tips for editing cell content using **Visual Editor**:
* Use LaTeX commands, not the toolbar, to apply bold or italic styles to cell text:
* use [`\textbf{...}`](https://www.overleaf.com/learn/latex/Bold%2C_italics_and_underlining%23Bold_text#Bold_text) for **bold** text.
* use [`\textit{...}`](https://www.overleaf.com/learn/latex/Bold%2C_italics_and_underlining#Italicized_text) for *italic* text.
* use `\textbf{... \textit{...}...}` for text in ***bold italic***.
* Cells can contain [inline mathematics](https://learn.overleaf.com/learn/Mathematical_expressions#Inline_math_mode) via `\( ... \)`.
**Visual Editor** will preview the styled text and inline math.
### **Example: styled text and math in table cells**
The next screenshot shows **Visual Editor** previewing the following cell content:
* `\(\sqrt{a^2+b^2}\)`
* `\textbf{bold}, \textit{italic}, \textbf{\textit{bold italic}}`
## How to select one or more columns or rows
1. Use the row or column selectors to select a particular row or column.
2. Hold down the Shift key to select multiple rows or columns.
""
You can also select multiple rows or columns by clicking on (selecting) a cell and dragging the selection (mouse) pointer.
## How to change the table caption
### To edit the caption text
1. Click on the default caption text, which is the word **Caption.**
""
2. The LaTeX `\caption` command is displayed.
3. Add your preferred caption between the braces `{...}`
""
### To remove the caption or place it above or below the table
1. Select any table cell to display the table editor menu.
2. From the caption drop-down menu, select your preferred option:
* **No caption**: Remove it.
* **Caption above**: Place the caption above the table.
* **Caption below**: Place the caption below the table.
{% hint style="info" %}
The caption drop-down is disabled if the [`tabular`](https://www.overleaf.com/learn/latex/Tables#Creating_a_simple_table_in_LaTeX) [environment](https://learn.overleaf.com/learn/Environments) is not directly inside a [`table` environment](https://www.overleaf.com/learn/latex/Tables#Positioning_tables). This is demonstrated by the following example in which the `tabular` environment is directly inside a `center` environment.
{% endhint %}
```latex
\documentclass{article}
\usepackage{hologo} % for the XeTeX logo
\begin{document}
\begin{center}
\begin{tabular}{lcc}
\hline
\TeX{} engine&Year released&Native UTF-8\\
\hline
pdf\TeX&1996&No\\
\hologo{XeTeX}&2004&Yes\\
Lua\TeX&2007&Yes\\
LuaHB\TeX&2019&Yes\\
\hline
\end{tabular}
\end{center}
\end{document}
```
[Open this example in Overleaf and switch to Visual Editor.](https://www.overleaf.com/docs?engine=pdflatex\&snip_name=A+tabular+not+immediately+inside+a+table\&snip=%5Cdocumentclass%7Barticle%7D%0A%5Cusepackage%7Bhologo%7D+%25+for+the+XeTeX+logo%0A%5Cbegin%7Bdocument%7D%0A%5Cbegin%7Bcenter%7D%0A%5Cbegin%7Btabular%7D%7Blcc%7D%0A%5Chline%0A++++%5CTeX%7B%7D+engine%26Year+released%26Native+UTF-8%5C%5C%0A%5Chline%0A++++pdf%5CTeX%261996%26No%5C%5C+%0A++++%5Chologo%7BXeTeX%7D%262004%26Yes%5C%5C+%0A++++Lua%5CTeX%262007%26Yes%5C%5C%0A++++LuaHB%5CTeX%262019%26Yes%5C%5C+%0A%5Chline%0A%5Cend%7Btabular%7D%0A%5Cend%7Bcenter%7D%0A%5Cend%7Bdocument%7D)
If you open the code above in Overleaf then switch to Visual Editor, you’ll see the caption drop-down is greyed out (disabled):
""
## How to add borders to table cells
At the moment, **Visual Editor** provides basic support for borders, accessible from the borders drop-down menu which currently has three user-selectable options:
* **All borders**: All cells have a border.
* **No borders**: No cells have a border.
* **Booktabs**: A three-lined table.
A table inserted from the toolbar starts with the **No borders** option. If you [add borders using LaTeX code](#does-visual-editor-preview-borders-applied-using-latex-code), the button will display **Custom borders**.
## How to change the table’s label
1. Click on the default label text `tab:my_label.`
2. The LaTeX `\label` command is displayed.
3. Add your preferred label between the braces {...}.
The label text is an identifier used to reference this table elsewhere in your document. You can read more about using labels in our [article on cross-referencing](/writing-and-editing/inserting-images#labels-and-cross-references).
## How to change the alignment of a table column
Table columns can be right-, left-, or center-aligned. Follow these steps to change a column’s alignment:
1. [Select the column(s)](#how-to-select-one-or-more-columns-or-rows) whose alignment you want to change.
2. The alignment icon () becomes active.
3. Select the drop-down menu, then choose the preferred alignment: left, centered, or right.
4. The following screenshot shows how to right-align all cells in column 1 of a table:
# Set the width of table columns
Changes made to table column width settings will affect the *typeset table* only, not the *preview* provided by **Visual Editor**. You need to recompile your document to see the result of any changes made to column widths.
Follow these steps to set column width(s) to a fixed value, or allow the width(s) to vary according to the content in the column cells.
1. [Select the column(s)](#how-to-select-one-or-more-columns-or-rows) whose width you want to change. The column width icon ( ) is then enabled.
2. Select the drop-down menu:
Menu options showing the width options
3. Choose the preferred option for the selected column(s):
* **Stretch width to text:** this option allows the typeset column width(s) to be determined by the amount of content contained in the column's cells, e.g., the width of typeset text or mathematics.
* **Fixed width, wrap text**: sets the width of the column(s) to a fixed value which causes line breaking (text wrapping) within column cells. Selecting this option displays the Set column width window used to set fixed column width(s), as explained in the next section.
## How to set a fixed column width
The **Set column width** pop-up window provides a drop-down list containing three ways to set fixed column widths:
* As a percentage (%) of the current environment's line width: the table column widths might then vary according to where the table is used (see [example below](#example-using-percentage-of-line-width)).
* Using explicit widths expressed in units of millimeters (mm), centimeters (cm), [inches](https://en.wikipedia.org/wiki/Inch) (in) or [points](https://en.wikipedia.org/wiki/Point_\(typography\)) (pt).
* A **Custom** option using LaTeX commands to calculate the width ([see example below](#example-using-custom-commands)).
The following image shows how **Visual Editor** uses a small icon to indicate columns with a fixed width. You can edit the fixed-width setting by selecting (clicking) the icon to display the **Set column width** window.
### Example: using percentage of line width
The LaTeX command `\linewidth` holds the value of the current line width, which varies based on the document format, such as single-column or double-column layouts. Additionally, the value of `\linewidth` can change in specific environments, e.g., within a `minipage`.
This example uses the `multicol` package to typeset two identical tables with column widths set to `0.25\linewidth`. One table is typeset in a single-column section, the other in a two-column section, demonstrating how changes to `\linewidth` affects the table column widths.
```latex
\documentclass{article}
\usepackage{array}
\usepackage{multicol}
\begin{document}
\section{Section with a single column}
This part of the page is a single column with \verb|\linewidth|=\the\linewidth.\vskip12pt
\begin{tabular}{|p{0.25\linewidth}|p{0.25\linewidth}|}
\hline
A & B\\
\hline
C & D \\
\hline
\end{tabular}
\vskip12pt \noindent We now typeset the same table in a two-column section.
\begin{multicols}{2}
[
\section{Section with two columns}
]
Here, \verb|\linewidth|=\the\linewidth. The table column widths are smaller.
\begin{tabular}{|p{0.25\linewidth}|p{0.25\linewidth}|}
\hline
A & B\\
\hline
C & D \\
\hline
\end{tabular}
\end{multicols}
\end{document}
```
[Open this example in Overleaf and switch to Visual Editor.](https://www.overleaf.com/docs?engine=pdflatex\&snip_name=Using+line+width+to+set+table+column+widths\&snip=%5Cdocumentclass%7Barticle%7D%0A%5Cusepackage%7Barray%7D%0A%5Cusepackage%7Bmulticol%7D%0A%5Cbegin%7Bdocument%7D%0A%5Csection%7BSection+with+a+single+column%7D%0AThis+part+of+the+page+is+a+single+column+with+%5Cverb%7C%5Clinewidth%7C%3D%5Cthe%5Clinewidth.%5Cvskip12pt+%0A%0A%5Cbegin%7Btabular%7D%7B%7Cp%7B0.25%5Clinewidth%7D%7Cp%7B0.25%5Clinewidth%7D%7C%7D%0A%5Chline%0AA+%26+B%5C%5C%0A%5Chline%0AC+%26+D+%5C%5C%0A%5Chline%0A%5Cend%7Btabular%7D%0A%0A%5Cvskip12pt+%5Cnoindent+We+now+typeset+the+same+table+in+a+two-column+section.%0A%5Cbegin%7Bmulticols%7D%7B2%7D%0A%5B%0A%5Csection%7BSection+with+two+columns%7D%0A%5D%0AHere%2C+%5Cverb%7C%5Clinewidth%7C%3D%5Cthe%5Clinewidth.+The+table+column+widths+are+smaller.%0A%0A%5Cbegin%7Btabular%7D%7B%7Cp%7B0.25%5Clinewidth%7D%7Cp%7B0.25%5Clinewidth%7D%7C%7D%0A%5Chline%0AA+%26+B%5C%5C%0A%5Chline%0AC+%26+D+%5C%5C%0A%5Chline%0A%5Cend%7Btabular%7D%0A%5Cend%7Bmulticols%7D%0A%5Cend%7Bdocument%7D)
This example produces the following output:

### Example: using custom commands
The **Custom** option lets you set column widths using a wider range of units including [`em`, `ex` and `sp`](https://learn.overleaf.com/learn/Lengths_in_LaTeX) together with LaTeX commands—provided those commands produce a valid width value in units LaTeX understands.
The next example demonstrates just a few of the many ways you can use the **Custom** option to set column widths, including use of the units `em` and `ex`, simple arithmetic expressions and more advanced calculations using LaTeX commands. The`\dimexpr` ("dimension expression") command is used to perform arithmetic operations on LaTeX lengths (also called dimensions) using addition, subtraction, multiplication, or division. In essence, `\dimexpr` enables use of dynamically-calculated lengths, including the width of table columns.
```latex
\documentclass{article}
\usepackage{array}
\begin{document}
\newdimen\mydim
\mydim=1.25cm
\newcommand{\Acol}{\dimexpr 1cm + 0.1in + 3pt + 2.5mm\relax}
\newcommand{\Bcol}{0.1\linewidth}
\begin{itemize}
\item Width of column 1: 4em=\the\dimexpr 4em\relax
\item Width of column 2: 3ex=\the\dimexpr 3ex\relax
\item Width of column 3: \verb|\Acol| sets a width of \the\dimexpr 1cm + 0.1in + 3pt + 2.5mm\relax
\item Width of column 4: \verb|\Bcol| sets a width of \the\dimexpr0.1\linewidth\relax
\item Width of column 5: \verb|\dimexpr0.25\linewidth+2cm-\mydim\relax| sets a width of \the\dimexpr0.2\linewidth+2cm-\mydim\relax
\end{itemize}
\begin{table}
\centering
\caption{Using \LaTeX{} commands and units to set column widths}
\begin{tabular}{|p{4em}|p{3ex}|p{\Acol}|p{\Bcol}|p{\dimexpr0.2\linewidth+2cm-\mydim\relax}|}
\hline
A & B &C & D&E\\
\hline
F& G&H& I&J\\
\hline
\end{tabular}
\end{table}
\end{document}
```
[Open this example in Overleaf and switch to Visual Editor.](https://www.overleaf.com/docs?engine=pdflatex\&snip_name=Using+LaTeX+commands+to+set+table+column+widths\&snip=%5Cdocumentclass%7Barticle%7D%0A%5Cusepackage%7Barray%7D%0A%5Cbegin%7Bdocument%7D%0A%5Cnewdimen%5Cmydim%0A%5Cmydim%3D1.25cm%0A%5Cnewcommand%7B%5CAcol%7D%7B%5Cdimexpr+1cm+%2B+0.1in+%2B+3pt+%2B+2.5mm%5Crelax%7D%0A%5Cnewcommand%7B%5CBcol%7D%7B0.1%5Clinewidth%7D%0A%0A%5Cbegin%7Bitemize%7D%0A++++%5Citem+Width+of+column+1%3A+4em%3D%5Cthe%5Cdimexpr+4em%5Crelax%0A++++%5Citem+Width+of+column+2%3A+3ex%3D%5Cthe%5Cdimexpr+3ex%5Crelax%0A++++%5Citem+Width+of+column+3%3A+%5Cverb%7C%5CAcol%7C+sets+a+width+of+%5Cthe%5Cdimexpr+1cm+%2B+0.1in+%2B+3pt+%2B+2.5mm%5Crelax%0A++++%5Citem+Width+of+column+4%3A+%5Cverb%7C%5CBcol%7C+sets+a+width+of+%5Cthe%5Cdimexpr0.1%5Clinewidth%5Crelax%0A++++%5Citem+Width+of+column+5%3A+%5Cverb%7C%5Cdimexpr0.25%5Clinewidth%2B2cm-%5Cmydim%5Crelax%7C+sets+a+width+of+%5Cthe%5Cdimexpr0.2%5Clinewidth%2B2cm-%5Cmydim%5Crelax%0A%5Cend%7Bitemize%7D%0A%0A%5Cbegin%7Btable%7D%0A%5Ccentering%0A%5Ccaption%7BUsing+%5CLaTeX%7B%7D+commands+and+units+to+set+column+widths%7D%0A%5Cbegin%7Btabular%7D%7B%7Cp%7B4em%7D%7Cp%7B3ex%7D%7Cp%7B%5CAcol%7D%7Cp%7B%5CBcol%7D%7Cp%7B%5Cdimexpr0.2%5Clinewidth%2B2cm-%5Cmydim%5Crelax%7D%7C%7D%0A%5Chline%0AA+%26+B+%26C+%26+D%26E%5C%5C%0A%5Chline%0AF%26+G%26H%26+I%26J%5C%5C%0A%5Chline%0A%5Cend%7Btabular%7D%0A%5Cend%7Btable%7D%0A%5Cend%7Bdocument%7D)
This example produces the following output:

## How to change the alignment of a table cell
* The alignment of individual, *non-merged*, cells can’t be changed in **Visual Editor**.
* The content of *merged* cells can be aligned (see the section [Merging two or more cells in a table row](#merging-two-or-more-cells-in-a-table-row)).
## How to merge (or unmerge) table cells
Table cells can be merged horizontally, within a table *row*, but not vertically within a table column.
### Merging two or more cells in a table row
1. Select the cells you want to merge.
2. Select the **Merge cells** icon () to merge the cells.
3. Optionally, you can change the alignment of the merged cells.
### Unmerging two or more merged cells
1. Select the merged cell.
2. Select the **Merge cells** icon () to unmerge the cells.
The following video demonstrates merging three cells in a table row, changing alignment of the merged cell, and unmerging the cell content.
{% embed url="" %}
{% hint style="info" %}
All content contained in the merged cell is placed in the first cell of the unmerged set.
{% endhint %}
## How to delete a table row or column
1. [Select the rows or columns](#how-to-select-one-or-more-columns-or-rows) you want to delete.
2. Select the **Delete row or column** icon () to delete the selected rows or columns.
## How to add new rows or columns
The **Insert** button () lets you add one or more new rows or columns before or after a selected location.
If you want to insert *m* rows and *n* columns, select an *m* × *n* group of cells covering the locations where you want to insert those rows and columns.
**Example**: In the following screenshot, a 3 × 2 group of cells straddling 3 rows and 2 columns has been selected.
""
* Selecting provides the following options:
""
* You can now insert any of the following:
* 2 columns to the left of column 1
* 2 columns to the right of column 2
* 3 rows above row 1
* 3 rows below row 3
# Pasting tables into your project
You can copy and paste tables from webpages, word processors and spreadsheets into Overleaf.
## Pasting tables into your Overleaf project
**Visual Editor** can’t fully preserve the form and style of every table pasted into your project, but you can still save time and effort by pasting a wide range of tables created in other applications.
**Visual Editor** tries to preserve and preview the following table elements:
* horizontally merged cells (spanning multiple columns)
* borders applied to cells
* formatting of text within table cells
* table captions and headings
**Visual Editor** also lets you [modify the pasted table](/writing-and-editing/generating-and-inserting-tables#how-to-edit-or-customize-an-inserted-table), such as editing cell contents or adding rows and columns. You can also switch to **Code Editor** to make changes, including setting $$\LaTeX$$ parameters that control the table’s [position within the typeset document](/writing-and-editing/inserting-images#positioning).
# Inserting symbols
LaTeX provides many commands for mathematical and non-mathematical symbols. Please see [this article](https://www.overleaf.com/learn/latex/List_of_Greek_letters_and_math_symbols) for an overview of how you can insert symbols directly using LaTeX commands. To make it easier to find and insert the right LaTeX symbol command, Overleaf provides a Symbol Palette that allows you to choose from an array of commonly used symbols to insert.
## Using the Symbol Palette
The Symbol Palette is a [premium feature](/getting-started/free-and-premium-plans/premium-features). To open the Symbol Palette, click the **Ω** button, which is visible when using the Code Editor or Visual Editor:
{% embed url="" fullWidth="false" %}
The Symbol Palette will open at the bottom of the editor window.
The Overleaf Symbol Palette
To close the Symbol Palette, click the Ω button again, or use the X symbol located on the palette.
### Video demonstration
The Symbol Palette has a selection of commonly-used mathematical symbols you can browse or search by typing their name or an alias into the Search box. All symbols contained in the Symbol Palette are designed for use within mathematical content, which means they need to be inserted at a point where the LaTeX document compiler will be in *math mode.*
{% embed url="" %}
## Math mode
Symbols shown in the Symbol Palette should only be inserted into your document when LaTeX is in math mode, which means they must be enclosed within special math markup:
* To put your equation in *inline* mode, enclose it within the delimiters: `\( \)` or `$ $`. You can also place it within the `math` environment: `\begin{math} \end{math}`.
* To put your equation in *display* math mode, use either `\[ \]` or `\begin{equation} \end{equation}`.
This also applies to symbols such as subscripts (\_), integrals (`\int`), Greek letters (`\alpha`, `\beta`, `\delta`) and modifiers (`\vec{x}`, `\tilde{x}`).
If you’d like to learn more about math mode, we have a short explanation [here](https://www.overleaf.com/learn/latex/Mathematical_expressions#Mathematical_modes). For a more general overview of writing math in LaTeX , check out [Learn LaTeX in 30 minutes](https://www.overleaf.com/learn/latex/Learn_LaTeX_in_30_minutes)—in particular, the section [Adding math to LaTeX](https://www.overleaf.com/learn/latex/Learn_LaTeX_in_30_minutes#Adding_math_to_LaTeX).
If you add one of these symbols *outside* of math mode, you will see some errors when compiling your document. The error you will see depends on what else is in your document, but a common error triggered by math symbols used outside of math mode is [`Missing $ inserted`](https://www.overleaf.com/learn/latex/Errors/Missing_$_inserted).
## Required packages
Some symbols require you to use extra packages—if you hover on the symbol, the tooltip will tell you which package you need:
Symbol Palette advising need of a \LaTeX package
For example, in this case, to use the `\iint` symbol you need to make sure you have `\usepackage{amsmath}` in your document preamble, i.e., before the `\begin{document}` statement.
# Using Word Count
Overleaf's Word Count feature helps you track the size of your project
You can obtain a word count which automatically excludes the LaTeX commands by selecting **File** and then **Word Count** as demonstrated below:
\
This will run the [TeXcount](http://app.uio.no/ifi/texcount) utility to count the words in the project's main file and any files imported into your project's main file via `\include` and `\input`. Note that your project's main document must be on the project's top level (i.e. not within a folder) for TeXcount to work in Overleaf.
## Include references in the word count
By default, references, headers, captions, floats, displayed math, etc. are not included in the count. To include the citations and references:
1. Add `%TC:incbib` in your .tex file's preamble, and then
2. Add a file named `latexmkrc` (no file extension) in your project, with the following line in it:
{% hint style="warning" %}
Note that this workaround is only applicable if you are using a manual `thebibliography` list or BibTeX. [TeXcount does not currently support BibLaTeX](https://tex.stackexchange.com/q/102882/226).
{% endhint %}
See [#run-texcount-with-custom-parameters](#run-texcount-with-custom-parameters "mention") for showing word counts for headers, captions, floats, displayed math, etc.
## Ignoring some sections
At times, you may want to exclude certain sections or regions from the word count. You can place `%TC:ignore` and `%TC:endignore` around such regions. For example:
```latex
%TC:ignore
\maketitle
\begin{abstract}
...So the title page and abstract will not be word-counted...
\end{abstract}
%TC:endignore
```
## Run TeXcount with custom parameters
If you'd like to use your own set of [TeXcount parameters](http://app.uio.no/ifi/texcount/documentation.html) to customize the output, or to perform a character count, or to include captions etc, you can do so by defining a few commands in your project (though this involves using LaTeX commands). For example:
```latex
\usepackage{verbatim}
\newcommand{\detailtexcount}[1]{%
\immediate\write18{texcount -merge -sum -q #1.tex output.bbl > #1.wcdetail }%
\verbatiminput{#1.wcdetail}%
}
\newcommand{\quickwordcount}[1]{%
\immediate\write18{texcount -1 -sum -merge -q #1.tex output.bbl > #1-words.sum }%
\input{#1-words.sum} words%
}
\newcommand{\quickcharcount}[1]{%
\immediate\write18{texcount -1 -sum -merge -char -q #1.tex output.bbl > #1-chars.sum }%
\input{#1-chars.sum} characters (not including spaces)%
}
```
{% hint style="info" %}
Note that due to how the Overleaf build process is configured, you must include "output.bbl" in the TeXcount command for BibTeX-produced reference lists to be counted as well.
{% endhint %}
Assuming your file is named `main.tex`, invoking these commands in your project would then have the following output in the PDF. The output includes breakdown for each (sub)section, as well as for captions, floats, displayed equations, etc.
{% columns %}
{% column %}
```latex
% Don't count these!
%TC:ignore
\quickwordcount{main}
\quickcharcount{main}
\detailtexcount{main}
%TC:endignore
```
{% endcolumn %}
{% column %}
{% code title="Output displayed in PDF" %}
```
File: main.tex
Encoding: ascii
Sum count: 865
Words in text: 781
Words in headers: 66
Words outside text (captions, etc.): 11
Number of headers: 14
Number of floats/tables/figures: 2
Number of math inlines: 6
Number of math displayed: 1
Subcounts:
text+headers+captions (#headers/#floats/#inlines/#displayed)
2+3+0 (2/0/0/0) _top_
86+1+0 (1/0/0/0) Section: Introduction
0+5+0 (1/0/0/0) Section: Some examples to get started
49+6+0 (1/0/0/0) Subsection: How to create Sections and Subsections
111+4+8 (1/1/0/0) Subsection: How to include Figures
23+4+3 (1/1/0/0) Subsection: How to add Tables
122+7+0 (1/0/0/0) Subsection: How to add Comments and Track Changes
20+4+0 (1/0/0/0) Subsection: How to add Lists
37+4+0 (1/0/6/1) Subsection: How to write Mathematics
122+8+0 (1/0/0/0) Subsection: How to change the margins and paper size
81+10+0 (1/0/0/0) Subsection: How to change the document language and spell check settings
78+8+0 (1/0/0/0) Subsection: How to add Citations and a References List
50+2+0 (1/0/0/0) Subsection: Good luck!
File: output.bbl
Encoding: ascii
Sum count: 0
Words in text: 0
Words in headers: 0
Words outside text (captions, etc.): 0
Number of headers: 0
Number of floats/tables/figures: 0
Number of math inlines: 0
Number of math displayed: 0
```
{% endcode %}
{% endcolumn %}
{% endcolumns %}
See the [TeXcount documentation](http://app.uio.no/ifi/texcount/documentation.html#options) for what each runtime flag does. You can see these examples in action [here](https://www.overleaf.com/read/dqvrqghbtmbc).
{% hint style="info" %}
"Words in headers" and "headers" in the section-by-section breakdown is for `\section`, `\subsection`, etc. but excluding the numbers 1, 1.1, etc. "Word outside text" and "captions" in the section-by-section breakdown is for `\caption` but excluding the prefix "Table 1", etc.
{% endhint %}
By default, inline citations aren't counted. If you want to count them, add these lines to your preamble:
```latex
%TC:macro \cite [option:text,text]
%TC:macro \citep [option:text,text]
%TC:macro \citet [option:text,text]
% ... and for any other \cite commands you may use
```
{% hint style="info" %}
Note that each `\citep{ddd}` counts only as one word in TeXcount; otherwise, you can artificially bump up word counts tremendously by citing references with multiple authors.
So `\cite{faye1996}`, although rendered as "(Fay, 1996)", is counted as one word by TeXcount but two words by other word processors.
{% endhint %}
To include words in tabulars and tables in the "words in main text" count, you can [add these TeXcount instructions](https://tex.stackexchange.com/a/37777/226) as well:
```latex
%TC:group table 0 1
%TC:group tabular 1 1
```
## Using the `\import` command with TeXcount
By default, TeXcount recognises common commands like `\input` and `\include` for counting included subfiles. However, the command `\import` from the `import` package is not supported by default.
Therefore if you are using `\import` in your document, you may wish to use the more common `\input` and `\include` commands instead, and TeXcount will work without any further changes.
If you do prefer to continue using `\import`, you can add a TeXcount instruction in the preamble so that `\import{foo}{bar}` looks like `\include{foo/bar}` to TeXcount, so that it'll count the words in the subfiles:
```latex
%TC:fileinclude \import dir,file
```
{% hint style="warning" %}
Please note that you'll have to do a recompile first after adding this line, before clicking on "Word count".
{% endhint %}
[^1]: Change "main" to your main document file name.
# History and versioning
Sometimes you need to travel back in time.
The **History** feature lets you label and manage different versions of your project. You can view, download and compare project versions, restore previously deleted files, and see content added by collaborators at a glance.
## Using the full History feature
{% hint style="success" %}
Full Project History is a [premium feature](/getting-started/free-and-premium-plans/premium-features). For users on our free plan, the History panel will show edits made in the last 24 hours as well as any labeled versions.
{% endhint %}
The project owner needs to be on a premium subscription in order for them and their collaborators to access the full history.
## How to access a project’s history
Select the **History** icon , located above the preview panel, to access the History feature. You can then select:
* **All history** to view all available history versions.
* **Labels** to access the list of labels you have created.
### How to return to editing mode
To exit the History mode and return to normal editing mode, select the **Back to editor** button located in the top left.
### What happens to the history if you copy a project?
A [copied project](/managing-projects-and-files/copying-a-project) starts with a completely new, fresh history—the original project’s history is not copied to the new project.
## Downloading an older version of your project
When you download a project using the **Download as source (.zip)** option in the File menu, you are downloading the current version of the project. Sometimes you may wish to download an earlier version of the project.
To label or download a project version:
{% stepper %}
{% step %}
Switch to the **All history** view in History mode.
{% endstep %}
{% step %}
Select the three-dot menu within the version you wish to download.
{% endstep %}
{% step %}
Choose **Download this version**.
A `.zip` file containing your project files is generated and downloaded to your device.
{% endstep %}
{% endstepper %}
## Labeling a project version
Version labels allow you to identify key milestones in a project and make it easier to find those versions to compare them with other versions, download them, or restore the project to that particular state.
{% hint style="info" %}
The current version of a project is labeled **Current state**.
{% endhint %}
To label a project version:
{% stepper %}
{% step %}
Switch to the **All history** view.
{% endstep %}
{% step %}
Select the three-dot menu within the version you wish to label.
{% endstep %}
{% step %}
Choose **Label this version**.
{% endstep %}
{% step %}
Type the desired label into the pop-up window and select **Add label**.
{% hint style="success" %}
You can attach multiple labels to each project version.
{% endhint %}
{% endstep %}
{% endstepper %}
## Comparing versions
To select a range of versions to compare, use the icons , , or located on each project version. Noting that project versions are listed in chronological order, with the newest at the top and older versions lower down the list, these icons perform the following actions:
* : compare up to this version
* : compare from this version
* : compare up to this version **or** compare from this version
{% hint style="info" %} provides a drop-down menu offering either of the two options. This icon appears for versions in the middle of the current comparison range.
{% endhint %}
## How to restore a single file to a previous version
Follow these steps to restore a single file to a previous version. This process restores the file’s content, plus any comments and tracked changes, to the state it was in at the selected date and time.
{% stepper %}
{% step %}
Switch to the **All history** view.
{% endstep %}
{% step %}
Select the file version you wish to restore.
{% endstep %}
{% step %}
Select **Restore this version** to reinstate the file.
Steps to restore a file version
{% endstep %}
{% step %}
You are asked to confirm that you want to Restore this version of the chosen file. Select **Restore** to confirm.
Overleaf restores the file and switches your project out of History mode and back to editing mode.
{% endstep %}
{% endstepper %}
## Recovering deleted files
To recover a deleted file:
{% stepper %}
{% step %}
Switch to the **All history** view.
{% endstep %}
{% step %}
Select the project version in which the file was deleted.
{% endstep %}
{% step %}
Select the deleted file from the list of project files (it will be in ~~strikethrough~~).
{% endstep %}
{% step %}
Select **Restore this version** to recover the file.
Image showing how to restore a deleted project file using the new History user interface.
{% endstep %}
{% step %}
You are asked to confirm that you want to Restore this version of the chosen file. Select **Restore** to confirm.
Overleaf restores the file and switches your project out of History mode and back to editing mode.
{% endstep %}
{% endstepper %}
## Restoring an earlier version of the project
Follow these steps to restore an entire project to a previous version. This process restores the project’s content, plus any comments and tracked changes, to the state it was in at the selected date and time.
{% stepper %}
{% step %}
Switch to the **All history** view.
{% endstep %}
{% step %}
Select the three-dot menu within the project version you wish to restore.
{% endstep %}
{% step %}
Choose **Restore project to this version**.
How to restore an Overleaf project version
{% endstep %}
{% step %}
You are asked to confirm whether you want to restore the entire project to its state at the specified time and date—including any comments and tracked changes. Select **Restore** to confirm.
Overleaf restores your project, switches out of History mode and back to editing mode. You will need to select the file you want to continue editing.
{% endstep %}
{% endstepper %}
# Creating accessible PDFs in LaTeX
This page describes LaTeX accessibility in Overleaf and relevant considerations.
Over time, updates to standards and authoring tools have made it possible to produce accessible PDFs. Recent strides, including essential contributions from the [LaTeX Tagging Project](https://latex3.github.io/tagging-project/documentation/), now allow LaTeX-based PDFs to be accessible as well, and improvements continue to occur.
The approach described in this documentation is largely informed by the LaTeX Project's [accessible PDF instructions](https://latex3.github.io/tagging-project/documentation/usage-instructions), which you can refer to for more details on the following topics.
{% hint style="warning" %}
Note that implementing these practices doesn't guarantee that every element of your PDF is accessible—see this page's [FAQs section](#faqs) for more information.
{% endhint %}
## :tag: Tagging and `\DocumentMetadata`
In essence, PDF tagging is a process that automatically creates a "structure" that is easily identified by screen readers and is more searchable both now and in the future. It leverages the existing structure defined by your LaTeX code so the screen reader can differentiate between elements like headers, body text, figures, and equations.
Select [TeX Live 2025](https://www.overleaf.com/blog/tex-live-2025-is-now-available) or later as your project's TeX Live version so that the compiler recognizes the `tagging` and `tagging-setup` keys. [TeX Live 2026](https://www.overleaf.com/blog/tex-live-2026-is-now-available) provides even more functionality and support for accessible PDF generation using LaTeX, taking it out of prototype mode.
{% hint style="success" %}
You can [ensure your project is using TeX Live 2025 or later](/getting-started/recompiling-your-project/selecting-a-tex-live-version-and-latex-compiler) by adjusting your project settings.
{% endhint %}
{% content-ref url="/pages/LLoIafHebWRLy1O5PJaQ" %}
[Selecting a TeX Live version and LaTeX compiler](/getting-started/recompiling-your-project/selecting-a-tex-live-version-and-latex-compiler)
{% endcontent-ref %}
Add the `\DocumentMetadata` declaration before `\documentclass` to enable automated PDF tags. There are several important keys to this declaration that affect tagging capabilities: [`tagging`](#tagging-1) **,** [`tagging-setup`](#tagging-setup) **,** [`pdfstandard`](#pdfstandard) , and [`lang`](#lang).
### **`tagging`**
Ensure that tagging is enabled by setting the `tagging` key to `on`.
The setting `tagging=on` should be the standard setting on your document. It instructs LaTeX to produce a tagged PDF. Using the setting `tagging=draft` is appropriate for speeding up the compile on large projects before you produce the final PDF, as it performs the tagging logic but does not write the tags to the compiled PDF.
### **`tagging-setup`**
Configure how your document is tagged by changing the value of the `tagging-setup` key.
In this example, we used `math/setup=mathml-SE` for MathML Structure Elements (SE), but it can be set to any value that [`\tagpdfsetup`](https://ctan.math.washington.edu/tex-archive/macros/latex/contrib/tagpdf/tagpdf.pdf) supports as long as it fulfills the tagging requirements of your document.
MathML SE tagging requires LuaLaTeX. If you aren't using LuaLaTeX (or if the automatically generated MathML needs to be altered), you can use the Associated File (AF) method using the key-value pair `tagging-setup={math/setup=mathml-AF}` , and provide the file containing the MathML. In Overleaf, if you enable the `mathml-AF` option, the generated MathML files will be available in the [Other logs and files](/) of your project.
Please see the[ LaTeX tagging project documentation](https://latex3.github.io/tagging-project/documentation/usage-instructions) for more information on using the Associated File method. Furthermore, [this paper](https://www.latex-project.org/publications/2025-FMi-DPC-UFi-JAW-DocEng2025-MathML-and-other-XML.pdf) details technical considerations of using MathML to produce accessible mathematical documents.
### `pdfstandard`
Tell the compiler which PDF standard you are targeting using the `pdfstandard` key. The recommended value here is `pdfstandard=ua-2` (the [PDF/UA-2](https://pdfa.org/iso-14289-2-pdfua-2/) or [ISO 14289-2](https://www.iso.org/standard/82278.html) standard).
There are several different PDF standards, but PDF/UA-2 (PDF 2.0 for Universal Accessibility) directly supports MathML. Generating a valid PDF/UA-2 document is the provides the key technical conditions to meet the PDF-specific criteria of [WCAG](https://www.w3.org/WAI/standards-guidelines/wcag/).
Some older PDF readers may not support PDF 2.0, and the UA-1 version that is supported by PDF 1.7 may be required.
### `lang`
Tell screen readers how to pronounce the text in your document using the `lang` key. The default value is `en-US` , and if not set, your document may not be accessible to screen reader users. Note that this setting only affects PDF metadata and does not influence the language used in your document for generated text or hyphenation.
The valid settings for lang are standard [BCP 47 language tags](https://developer.mozilla.org/en-US/docs/Glossary/BCP_47_language_tag): either codes like `en` (English), `de` (German), or `fr` (French), or the regional variations such as `en-GB` (British English), or `de-DE` (German as used in Germany).
## :text-size: Descriptions
In addition to automatic tagging, you may also need to also add descriptions of the content of the elements, particularly if your document contains [images](#images) and/or [tables](#tables).
### :image: Images
Adding vital descriptions to images in Overleaf help with understanding the context of those images when referencing the LaTeX code. Each instance of `\includegraphics` should have an associated image description option and value.
There are three types of accessible images: images that require [alternative (alt) text](#alt-text), [artifacts](#artifacts), and images that correspond to [actual text](#actual-text).
#### **Alt text**
Adding alternative text to images ensures that the photo has a description that can be used as a text-based substitute to the visual. Use the `alt` key and input a text value.
#### **Artifacts**
If an image doesn't need to be picked up by a screen reader (i.e., if it's purely decoration), mark the image as an artifact. Use the `artifact` option without assigning a value.
#### **Actual text**
If an image is a solely a picture of a Unicode character, then include the text-based character. Use the `actualtext` key and assign it a single character value (without brackets).
### :table: Tables
While tables usually have text associated with them, it's still important that the text is associated with the correct aspects of the table. Add `\tagpdfsetup` to describe the table structure before your `tabular`. If your tables have common tagging requirements, this can placed in the preamble of your document. There are two main types of tables to distinguish for accessibility: [data tables](#data-tables) and [presentation tables](#presentation-tables).
#### **Data tables**
If a table has at least one header row, then designate which rows are the header rows. Use the `table/header-rows` key and provide for the value a series of numbers that correspond with the locations of the header rows.
#### **Presentation tables**
If a table is not meant to be interpreted as a table by a screen reader, then mark it as a presentation table. Set the `table/tagging` key to `presentation`.
## :square-check: Best practices
Following the instructions for producing tagged PDFs are an essential part of creating an accessible PDFs but are not on their own sufficient.
As described above, proper document metadata must be provided using the `\DocumentMetadata` command. All meaningful images must include a text description, any decorative images should be marked as artifacts. Data table structure should be as simple as possible, and have headers indicated, and any structural tables should be identified.
In addition, observing the following guidelines can help ensure that your LaTeX document is accessible.
### Create structure using standard commands
A document can't be accessible if visual formatting is used to imply structure.
* **Inaccessible**: `\textbf{\Large 1. Introduction}` (Just big bold text with no semantics).
* **Accessible**: `\section{Introduction}` (This creates a navigation point and a heading tag).
Screen readers use the "Heading Tree" to navigate. If you don't create actual headings, the user can't jump to sections.
### Fix all LaTeX errors
By default, the Overleaf compiler runs in non-stop mode, in which the compiler will attempt to continue working to produce a PDF even if errors are encountered. To produce proper PDF output, all LaTeX errors must be addressed. Please see: [Fixing LaTeX errors](/troubleshooting-and-support/fixing-latex-errors).
### Enable MathML for mathematics
Setting the `math/setup` key to the value `mathml-SE` in the `\DocumentMetadata` block [described above](#tagging-setup) instructs LaTeX to use MathML to tag mathematics in the document. It is essential to use this method, rather than other alternatives which also might seem reasonable.
In order to pass an accessibility checker, authors may be tempted to tag an equation as a figure, and add a textual description. The alt-text that some PDF tools or outdated LaTeX packages can allow you to add to mathematics will not convey mathematical structure or meaning, however.
Enabling MathML provides a structured representation of the mathematics in your document and is an essential part of making any document that contains mathematics accessible.
### Load the `unicode-math` package
The package [`unicode-math`](https://texdoc.org/serve/unicode-math/0) maps LaTeX commands for mathematical characters to the [Unicode Mathematical Alphanumeric Symbols block](https://en.wikipedia.org/wiki/Mathematical_Alphanumeric_Symbols). This helps ensure that the the intended meaning of mathematical symbols are conveyed, rather than just their appearance.
### Avoid forced vertical whitespace
Attempts to alter the layout of text and especially mathematics can cause problems. Refrain from adding blank lines or `\par` commands in math expressions, and refrain from adding redundant line ends (`\\`).\
\
When a document is tagged, paragraphs is considered a cohesive and logical container of text. If you force a line break `\\` to change the appearance of the text (e.g., to make a line look shorter), you are inserting a visual instruction will affect the logical structure that the tags are attempting to describe. This may impact the reading flow and order provided by assistive technology that is relying on the tagging information.
If blank lines are left inside an equation, LaTeX will often throw a compilation error. In some cases, this may still produce a seemingly correct PDF if the compilation is running in non-stop mode. As mentioned above, PDFs produced with errors will not have an intact tagging structure; all errors must be resolved in order to produce an accessible PDF.
### Follow up-to-date instructions
There are some packages, such as the [`accessibility`](https://ctan.org/pkg/accessibility) package that are still distributed in TeX Live and referenced in some online instructions that are no longer valid or maintained. When in doubt, please check the [LaTeX Tagged PDF Project instructions](https://latex3.github.io/tagging-project/).
### Be aware that not all packages support tagging
To help ensure that your document is well tagged, compare the list of packages that you import in your document preamble and the LaTeX Tagging Project's list of [compatible packages](https://latex3.github.io/tagging-project/tagging-status/).\
\
In general, packages that alter document structure, create complex layouts, or draw text are possible sources of incompatibilities and should be checked for tagging support.
## :building-columns: Regulations and standards
### Regulations
Many LaTeX users, especially in education and government, are explicitly required to make the documents they produce for teaching and publication accessible.
* **In the United States:** The Department of Justice (DOJ) recently updated ADA Title II (April 2024), mandating that state and local governments (including public universities and schools) ensure their digital content meets WCAG 2.1 Level AA standards by April 2026 (or 2027 for smaller entities). Additionally, Section 504 applies similar requirements to any institution receiving federal funding.
* **In Europe**: The European Accessibility Act (EAA) and standard EN 301 549 require digital products and services to be accessible, effective June 2025.
### Standards
While there are many PDF standards, **PDF/UA** (Universal Accessibility) is the standard for producing documents compatible with assistive technology. This is distinct from **PDF/A** (Archiving), which focuses on long-term archiving and does not strictly require accessibility features.
For accessibility compliance, two versions of the PDF/UA standard are relevant:
* **PDF/UA-1**: An early accessibility standard (ISO 14289-1) for PDFs. PDF/UA-1 addresses accessibility for older PDF versions (PDF 1.7) and remains relevant because some legacy software tools and validators may only support this version.
* **PDF/UA-2**: The current accessibility standard (ISO 14289-2) for PDFs. It supports modern PDF features (PDF 2.0), offering significantly better capabilities for complex content, such as mathematics.
{% hint style="success" %}
**PDF/UA-2** incorporates the requirements of **WCAG 2.1**, providing the technical foundation for meeting WCAG accessibility mandates for PDFs.
{% endhint %}
## :code: HTML output options
For some institutions and users, HTML is the preferred format for accessibility because it naturally responds to various sizes of screens and integrates well with web-based assistive technologies. There are a number of options for obtaining an HTML output from a LaTeX source.
### Tagging can still be helpful
Even if your ultimate goal is to produce HTML, we recommend following the [LaTeX tagging instructions](#tagging-and-documentmetadata) outlined in this guide. The steps followed to produce a valid tagged PDF, such as using semantic structure, adding alternative text to images, and utilizing proper table headers, produces higher quality and more accessible LaTeX source.
### Conversion workflows
While Overleaf focuses on PDF generation, the platform supports workflows for users who need to generate HTML.
#### PDF to HTML
By using the LaTeX tagging features to produce a high-quality, well-structured PDF, you can often use third-party tools to successfully convert that PDF into accessible HTML.
There is an [ISO standard](https://pdfa.org/resource/deriving-html-from-pdf/) for converting PDF to HTML that many tools implement. A recommended tool for PDF to HTML is [ngPDF](https://ngpdf.com/).
#### LaTeX to HTML
Users can utilize external tools (such as [LaTeXML](https://math.nist.gov/~BMiller/LaTeXML/) or [BookML](https://vlmantova.github.io/bookml/)) to generate HTML directly from LaTeX source code.
While these HTML conversion tools are not currently built into the Overleaf compiler, you can connect your project to GitHub using [Overleaf’s GitHub Synchronization](/integrations-and-add-ons/git-integration-and-github-synchronization) feature to set up automated external workflows that handle this conversion.
## :comments-question: FAQs Are there any tools that can help verify that my document is accessible?
Yes, there are several external tools, including [veraPDF](https://verapdf.org/), that can validate PDF/A parts and conformance levels. You can also inspect the tagged structure of your PDF using [ngPDF](https://ngpdf.com/). Whichever tool you decide to use, ensure that the tool understands tagged PDFs.
Additionally, there are other external tools for more targeted accessibility checks. For example, [WebAIM](https://webaim.org/) calculates the contrast ratio between two colors, which can be helpful for infographics.
{% hint style="warning" %}
Note that [Canvas's accessibility checker](https://community.instructure.com/en/kb/articles/662936-how-do-i-use-the-accessibility-checker-in-the-rich-content-editor?utm_source=community-search\&utm_medium=organic-search\&utm_term=accessibility+checker) doesn't appropriately apply checks to documents created outside of their editor, including documents created using LaTeX. It may flag an accessible document as inaccessible.
{% endhint %}
{% hint style="info" %}
In addition, consider the *content* of items such as alt text or headings, which can't always be verified as sufficient by an accessibility checker.
{% endhint %}
Are the packages in my Overleaf project compatible with these features?
It is a best practice to check the packages used in your project with those that have been tested against the LaTeX tagging features. You can refer to the LaTeX Tagging Project's [packages status list](https://latex3.github.io/tagging-project/tagging-status/) for an assessement of the status of most common packages.
Can I still use beamer? Are there other packages available for presentations?
Unfortunately, the `beamer` class is not compatible with PDF tagging. The experimental [`ltx-talk` class](https://ctan.org/pkg/ltx-talk) is intended to be a replacement for beamer that is built with tagging support as a core requirement.
The `ltx-talk class` requires a more recent version of TeX Live 2025 than what is provided by default by Overleaf, so to use this package, you would need to use TeX Live 2026, or use the "rolling TeX Live" image provided through [Overleaf Labs](https://www.overleaf.com/labs/participate).
Is the Overleaf editor accessible?
As a web application, Overleaf leverages the accessibility features and functionality of modern web browsers which are regularly assessed by accessibility experts. Our latest completed [Voluntary Product Accessibility Template (VPAT)](https://www.overleaf.com/for/customers/vpat) shows conformance with Web Content Accessibility Guidelines (WCAG) 2.2 Level AA.
Can PDFs produced by Overleaf satisfy the requirements of Title II of the Americans with Disability Act (ADA) and the harmonized European Standard for accessibility (EN 301 549)?
Yes. Legislation in the United States and Europe requires that PDFs meet WCAG 2.1 AA. To meet WCAG 2.1 AA, a PDF must be a tagged PDF. Making use of the support for PDF tagging that is provided in TeX Live 2025 is an important step towards producing accessible documents that are compliant with these regulations.\
\
However, as mentioned above, it is not sufficient to simply compile with TeX Live 2025 or later and enable the LaTeX tagging support to produce either compliant or truly accessible documents. We recommend following the instructions and best practices outlined here, as well as making accessibility a primary consideration throughout your writing process.\
\
Please note also that local and institutional accessibility guidelines and recommendations should be considered, and that testing and validation results may vary depending on the tools used.
Where can I select the most recent version of TeX Live?
Most PDF tagging features are available in the standard [TeX Live 2025](https://www.overleaf.com/blog/tex-live-2025-is-now-available) image, and there are more features in [TeX Live 2026](https://www.overleaf.com/blog/tex-live-2026-is-now-available).\
\
You can get the latest in [Overleaf Labs](https://www.overleaf.com/labs/participate), which provides access to the "rolling TeX Live" image in Overleaf, including the latest in PDF tagging support. This experimental TeX Live version is primarily for testing changes to TeX Live, packages, and previewing new accessibility features before they’re compiled into our annual TeX Live release.\
\
To get the latest fixes provided by the LaTeX team with respect to automatic MathML tagging, you should include a custom `latexmkrc` file with a `$lualatex = 'lualatex-dev';` rule. See [The latexmkrc file](/managing-projects-and-files/the-latexmkrc-file).
How do I switch my compiler to LuaLaTeX?
While the default compiler in Overleaf is pdfLaTeX, you can [switch to LuaLaTeX in your project settings](/getting-started/recompiling-your-project/selecting-a-tex-live-version-and-latex-compiler). LuaLaTeX is the LaTeX compilation engine that is recommended by the LaTeX tagging project team.
[^1]: Automatic tagging is enabled.
[^2]: Tagging configuration is set. mathml-SE\[^10] requires the LuaLaTeX compiler.
[^3]: PDF ISO standard is set.
[^4]: Metadata language is set.
[^5]: Image has alternative text.
[^6]: Image is an artifact.
[^7]: Image is a character.
[^8]: Table has one header row.
[^9]: Table is a presentation table.
# Managing projects and files
Overleaf allows you to take control of your projects through various organizational features:
{% columns %}
{% column %}
{% content-ref url="/pages/F1dQGWI8RWKmVmuxs2zB" %}
[Renaming a project](/managing-projects-and-files/renaming-a-project)
{% endcontent-ref %}
{% content-ref url="/pages/GM7bq2dGQbO86medzdnN" %}
[Copying a project](/managing-projects-and-files/copying-a-project)
{% endcontent-ref %}
{% content-ref url="/pages/sN4pP9NcEt8dnaqFT3sD" %}
[Uploading a project](/managing-projects-and-files/uploading-a-project)
{% endcontent-ref %}
{% content-ref url="/pages/PCzmp6YE9NdQby4IDmLO" %}
[Downloading a project](/managing-projects-and-files/downloading-a-project)
{% endcontent-ref %}
{% content-ref url="/pages/QcNfAkmPRqzkgDnZpHvY" %}
[Archiving, deleting, and leaving projects](/managing-projects-and-files/archiving-deleting-and-leaving-projects)
{% endcontent-ref %}
{% endcolumn %}
{% column %}
{% content-ref url="/pages/O7Cyh9okNWwRHOqkS62K" %}
[Organizing projects with tags](/managing-projects-and-files/organizing-projects-with-tags)
{% endcontent-ref %}
{% content-ref url="/pages/pbhE7ci5wzq8czVUZwrX" %}
[Adding files to a project](/managing-projects-and-files/adding-files-to-a-project)
{% endcontent-ref %}
{% content-ref url="/pages/onfeCRWrlISkRk7THzhQ" %}
[The latexmkrc file](/managing-projects-and-files/the-latexmkrc-file)
{% endcontent-ref %}
{% content-ref url="/pages/7aB55uhrGzbCP1PYeEW6" %}
[Adding LaTeX dependencies](/managing-projects-and-files/adding-latex-dependencies)
{% endcontent-ref %}
{% endcolumn %}
{% endcolumns %}
# Renaming a project
There are two ways to rename an Overleaf project:
1. [#from-the-project-dashboard](#from-the-project-dashboard "mention")
2. [#from-within-the-project](#from-within-the-project "mention")
## From the project dashboard
You can select the project in your project dashboard, and then go to **More** > **Rename** above the project list.
## From within the project
Alternatively, if you're currently working on a project, you can click the project name at the top of the editor and the select **Rename** in the dropdown menu that appears:
{% hint style="warning" %}
Note that only the project's owner can change its name.
{% endhint %}
# Copying a project
There are two ways to copy an Overleaf project:
1. [#from-the-project-dashboard](#from-the-project-dashboard "mention")
2. [#from-within-the-project](#from-within-the-project "mention")
Default settings of copied projects
Overleaf applies the following settings to copies of an existing project:
* A copied project will be owned by whoever creates that copy, even if the original was owned and shared by another user.
* Collaborators in the original project are not transferred to the copy.
* Link-sharing will be turned off in the copied project.
* History, Tracked Changes, Comments, and Chat will be empty in the copied project.
* Tags applied to the original project are removed from the copy.
* The copied project will use Overleaf’s most recent version of TeX Live.
{% hint style="info" %}
**Notes on the TeX Live version used by copied projects**
When making a copy of an older project there is always a small risk that the copied project might not compile correctly with Overleaf's most current version of TeX Live—for example, due to changes in the LaTeX packages. You can [switch to an older TeX Live version](/getting-started/recompiling-your-project/selecting-a-tex-live-version-and-latex-compiler) of the copied project to resolve this.
{% endhint %}
## From the project dashboard
{% stepper %}
{% step %}
Within the projects list page (view), locate the project you want to copy.
{% endstep %}
{% step %}
Select the small check box to the left of the project's title. A button labeled **More** will appear.
{% endstep %}
{% step %}
Select the **More** button to display a drop-down menu, then select **Make a copy**:
{% endstep %}
{% step %}
Use the **Copy Project** pop-up window to name the copied project (a default name is suggested):
{% endstep %}
{% step %}
After you have named the project, select **Copy**. The copied project will then appear in your projects list.
{% endstep %}
{% endstepper %}
## From within the project
{% stepper %}
{% step %}
Open the project you wish to copy. Go to **File** > **Make a copy**.
{% endstep %}
{% step %}
{% endstep %}
{% step %}
Use the Copy Project modal to name the copied project (a default name is suggested):
{% endstep %}
{% step %}
After you have named the project, select **Copy**. This will also automatically open the copied project.
{% endstep %}
{% endstepper %}
# Uploading a project
This page goes over how to create a new project from a .zip file and some common troubleshooting steps.
If you have a set of LaTeX files on a local machine, you can upload the entire set to create an Overleaf project. Local LaTeX documents that require multiple files (.tex, .bib, image files, and others) can be zipped and uploaded to Overleaf to create a project.
{% hint style="info" %}
For details on uploading `.docx` or `.md` files please see [Importing and exporting files](/managing-projects-and-files/importing-and-exporting-files). For importing from GitHub please refer to [Creating a new Overleaf project from a GitHub repository](/integrations-and-add-ons/git-integration-and-github-synchronization/github-synchronization#creating-a-new-overleaf-project-from-a-github-repository).
{% endhint %}
## How to upload a project
{% stepper %}
{% step %}
In the project dashboard, click the **New project** button above the projects list on the right side.
{% endstep %}
{% step %}
Select the **Existing project (.zip)** option in the dropdown menu:
{% endstep %}
{% step %}
Drag or select a `.zip` file within the **Upload Zipped Project** modal:
{% endstep %}
{% step %}
If the upload is successful, the project will open in Overleaf.
{% endstep %}
{% endstepper %}
## Uploading large projects
If you plan to upload large projects, here are some Overleaf resource limits/restrictions you need to be aware of:
* You cannot upload individual files which exceed 50 MB.
* Each upload can contain up to 180 files—if you attempt to upload more than that, only 180 files will be uploaded.
* Each Overleaf project cannot contain more than 2000 individual files.
If your project’s `.zip` file exceeds 50 MB you can try this:
* Upload a subset of your files in a `.zip` file (just to create the project).
* Manually upload the remaining files.
For a `.zip` file to upload properly:
* It should contain only file types that a LaTeX compiler can process: plain text files and images in `.eps`, `.pdf`, `.svg` and `.png` formats.
* It cannot contain more than 7 MB of material that can be edited on Overleaf (this is the maximum editable data for a project on Overleaf). For further information, please refer to [this page](/getting-started/free-and-premium-plans/plan-limits#overleaf-plan-limits).
## Troubleshooting project upload issues
If a project that compiles on your local machine fails to compile when uploaded to Overleaf, there are a few things you should check before moving on to general LaTeX troubleshooting.
### Ensure that your compiler is the right type for your project
By default, the compiler will be set to be **pdfLaTeX.** Some projects and templates may require the use of another compiler type (**LaTeX**, **LuaLaTeX** or **XeLaTeX**). [Selecting a TeX Live version and LaTeX compiler](/getting-started/recompiling-your-project/selecting-a-tex-live-version-and-latex-compiler)
### Check that your project's TeX Live version is compatible with your LaTeX code
When you create a new project in Overleaf, the TeX Live version will be set to the latest available version. Some projects and templates may require the use of an older version of TeX Live. [Selecting a TeX Live version and LaTeX compiler](/getting-started/recompiling-your-project/selecting-a-tex-live-version-and-latex-compiler)
### Select the correct main document
Overleaf will attempt to automatically detect the main document, but you should check that the correct `.tex` file has been designated as the main document. [The Main document](/getting-started/recompiling-your-project/the-main-document)
### If all files (including your main document) are in a top-level folder, move them out
Sometimes all the files in a zip are under a top-level folder, which can cause problems for Overleaf's compile process. If all your files are in a folder, move the files (and subfolders) out so that your main document is not in a folder. [The Main document](/getting-started/recompiling-your-project/the-main-document)
### If you are still seeing errors
If your project is using the right compiler, a compatible TeX Live version, and has a correctly specified main document that is not in a folder, you'll have to take a closer look at any remaining errors that are being reported in order to identify the problem that is occurring. [Fixing LaTeX errors](/troubleshooting-and-support/fixing-latex-errors)
# Importing and exporting files
You can import Word documents and Markdown files into Overleaf, and export your project to either of those formats or HTML.
{% hint style="info" %}
Conversion in both directions uses [Pandoc](https://pandoc.org/). All standard Pandoc limitations apply — complex formatting may not convert exactly. Review your project after importing or exporting.
{% endhint %}
## Importing
Automatically import a document you've been working on elsewhere through the **New project** menu.
{% columns %}
{% column width="58.333333333333336%" %}
You can create a new Overleaf project from a `.docx` or `.md` file.
1. From the project dashboard, select **New project**.
2. Under the **Import** options select Word document (`.docx`), Markdown document (`.md`) file.
Overleaf then imports the file, converts it to LaTeX (using [Pandoc](https://pandoc.org/)), and opens it as a new project.
{% hint style="info" %}
You may need to edit styling, particularly for tables, figures, and citations. For more on limitations see [What conversions can and can't do](#what-conversions-can-and-cant-do) below.
{% endhint %}
{% endcolumn %}
{% column width="41.666666666666664%" %}
{% endcolumn %}
{% endcolumns %}
### Importing Equations
While styling might not pull through exactly, the equation conversion can be quite robust and save a lot of manual work. We recommend you review [Pandoc's Math User Guide](https://pandoc.org/MANUAL.html#math), but here's a simple example.
{% tabs %}
{% tab title="Word" icon="file-word" %}
Word uses Office Math Markup Language ([OMML](https://learn.microsoft.com/en-us/dotnet/api/documentformat.openxml.math.officemath?view=openxml-3.0.1)) to create equations. Because of its rigidly defined rules, Pandoc can map this to LaTeX. For example:
const euler = new OfficeMath({
  children: [
    new MathSuperScript({ children: [new MathRun('e')], superScript: [new MathRun('iπ')] }),
    new MathRun(' + 1 = 0')
  ]
});
And displays like so in the PDF:
{% endtab %}
{% tab title="Markdown" icon="markdown" %}
Pandoc expects [Tex math notation](https://www.overleaf.com/learn/latex/Mathematical_expressions) from Markdown with the delimiter `$_$` (for in-line math) or `$$_$$` (for display style). For example:
$e^{iπ}+1=0$
Pandoc converts to LaTeX (and sets the compiler to LuaLaTeX to handle the pi symbol):
\(e^{iπ}+1=0\)
Renders to the PDF:
{% endtab %}
{% endtabs %}
## Exporting
You can export your project through the File menu. We use [Pandoc](https://pandoc.org/) to convert your LaTeX code to the nearest equivalent `.docx`, `.md`, or `.html`.
### Export Options
1. In the editor, select **File**.
2. Select **Download** > **Export as Word (.docx)**, **Export as Markdown (.md)**, or **Export as HTML (.html)**.
3. The file will be saved to your Downloads folder.
### What conversions can and can't do
Pandoc is a general-purpose document converter. It understands document *structure*—headings, paragraphs, lists, figures, citations—but it does not recreate visual *styling*. Converting from LaTeX to Word, for example, produces a document with correct structure but without your LaTeX document class, custom packages, or typographic styling.
Think of conversion as a way to share your *content* with collaborators who don't use LaTeX, not as a way to produce a print-ready Word document.
### Before you export: fix your LaTeX errors
The most common reason a conversion fails—especially export to Word—is that the project has unresolved LaTeX errors.
To check for errors, look for a **red notification badge** next to the **Recompile** button. If you see one, your project has compile errors that need to be fixed before a conversion will succeed.
To resolve errors:
1. Select the red badge to open the error log.
2. Select each error to jump to the relevant line in the Code Editor.
3. Fix the error, then recompile.
For help understanding specific error messages, see [Fixing LaTeX errors](https://docs.overleaf.com/troubleshooting-and-support/fixing-latex-errors) and the [LaTeX errors reference](https://www.overleaf.com/learn/latex/Errors). Searching for the exact text of an error message online often finds helpful explanations.
Once all errors are resolved, try the conversion again.
{% hint style="info" %}
Even LaTeX *warnings* can sometimes cause conversion failures. Check the log panel for warnings too, particularly around `\cite` commands and unclosed braces.
{% endhint %}
## Common issues and how to address them
Running into trouble? Check these FAQs.
The conversion fails with an error message
**What you see:** An error notification appears after you attempt to export or import. The error message may include a description of what went wrong.
**Why it happens:** Pandoc cannot process every valid LaTeX document. Some packages, macros, or document structures are not supported. LaTeX compile errors in the project are also a very common cause.
**What to do:**
1. First, make sure your project has no LaTeX errors (see [Before you export](https://app.gitbook.com/o/gVTOSUMkBnf8EicljJzB/s/VetOkhFZmAC8QCQK0Pi7/~/edit/~/changes/272/managing-projects-and-files/importing-and-exporting-files/~/comments#before-you-convert-fix-your-latex-errors) above).
2. Check the error message shown after the failed conversion for clues about what caused the problem.
3. If the error mentions a specific file not being found (such as a `.bib` file), see Bibliography files in subfolders below.
4. If you cannot resolve the issue, there are alternative conversion tools available:
* Open the exported PDF in a recent version of Microsoft Word, which can attempt to convert it to .docx.
* Open the PDF in Adobe Acrobat and use its Export to Word function.
* Use an online converter such as [GrindEQ](http://www.grindeq.com/) or [CloudConvert](https://cloudconvert.com/).
The exported Word file is missing citations and references
**What you see:** `\cite` commands in your LaTeX source appear as placeholder text or disappear entirely in the Word output. The bibliography section is missing.
**Why it happens:** Pandoc needs access to your `.bib` file and needs to process bibliography commands to render citations. If the `.bib` file cannot be found, or if the project has bibliography-related errors, citations are dropped.
**What to do:**
* Make sure your project compiles successfully before exporting. A successful PDF compile confirms that bibliography processing is working correctly.
* If your `.bib` file is in a subfolder, see Bibliography files in subfolders below.
* Avoid using `\cite` commands without braces (e.g. write `\cite{key}`, not `\cite key`). The latter may produce only a warning in LaTeX but can break the Pandoc conversion entirely.
Bibliography files in subfolders
**What you see:** Export fails with an error message containing `File references.bib not found in resource path` (or similar for your own `.bib` filename).
**Why it happens:** Pandoc looks for bibliography files relative to the project root. If your `.bib` file lives in a subfolder, Pandoc cannot find it using a bare filename.
**What to do:**
Update your `\addbibresource` command to include the full relative path to the file. For example, if your `.bib` file is in a folder called `Chapter_1`:
```latex
% Before
\addbibresource{references.bib}
% After
\addbibresource{Chapter_1/references.bib}
```
After making this change, recompile to confirm it still works, then retry the export.
Images are missing from the exported Word file
**What you see:** Images appear in your Overleaf PDF but are absent or broken in the exported `.docx` file.
**Why it happens:** Pandoc resolves image paths relative to the project root. If images are stored in subfolders, or if your project uses `\graphicspath{}` to set an image directory, Pandoc may not be able to locate them.
**What to do:**
* If possible, move image files to the project root and update your `\includegraphics` commands accordingly.
* If you use `\graphicspath{}`, try removing it and using explicit relative paths in each `\includegraphics` call instead. For example:
```latex
% Instead of \graphicspath{{figures/}} and \includegraphics{my-chart}
\includegraphics{figures/my-chart}
```
* If images are in deeply nested folders, consider restructuring the project to keep files at the top level.
Exported Markdown has broken image paths
**What you see:** You export your project as Markdown and the image references in the `.md` file point to incorrect paths, so images don't display.
**Why it happens:** When images are stored in subfolders within an Overleaf project, the exported Markdown file may not correctly reflect the relative paths needed to find them.
**What to do:** After exporting, open the `.md` file and manually correct the image paths to match the actual file locations in the exported `.zip`. Alternatively, move your image files to the project root before exporting.
Tables lose formatting in the exported Word file
**What you see:** Tables in your Word export are missing borders, have broken column widths, or need to be rebuilt from scratch.
**Why it happens:** LaTeX table environments (like `tabular`, `longtable`, and those using packages like `booktabs`) use a richer structural model than Word tables. Pandoc converts the basic structure but cannot replicate all visual styling, borders, or cell-level formatting.
**What to do:**
* For tables that are important for your collaborators to work with, plan to rebuild or reformat them in Word after export.
* Keep table code in your LaTeX source as straightforward as possible. Highly custom tables using advanced packages are less likely to convert cleanly.
* Merged cells and multi-page tables in particular do not convert reliably.
Page formatting isn't preserved when importing from Word
**What you see:** After importing a Word document into Overleaf, the resulting LaTeX file does not match the original margins, font sizes, line spacing, or page layout.
**Why it happens:** Word's visual page layout is controlled by its own settings (margins, styles, themes), while LaTeX controls layout through document classes and packages. Pandoc converts document *structure* between the two formats, not visual appearance. There is no direct mapping from Word page settings to LaTeX layout commands.
**What to do:**
* After importing, choose a LaTeX document class and add packages (such as `geometry` for margins) to set the layout you need.
* Use the imported `.tex` file as a starting point for your content, not a pixel-for-pixel recreation of the Word document.
* For journal or conference submissions, start from the official template rather than converting from Word.
Custom LaTeX packages and macros aren't converted
**What you see:** Formatting or content that relies on custom LaTeX packages (such as TikZ diagrams, algorithm listings, or custom-styled boxes) is missing, simplified, or broken in the exported Word file. Custom macros (`\newcommand`) may appear as literal text or be dropped.
**Why it happens:** Pandoc understands a core subset of LaTeX but does not interpret every package or macro. Commands it doesn't recognise are either dropped or passed through as plain text.
**What to do:**
* Diagrams produced by TikZ or similar packages cannot be converted—export the diagram as an image file and include it in your Word document manually.
* If you use custom macros extensively, consider whether the exported Word file is the right tool for your use case. Alternative converters such as [GrindEQ](http://www.grindeq.com/) may handle specific packages better.
* For content that must survive conversion, use standard LaTeX commands where possible.
Heading styles or colours change after export
**What you see:** Section headings appear in a different colour or style in the exported Word document compared to your Overleaf output.
**Why it happens:** LaTeX heading appearance is controlled by your document class or packages like `titlesec`. Pandoc maps LaTeX headings to Word's built-in heading styles (Heading 1, Heading 2, etc.), which carry Word's own default styling. Custom colours or formatting applied via LaTeX packages are not preserved.
**What to do:** After exporting, apply your preferred styling to Word's heading styles directly. Changes to a heading style in Word apply to all headings at that level throughout the document.
Emojis in a Markdown file cause import problems
**What you see:** After importing a `.md` file that contains emoji characters, the resulting `.tex` file appears non-editable in Overleaf.
**Why it happens:** Emoji characters are outside the standard character set that LaTeX handles by default, and can produce encoding errors that affect the file.
**What to do:** Remove emoji characters from your Markdown file before importing, then retry.
The conversion times out or fails on a large project
**What you see:** The conversion spinner runs for a long time and then shows a "something went wrong" error, or you receive a timeout message.
**Why it happens:** Conversions have a file size limit (files over 50MB cannot be converted) and a time limit. Very large projects, projects with many images, or documents that generate complex output can exceed these limits.
**What to do:**
* Check that your project is under 50MB total.
* If your project is large, try exporting the main `.tex` file only rather than the whole project.
* Remove any large or unused files from the project before attempting conversion.
The round-trip workflow (LaTeX → Word → LaTeX) loses formatting
**What you see:** You export to Word for a collaborator to edit, re-import the revised file, and find that custom styling, typefaces, and table formatting have been lost. There is no `.sty` file in the imported project.
**Why it happens:** Each conversion in the round-trip loses information that cannot be recovered. The LaTeX-to-Word conversion loses package styling; the Word-to-LaTeX conversion has no way to reconstruct it. There is no stylesheet or `.sty` file that carries over between formats.
**What to do:** The round-trip workflow works best for plain text content edits (corrections, additions, rewrites) rather than structural or design changes. After re-importing:
* Reapply your preamble, packages, and document class from your original project.
* Rebuild any tables or figures that need to match your original layout.
* Consider using [Track Changes](https://www.overleaf.com/learn/latex/Track_Changes_in_Overleaf) or sharing the project directly with collaborators as an alternative to round-tripping through Word.
### If you're still stuck
If a conversion fails and none of the above steps resolve it, contact [Overleaf Support](https://www.overleaf.com/contact). It helps to include:
* The URL of your Overleaf project (if you're comfortable sharing it)
* The full error message shown after the failed conversion
* A description of what you were trying to do (export to Word, import from Markdown, etc.)
[^1]:
# Downloading a project
This page explains how to export Overleaf projects as a .zip file or download just the final typeset PDF. Each process is explained step-by-step but a quick guide is also provided.
{% hint style="info" %}
Projects downloaded from Overleaf are provided as a `.zip` file. The `.zip` file will contain the source files *only.* It *does not* include the final typeset PDF, which must be [downloaded separately](#how-to-download-the-pdf-file) after successful compilation.
{% endhint %}
## How to download the PDF file
There are two ways to download the PDF file:
* [#from-the-file-menu](#from-the-file-menu "mention")
* [#from-the-download-icon](#from-the-download-icon "mention")
### From the File menu
{% stepper %}
{% step %}
Select **File** in the upper-left of the editor window.
{% endstep %}
{% step %}
Select **Download as PDF** within the **Download** option of the dropdown menu:
{% endstep %}
{% step %}
The typeset PDF is then exported in accordance with your browser and operating system settings, usually to your device's downloads folder. By default, the downloaded PDF will have the same name as your Overleaf project.
{% endstep %}
{% endstepper %}
### From the download icon
{% stepper %}
{% step %}
From within the PDF display window, select the **Download PDF** icon to the right of the **Recompile** button:
{% endstep %}
{% step %}
The typeset PDF is then exported in accordance with your browser and operating system settings, usually to your device's downloads folder. By default, the downloaded PDF will have the same name as your Overleaf project.
{% endstep %}
{% endstepper %}
## How to download Overleaf projects
Here we show how to download your current project as a `.zip` file, or how to download multiple projects as a single `.zip` file inside of which there are further `.zip` files, one for each project.
### How to download an individual project as a `.zip` file
There are two ways to download an individual project as a `.zip` file:
* [#from-within-the-project](#from-within-the-project "mention")
* [#from-the-projects-dashboard](#from-the-projects-dashboard "mention")
#### From within the project
{% stepper %}
{% step %}
Select **File** in the upper-left of the editor window.
{% endstep %}
{% step %}
Select **Download as source (.zip)** within the **Download** option of the dropdown menu:
{% endstep %}
{% step %}
The project source code will be exported as a `.zip` file in accordance with your browser and operating system settings, usually to your device's downloads folder. By default, the `.zip` file will have the same name as your Overleaf project.
{% endstep %}
{% endstepper %}
#### From the projects dashboard
{% stepper %}
{% step %}
If you're in the editor, select the **Back to your projects** button in the top-left, which appears with your cursor on :
{% endstep %}
{% step %}
In the projects dashboard, click the **Download .zip file** button for the project you want to download:
{% endstep %}
{% step %}
The project source code will be exported as a `.zip` file in accordance with your browser and operating system settings, usually to your device's downloads folder. By default, the `.zip` file will have the same name as your Overleaf project.
{% endstep %}
{% endstepper %}
### How to download multiple projects as a `.zip` file
{% stepper %}
{% step %}
If you're in the editor, select the **Back to your projects** button in the top-left, which appears with your cursor on :
{% endstep %}
{% step %}
In the projects dashboard, select the projects using the checkboxes.
{% endstep %}
{% step %}
Click the **Download** icon on the top-right to initiate download of the `.zip` file containing your projects.
{% endstep %}
{% step %}
The project source codes will be exported as a `.zip` file in accordance with your browser and operating system settings, usually to your device's downloads folder. The `.zip` file will be named "Overleaf Projects (*\[number of projects]* items)".
{% endstep %}
{% endstepper %}
## How to include a `.bbl` file (for journal submissions)
Some journal-submission processes ask for the LaTeX-generated `.bbl` file—an auxiliary file containing the formatted bibliography data—to be included with the article source files of LaTeX submissions. On Overleaf, `.bbl` files, and any other auxiliary files created during compilation, are “cached” but there are two ways to access the `.bbl` files:
* [#using-the-other-logs-and-files-button](#using-the-other-logs-and-files-button "mention")
* [#via-overleafs-arxiv-submission-process](#via-overleafs-arxiv-submission-process "mention")
### Using the **Other logs and files** button
Follow these steps to download just the `.bbl` file generated for your project:
{% stepper %}
{% step %}
Click on the **Logs and output files** button (next to the **Recompile** button).
{% endstep %}
{% step %}
Scroll all the way down, and click on **Other logs and output files**.
{% endstep %}
{% step %}
Select the project’s `.bbl` file, called `output.bbl`, to download it.
{% endstep %}
{% endstepper %}
### Via Overleaf’s arXiv submission process
The full project source files, including the `.bbl` file, can also be downloaded via the arXiv-submission process:
{% stepper %}
{% step %}
Click on the project title and click on **Submit**.
{% endstep %}
{% step %}
Overleaf displays the **Submit** window which lists Overleaf’s publishing partners. Scroll down until you reach the **Online Repositories** section which contains arXiv.
{% endstep %}
{% step %}
From within the arXiv section, select **Submit your paper to the arXiv**.
{% hint style="info" %}
Don't worry, selecting this option this will *not* immediately send the project files to arXiv; instead, it displays another window which lets you download your article, complete with `.bbl` file, for onward submission to arXiv:
{% endhint %}
{% endstep %}
{% step %}
Finally, select **Download project ZIP with submission files (e.g. .bbl)** which will initiate the download process.
{% endstep %}
{% endstepper %}
# Archiving, deleting, and leaving projects
There are two options for removing projects from your project dashboard: [#archiving](#archiving "mention") and [#trashing](#trashing "mention").
### Archiving
The **Archived projects** page is for projects you want to keep around but wish to remove (archive) from the main list in your project dashboard. Archived projects are *not* in a queue to be deleted.
### Trashing
The **Trashed projects** page is for projects you intend to delete (or leave) permanently. For help on deleting projects, see [Deleting a project](/managing-projects-and-files/archiving-deleting-and-leaving-projects/deleting-a-project).
{% hint style="info" %}
To permanently delete a project, or to leave a project that is owned by someone else, you must first select the **Trash** option, then, in Trashed Projects, select the **Delete** or **Leave** option.
{% endhint %}
{% content-ref url="/pages/BPfsy3T7XSTMCeGbRJ8h" %}
[Deleting a project](/managing-projects-and-files/archiving-deleting-and-leaving-projects/deleting-a-project)
{% endcontent-ref %}
## How to archive or trash an individual project
{% stepper %}
{% step %}
If you wish to archive a project, select the **Archive** icon in the Actions column. If you wish to trash a project, select the **Trash** icon:
{% tabs %}
{% tab title="Archive" %}
{% endtab %}
{% tab title="Trash" %}
{% endtab %}
{% endtabs %}
{% endstep %}
{% step %}
A confirmation modal is displayed. Select **Confirm** to move the project to Archived Projects or Trashed Projects:
{% tabs %}
{% tab title="Archive" %}
{% endtab %}
{% tab title="Trash" %}
{% endtab %}
{% endtabs %}
{% endstep %}
{% step %}
In the navigation bar on the left side of the page, select **Archived projects** or **Trashed projects** to view the new location of your project:
{% tabs %}
{% tab title="Archive" %}
{% endtab %}
{% tab title="Trash" %}
{% endtab %}
{% endtabs %}
{% endstep %}
{% endstepper %}
## How to archive or trash multiple projects
{% stepper %}
{% step %}
In any of the projects pages, select the projects using the checkboxes.
{% endstep %}
{% step %}
Click the **Archive** or **Trash** button above the projects list to archive or trash the projects.
{% tabs %}
{% tab title="Archive" %}
{% endtab %}
{% tab title="Trash" %}
{% endtab %}
{% endtabs %}
{% endstep %}
{% endstepper %}
## How to restore an individual project
{% stepper %}
{% step %}
In the **Archived Projects** or **Trashed Projects**, click the **Restore** icon in the Actions column to restore the project.
{% tabs %}
{% tab title="Archived Projects" %}
{% endtab %}
{% tab title="Trashed Projects" %}
{% endtab %}
{% endtabs %}
{% endstep %}
{% step %}
In the navigation bar on the left side of the page, select **Your Projects** to view the new location of your project.
{% endstep %}
{% endstepper %}
## How to restore multiple projects
{% stepper %}
{% step %}
In the **Archived Projects** or **Trashed Projects**, select the projects using the checkboxes.
{% endstep %}
{% step %}
Click the **Restore** button above the projects list to restore the projects.
{% endstep %}
{% step %}
In the navigation bar on the left side of the page, select **Your Projects** to view the new location of your projects.
{% endstep %}
{% endstepper %}
# Deleting a project
There are two steps to deleting a project:
1. Move the project to the Trashed Projects folder.
2. Delete the project permanently from the Trashed Projects folder.
{% hint style="danger" %}
For any project that *you own*, deleting it will permanently remove it, both for you and your collaborators.
**There is no undo!**
{% endhint %}
## Trashed Projects
* If you plan to get rid of a project, you can put it in the Trashed Projects folder.
* Moving a project to **Trashed Projects** *does not* delete a project or put it in a queue for automatic deletion at a later date.
* You can store projects in **Trashed Projects** for as long as you like. You have to *manually delete a project* to permanently remove it.
* When you decide it’s time to remove a project from your Trashed Projects folder, you can choose to
* [Leave](#how-to-leave-a-shared-project-one-not-owned-by-you) () any projects on which you are a collaborator (projects you do not own).
* [Delete](#permanently-deleting-a-project-in-the-trashed-projects-folder) () (permanently) any projects that you own.
* [Restore](#how-to-restore-a-trashed-project) () projects to move them back to the main project list.
* [Archive](/managing-projects-and-files/archiving-deleting-and-leaving-projects) () any project and move it to the Archived Projects folder.
## How does trashing a project affect collaborators?
* Putting any project in the Trashed Projects folder won’t affect collaborators on that project—it only affects where the project appears on *your* projects page.
* You cannot delete projects shared with you, i.e., projects that you do not own and where you are a collaborator. You can only archive them or place them in Trashed Projects and then Leave them.
* You can delete only those projects that *you own*. Deleting a project will permanently remove it—for you *and* any collaborators on your project.
Moving a single project to the Trashed Projects folderPermanently deleting a project in the Trashed Projects folder
{% hint style="danger" %}
There is no “undo deletion” feature: before proceeding, please be certain you wish to *permanently* delete your project.
{% endhint %}
How to leave a shared project (one not owned by you)
{% hint style="info" %}
You cannot permanently delete shared projects not owned by you. If you move a shared project into the Trashed Project**s** folder you have the option to Leave that project but not to Delete it: the Delete icon is replaced by the Leave icon.
{% endhint %}
Moving multiple projects to the Trashed Projects folderPermanently deleting multiple projectsHow to restore a trashed project
# Organizing projects with tags
{% hint style="success" %}
To add tags to a project, use a desktop, laptop, or tablet device. Mobile phones are not currently supported for this feature.
{% endhint %}
Create tags to keep your projects organized and easier to find.
{% columns %}
{% column width="50%" %}
{% content-ref url="/pages/9iD8S7guDSNMGbJhNM0y" %}
[Creating a new tag](/managing-projects-and-files/organizing-projects-with-tags/creating-a-new-tag)
{% endcontent-ref %}
{% content-ref url="/pages/Sg9JO49R1oO6gMZDq0um" %}
[Changing the name or color of a tag](/managing-projects-and-files/organizing-projects-with-tags/changing-the-name-or-color-of-a-tag)
{% endcontent-ref %}
{% endcolumn %}
{% column %}
{% content-ref url="/pages/WXFLszALq8MPlTVPxQLF" %}
[Adding tags to your projects](/managing-projects-and-files/organizing-projects-with-tags/adding-tags-to-your-projects)
{% endcontent-ref %}
{% content-ref url="/pages/ulefWNiZBAenTcN0VvyD" %}
[Deleting a tag](/managing-projects-and-files/organizing-projects-with-tags/deleting-a-tag)
{% endcontent-ref %}
{% endcolumn %}
{% endcolumns %}
# Creating a new tag
1. In your project dashboard, click on **New Tag** (bottom left).
2. Enter a name for your new tag
This can be anything you want—just make sure it’s unique and you haven’t used it before.
3. Pick a tag color
This will help you quickly spot and identify your tags. You can choose from our nine preset colors or create your own by using the color map or entering the HEX or RGB values (as shown below).
4. Click **Create.**
And there you have it—a new tag.
***
## Viewing projects with a specific tag
You can easily view all the projects with a specific tag in your project dashboard.
To do this, you can either:
* Click the tag name in the bottom left of your project dashboard.
OR
* Click the tag name next to the Title of your project.
***
# Adding tags to your projects
{% stepper %}
{% step %}
#### In your project dashboard, tick the box next to the Title of the project(s) you'd like to tag.
{% endstep %}
{% step %}
#### Click the Tag icon above the project list.
{% endstep %}
{% step %}
#### Select the tag(s) you want to add to the project(s).
{% endstep %}
{% endstepper %}
# Changing the name or color of a tag
{% stepper %}
{% step %}
### In your list of tags (bottom left of your project dashboard), hover over the tag you wish to edit and click the drop-down arrow.
{% endstep %}
{% step %}
###
Click Edit
You can then follow the steps shown in the [Creating a new tag](/managing-projects-and-files/organizing-projects-with-tags#creating-a-new-tag) section to change the name and/or color of your tag.\

{% endstep %}
{% step %}
### Click Save
{% endstep %}
{% endstepper %}
# Deleting a tag
If you no longer need a tag, you can delete it. This won’t delete the projects under this tag, just the tag itself. The tag will be removed from the Tags list and it will no longer appear next to the
{% stepper %}
{% step %}
#### In your list of tags (bottom left of your project dashboard), hover over the tag you wish to delete and click the drop-down arrow.
{% endstep %}
{% step %}
#### Click Delete
You will be asked if you’re sure you want to delete the tag. If you are, click **Delete**.
{% endstep %}
{% endstepper %}
# Adding files to a project
Overleaf provides a number of ways to bring files into a project.
## Standard mechanisms for adding files to a project
{% content-ref url="/pages/3xIAtRAnJHyKgLDd0Szp" %}
[Uploading files to a project](/managing-projects-and-files/adding-files-to-a-project/uploading-files-to-a-project)
{% endcontent-ref %}
{% content-ref url="/pages/hhh2UTCHfLniJ8EkX0DT" %}
[Adding a file from a URL](/managing-projects-and-files/adding-files-to-a-project/adding-a-file-from-a-url)
{% endcontent-ref %}
{% content-ref url="/pages/nkx06uDG7OKTBG1yp1Bh" %}
[Sharing files across projects](/managing-projects-and-files/adding-files-to-a-project/sharing-files-across-projects)
{% endcontent-ref %}
## Using integrations to add files to a project
The Git, GitHub, and Dropbox integrations provide ways to synchronize the contents of your projects with externally hosted files and files on your local device.
{% content-ref url="/pages/1IZe4Tza3eYCxQnm89hw" %}
[Git integration and GitHub synchronization](/integrations-and-add-ons/git-integration-and-github-synchronization)
{% endcontent-ref %}
{% content-ref url="/pages/orq07mETjk35wpWyXjd3" %}
[Dropbox](/integrations-and-add-ons/dropbox)
{% endcontent-ref %}
# Uploading files to a project
To add files to a new or existing Overleaf project, click on the “Upload” button at the top of the file list. This will launch the "Add files" interface, which includes an upload option.
You can then select the files you want to upload from your computer, either by first clicking on the "Select from your computer" button to open a file browser, or simply drag-and-drop files from your Explorer/Finder onto the uploader.
## Uploading multiple files
Multiple files can be uploaded to Overleaf in one go. When using the uploader you can either:
* select a folder to upload, and the directory structure will be preserved when the files are added to a project, or
* select multiple files when choosing which files to upload—as usual, by holding down shift or ctrl whilst making your selection.
The upload dialog will then display the progress of all uploads and close when the final upload is complete.
{% hint style="danger" %}
There is a hard limit of 180 individual files per upload and 50 MB of data per upload.
{% endhint %}
## Creating folders
If you're working on a large project with many chapters and many files, it can be useful to create folders to keep things organized.
To create nested folders on Overleaf, first click on an existing folder, then click the "New folder" button above the file list panel, or right-click on the folder and then select "New folder"
## Uploading a zip
If you are creating an entire project from a zip, use the upload project option.
{% content-ref url="/pages/sN4pP9NcEt8dnaqFT3sD" %}
[Uploading a project](/managing-projects-and-files/uploading-a-project)
{% endcontent-ref %}
## Troubleshooting
Please note that some file types should not be included in a project: [Files that should not be included in a project](/managing-projects-and-files/adding-files-to-a-project/uploading-files-to-a-project/files-that-should-not-be-included-in-a-project).
I am seeing a rate limit error when uploading many files to my project.
If you see the message **Too many files uploaded, your uploads have been throttled for short period**, this is due to a security precaution in the editor that kicks in after a large number of uploads have been processed. The reason for this is that too many uploads can potentially cause performance issues for other users. The limits can be dynamic but are roughly 200 files over a 30 minute period. Waiting for 30 minutes before uploading more documents will refresh the throttle.
I can't edit some of the files that I have uploaded.
Although the Overleaf editor can edit any plain text file, only those uploaded files with the most common LaTeX file extensions will be editable on the site—such as `.tex`, `.bib`, `.cls`, `.sty` etc. Suppose you need to edit a project file with a different extension. In that case, it is best to copy and paste its content into a new blank file within the project and then save it with the desired file extension; alternatively, upload it with a `.tex` extension and change it once online.
Text files larger than 2 MB cannot be edited online and don’t count toward the 7 MB limit, which means, for example, you can upload large `.csv` files for use with Rtex without using up your 7 MB editable data allowance.
I see a warning that I have exceeded a maximum file size or number of files.
There are limits on the size of files, the amount of editable text, and on the number of files that can be added to a project. You must stay within these limits when adding content to your project. Please see: [Plan limits](/getting-started/free-and-premium-plans/plan-limits).
# Files that should not be included in a project
Including some file types in a project can cause conflicts with Overleaf's LaTeX compilation/build process, be a source of confusion, or contribute unnecessarily towards project file limits.
## Best practice: only include files required to compile your project
An Overleaf project should not be used to store additional resources related to your project, such as PDFs of articles that you are referencing, or other documents. The contents of your Overleaf project should just be the "source" files that are needed to compile the PDF output.
## Best practice: do not upload a copy of the compiled PDF
Overleaf does not add the compiled PDF to your project's source files. The PDF is always regenerated and downloaded separately.
If you include a copy of the PDF in your source files, this can cause confusion, as this original version of the PDF will never be overwritten by Overleaf's compile process. The older PDF that you add to your project will remain, and may potentially cause confusion when downloaded or viewed.
To avoid confusion we recommend that PDF files with the same name as your local project's main `.tex` file be removed from your local project prior to upload.
You can download the up-to-date PDF by clicking on the "Download PDF" button near the "Recompile button" or, alternatively, go to the File menu and then select "Download PDF".
## Local project files to remove before uploading a ZIP file to Overleaf
* `*.aux` (unless you're using the `xr` package)
* Table of contents, list of figures/tables:`*.toc`, `*.lof`, `*.lot`
* References and citations auxiliary and output files `*.bbl` (unless you are *not* using a `.bib` file and rely on the `.bbl` only), `*.bcf`, `*.blg`
* Beamer auxiliary files `*.snm`, `*.out`, `*.nav`, `*.vrb`
* Glossaries/nomenclature/acronyms `*.ind`, `*.ilg`,`*.ist` (unless it's your custom index style file), `*.glg`,`*.gls`, `*.glo`, `*.acn`, `*.acr`, `*.alg`
* SyncTeX file `*.synctex.gz`
* `latexmk` auxiliary files files`*.run.xml`, `*.fls`
* Other generated file extensions created by various packages.
Manually uploading these files into your project list may cause problems with the build tool, especially `*.run.xml`!
## Git folders and files
Uploading `.git` folders can cause problems when working with the Git integration or GitHub Synchronization.
# Adding a file from a URL
This article explains how to upload externally hosted files to your Overleaf project using the From External URL feature.
## File sharing links (URLs)
File-hosting services such as Google Drive, Dropbox, OneDrive, and others, enable users to share files securely, creating and providing file-sharing links (URLs) which restrict who can access a particular file and determine the access mode granted: view-only or the ability to edit. Individuals who receive and then select or click a file-sharing link may need to login (authenticate) to the hosting service before they can access the file, or might reach a “landing page” which renders a preview of the file with further links to manually download it.
***
## Direct download links (URLs)
An important type of file link (URL) is the [direct download link](https://en.wikipedia.org/wiki/Direct_download_link) which enables immediate download of the file without having to authenticate (login) or needing to use an intermediate landing page or other interface. Clicking/selecting a direct download link starts the download process.
To use Overleaf’s **From External URL** feature, file-sharing URLs (links) provided by file-hosting services such as Google Drive, Dropbox or OneDrive, must be **converted** to a direct download link (a different URL) where the conversion process varies according to the hosting site/cloud service. For example, here are the instructions to [create direct download links from Dropbox link-sharing URLs](https://help.dropbox.com/files-folders/share/force-download) (which were current at the time of writing this article).
***
## Overleaf’s 'From External URL' feature
If you have a direct download link for a particular file, you can use Overleaf’s **From External URL** feature to upload it into your project.
Start by selecting the file upload icon, then choose **From External URL**:
Provide the link and give the file a name:
* **URL to fetch the file from**: provide the direct download link (URL) from a file-hosting service such as Google Drive
* **File Name In This Project**: give a name to the uploaded project file, one which does not include space characters
***
## Google Drive example
The following video demonstrates using a Google Drive direct download link to upload a project file and shows how to refresh the project file if the original was updated or changed on Google Drive.
{% embed url="" %}
***
## Notes on converting link-sharing URLs to direct download URLs
Readers are advised of the following points:
* File-hosting services do change the structure of their link-sharing URLs—such as [Google Drive security updates](https://support.google.com/a/answer/10685032?hl=en). Due to such changes, it’s impractical for Overleaf to provide fully documented URL-conversion processes because any guidance could become outdated shortly after publication. Readers should find and consult the most current documentation provided by the hosting service(s) they use, or seek out up-to-date articles or YouTube videos.
* Organizations/employers can implement security policies and procedures which prevent creation of direct-download links from URLs used to share the organization’s files and resources. If you experience difficulties uploading an external file into Overleaf, contact your organization’s administrator/manager of the file-sharing service to ask about that.
* Readers might wish to check their constructed download links by using an incognito/private browser page to make sure it works without being logged into the file-sharing service.
# Sharing files across projects
You may share files across projects using the **From Another Project** option located within the **Add Files** pop-up window:
If you'd like to (regularly) use the same files across multiple projects then it may be convenient to use the following arrangement:
1. Create a “parent” project containing your reusable files, e.g., `.bib`, `.cls`, `.sty`, graphics, etc.
2. Within a “child” project, in which you want to reuse a file, follow this procedure:
* Click the **Upload files** button at the top of the file list panel, or go to the **File menu** and select **Upload file**. Overleaf displays the **Add Files** pop-up window. Here, you need to do the following:
* Select **From Another Project.**
* Under **Select a Project**, choose the “parent” project containing the reusable files.
* Under **Select a File**, choose the file that you need.
You will now be able to *use* the linked file within your “child” project, but you will *not be able to edit it*. Although linked files in “child” projects cannot be edited, they can be updated (refreshed) if you’ve modified the original copy of the file(s) in the parent project:
* Click on the linked file in the “child” project.
* Select **Refresh** to pull in the changes.
{% hint style="info" %}
Any `.tex` files imported using **From Another Project** cannot be set as the main file for compiling the “child” project.
{% endhint %}
# The latexmkrc file
A project can include a latexmkrc file to customize how the LaTeX compile process is run.
Overleaf uses a Perl-based tool called **`LatexMk`** (LaTeX make) to compile your project. This tool allows you to provide a special file named **`latexmkrc`** that can customize how the compile process is run.
In some cases, a `latexmkrc` file is needed in a project in order to set a variable value for the LatexMk process, or to add extra steps to the compile process.
## Example: setting the time zone
All the dates and times in the PDF compiled on Overleaf are the dates and times of the server’s by default. What if instead you'd like to use your local date/time?
To display the date/time local to your time zone, you can change the `TZ` (time zone) environment variable using a custom `latexmkrc` file:
1. In your project editor window, click on the **Upload** icon on the top of the file tree panel.
2. Select **New file** and name the file `latexmkrc`.
3. Add the following line to the file `latexmkrc`:
```perl
$ENV{'TZ'}='Canada/Central';
```
or whichever time zone is required. Here's a [list of supported time zones for reference](http://php.net/manual/en/timezones.php).
Dates and times (e.g. `\today` and `\currenttime` from the `datetime` package) in the PDF should then give values local to the specified time zone.
## Example: setting the `TEXINPUTS` variable
Another practical use of the `latexmkrc` file is to add additional paths to the `TEXINPUTS` environment variable, see: [Adding LaTeX dependencies](/managing-projects-and-files/adding-latex-dependencies).
## Overleaf’s LatexMk file
Overleaf’s “system-wide” configuration file follows LatexMk conventions (for Linux): it is named **`LatexMk`** and is located in the folder `/usr/local/share/latexmk/`. **Note**: this file is read *before* any user-level configuration files.
User-level configuration files must be named `latexmkrc` and added to your Overleaf project to provide custom rules addressing the specific requirements of your Overleaf LaTeX project/document.
Overleaf’s `LatexMk` file contains code for Overleaf-specific processing plus rules for glossaries, nomenclature, and other commonly used packages. Overleaf’s `LatexMk` file may show some variation between releases of TeX Live to accommodate changes and updates made to packages and software tools within TeX Live itself.
### How to view a copy of Overleaf’s `LatexMk` file
The following link opens a project to typeset the Overleaf `LatexMk` file being used with your project’s LaTeX compiler and TeX Live version and also makes it available for download:
```latex
\documentclass[a4paper]{article}
\usepackage[margin=1cm]{geometry}
\usepackage{verbatim,shellesc}
\ShellEscape{cp /usr/local/share/latexmk/LatexMk ./LatexMk}
\begin{document}
\section*{About this project}
This project provides access to the system \texttt{LatexMk} initialization (configuration) file used by Overleaf. \texttt{LatexMk} is a Perl script which may vary slightly according to the \TeX{} Live version and compiler chosen for the project. If you need to be 100\% certain which \texttt{LatexMk} is being used, add code from this project to your project and compile to typeset a listing of \texttt{LatexMk} and make it available for download as one of the output files.
\section*{Listing the \texttt{LatexMk} file}
\verbatiminput{./LatexMk}
\end{document}
```
[Open this code in Overleaf.](https://www.overleaf.com/docs?engine=\&snip_name=Display+Overleaf+latexmkrc+file\&snip=%5Cdocumentclass%5Ba4paper%5D%7Barticle%7D%0A%5Cusepackage%5Bmargin%3D1cm%5D%7Bgeometry%7D%0A%5Cusepackage%7Bverbatim%2Cshellesc%7D%0A%5CShellEscape%7Bcp+%2Fusr%2Flocal%2Fshare%2Flatexmk%2FLatexMk+.%2FLatexMk%7D%0A%5Cbegin%7Bdocument%7D%0A%5Csection%2A%7BAbout+this+project%7D%0AThis+project+provides+access+to+the+system+%5Ctexttt%7BLatexMk%7D+initialization+%28configuration%29+file+used+by+Overleaf.++%5Ctexttt%7BLatexMk%7D+is+a+Perl+script+which+may+vary+slightly+according+to+the+%5CTeX%7B%7D+Live+version+and+compiler+chosen+for+the+project.+If+you+need+to+be+100%5C%25+certain+which++%5Ctexttt%7BLatexMk%7D+is+being+used%2C+add+code+from+this+project+to+your+project+and+compile+to+typeset+a+listing+of+%5Ctexttt%7BLatexMk%7D+and+make+it+available+for+download+as+one+of+the+output+files.%0A%5Csection%2A%7BListing+the+%5Ctexttt%7BLatexMk%7D+file%7D%0A%5Cverbatiminput%7B.%2FLatexMk%7D%0A%5Cend%7Bdocument%7D) After compiling the project above, the `LatexMk` file can be downloaded via the **Logs and output files**, see: [Generated files](/navigating-in-the-editor/generated-files).
# Adding LaTeX dependencies
If you have `.cls`, `.sty`, `.bst` files in your project, Overleaf's compile process will not be able to locate these files unless they are placed at the top level.
However, to organize your project, you may wish to put these files in to folders so they are easier for you to find and so that the top level of your project is not cluttered.
The good news is that we can specify custom `TEXINPUTS` directories using the `latexmkrc` file, so that Overleaf knows it needs to search in that directory for the package files.
To do this, let's say you've put these package files in a folder called `tex/`; and respectively bibliography style files in a folder called `bst/`:
1. Click on “Add file” on the top of the Project side bar.
2. Select “Blank file”, and save the file name as `latexmkrc` (if it's not already there).
3. Put the following line in `latexmkrc`:
```perl
$ENV{'TEXINPUTS'}='./tex//:' . $ENV{'TEXINPUTS'};
$ENV{'BSTINPUTS'}='./bst//:' . $ENV{'BSTINPUTS'};
```
(or change to the relevant folder names in your project)
Overleaf will now search the `tex/` folder first before searching the system `TEXINPUTS` to locate package files, and `bst/` folder first before searching the system `BSTINPUTS` to locate bibliography style files.
(Source: )
{% hint style="info" %}
Your main document file and your `latexmkrc` file must remain at the top level of your project, not in a folder.
{% endhint %}
{% content-ref url="/pages/onfeCRWrlISkRk7THzhQ" %}
[The latexmkrc file](/managing-projects-and-files/the-latexmkrc-file)
{% endcontent-ref %}
# Navigating in the editor
Learn how to use the Overleaf Editor to optimize your workflow and customize your display:
{% columns %}
{% column %}
{% content-ref url="/pages/srq6bLA1WT5Nca8jKm9H" %}
[Working with the PDF viewer](/navigating-in-the-editor/working-with-the-pdf-viewer)
{% endcontent-ref %}
{% content-ref url="/pages/zOVUvxZWa05f1rWHVYp0" %}
[Selecting and managing files](/navigating-in-the-editor/selecting-and-managing-files)
{% endcontent-ref %}
{% content-ref url="/pages/GOnQcUlVU5fqTbxRRvEW" %}
[Searching within a project](/navigating-in-the-editor/searching-within-a-project)
{% endcontent-ref %}
{% content-ref url="/pages/mcrvT1NyNDuxgMHG44Pk" %}
[Editor display font](/navigating-in-the-editor/editor-display-font)
{% endcontent-ref %}
{% endcolumn %}
{% column %}
{% content-ref url="/pages/Q8koA8dzfgpOkOp0SWdZ" %}
[Generated files](/navigating-in-the-editor/generated-files)
{% endcontent-ref %}
{% content-ref url="/pages/1L0B3qWmdjKMf9MQrZ7b" %}
[Keyboard shortcuts](/navigating-in-the-editor/keyboard-shortcuts)
{% endcontent-ref %}
{% content-ref url="/pages/bcKjTOBg8lwgY2gcRJLk" %}
[Vim and Emacs keybinding](/navigating-in-the-editor/vim-and-emacs-keybinding)
{% endcontent-ref %}
{% endcolumn %}
{% endcolumns %}
# Working with the PDF viewer
[Compiling](/getting-started/recompiling-your-project) your project produces the latest version of the PDF. Overleaf provides several options for viewing the PDF and navigating between the PDF viewer and the editor.
{% content-ref url="/pages/7KYWcUi56j396rrSECzi" %}
[PDF viewer options and navigation](/navigating-in-the-editor/working-with-the-pdf-viewer/pdf-viewer-options-and-navigation)
{% endcontent-ref %}
{% content-ref url="/pages/M6xvPplusopqTWKhqtXq" %}
[Editor & PDF layout and sizing](/navigating-in-the-editor/working-with-the-pdf-viewer/editor-and-pdf-layout-and-sizing)
{% endcontent-ref %}
{% content-ref url="/pages/6sBuYNRD01ocNinxoD4z" %}
[Moving between the editor and PDF](/navigating-in-the-editor/working-with-the-pdf-viewer/moving-between-the-editor-and-pdf)
{% endcontent-ref %}
{% content-ref url="/pages/BBGoqBOhdxrkAJ41e7pl" %}
[Resolving PDF rendering and project loading problems](/troubleshooting-and-support/resolving-pdf-rendering-and-project-loading-problems)
{% endcontent-ref %}
# PDF viewer options and navigation
Overleaf provides two options for the PDF viewer: the Overleaf PDF viewer and the default browser PDF viewer. The Overleaf PDF viewer provides specific zoom, navigation, and presentation options, remembers your position between compiles, and supports jump-to-location (allowing you to move easily between locations in the source and the PDF). However, sometimes browser or other limitations may require you to use the default browser PDF viewer.
## The Overleaf PDF and the Browser PDF viewers
Occasionally, TikZ drawings may appear incorrectly, or images may not display as expected in the PDF viewer. Sometimes, these can be resolved by changing the PDF viewer from *Overleaf* to *Browser*.
{% hint style="danger" %}
If images are not displaying, first check that you have set your compile mode to **Normal**, rather than **Fast \[draft]**. See: [Recompiling your project](/getting-started/recompiling-your-project).
{% endhint %}
### How to select Overleaf’s PDF viewer
Select the Settings icon in the bottom left, browse to Editor > PDF Viewer, and ensure it is set to **Overleaf**.
Image showing how to select the Overleaf PDF viewer
### Browser PDF viewer limitations
Note the following behaviors when using the *Browser* PDF viewer option:
* SyncTeX arrows [(jump-to-preview and jump-to-source)](https://learn.overleaf.com/learn/Kb/How_to_jump_to_the_source_code_from_the_typeset_PDF_\(SyncTeX\)) do not work.
* Each *Recompile* will return to the first page of the output PDF.
* Overleaf's PDF navigation controls are not available (only browser provided navigation tools are supported).
## PDF navigation
The following annotated screenshot summarizes the navigation tools provided by Overleaf’s PDF viewer.
Annotated screenshot summarizing navigation tools provided by Overleaf’s PDF viewer
### The zoom-level menu
Apart from Presentation mode, the zoom-level menu entries are mostly self-explanatory: you can zoom in or out; fit the PDF page to the viewer window width or height; set a custom zoom value by entering a specific percentage, or select one of the preset zoom levels.
The Zoom menu provided by Overleaf’s PDF viewer
## How to use presentation mode
Overleaf’s presentation mode offers a full-screen view of your PDF document, minimizing distractions by completely hiding Overleaf’s user interface. This mode lets you present your document directly from Overleaf without downloading it.
An example of presentation mode
### Document navigation in presentation mode
Use the following keys to navigate a document in presentation mode.
* Arrow keys
* Space or Shift-Space
* Backspace
* PgUp/PgDn
#### How to leave presentation mode
* Press the Esc key on Mac, Windows, or Linux.
## Navigation shortcuts using a keyboard and mouse
Outside of presentation mode, Overleaf’s PDF viewer supports various keyboard shortcuts and mouse actions for navigating and interacting with your compiled LaTeX document (PDF). To use keyboard shortcuts, ensure the Overleaf PDF viewer window is [in focus](https://en.wikipedia.org/wiki/Focus_\(computing\)). Mouse actions, such as using the scroll wheel, work without requiring the viewer window to have the focus.
### Keyboard shortcuts
To use a keyboard shortcut, press and hold ⌘ (Mac) or Ctrl (Windows/Linux), then press the accompanying shortcut key; for example, to zoom in on a Mac, press and hold ⌘, then press the + key.
Mac
Windows/Linux
Zoom in
⌘ +
Ctrl +
Zoom out
⌘ -
Ctrl -
Fit to width
⌘ 0
Ctrl 0
Fit to height
⌘ 9
Ctrl 9
* Fit to width and fit to height: Automatically adjust the PDF to fit the width or height of the PDF viewer window.
#### Other ways to navigate your PDF
**To zoom in or out:**
* Use pinch gestures on a trackpad.
* On a Mac, press ⌘ and use the mouse scroll wheel.
* On Windows/Linux, press Ctrl and use the mouse scroll wheel.
**Scrolling the PDF:**
* Use the mouse scroll wheel or a device’s trackpad.
* Up/down arrow keys scroll a whole page.
* PgUp or PgDn also scroll a whole page.
* Home key jumps to the start of a document.
* End key takes you to the end of a document.
## Troubleshooting
I can't find the PDF Viewer.
If you cannot see a split screen containing the Overleaf editor and PDF preview, or the PDF preview or Overleaf editor is hidden from view, you can use the **Layout menu** to quickly rearrange and refresh your Overleaf workspace.
To restore a split screen view, select **Split view** from the Layout menu as shown below. A checkmark is placed next to the currently active option:
The Overleaf layout menu
There is a "PDF Rendering" error instead of the PDF.
This problem can sometimes be caused by browser issues or network restrictions. Please see [Resolving PDF rendering and project loading problems](/troubleshooting-and-support/resolving-pdf-rendering-and-project-loading-problems).
There is a LaTeX error reported instead of the PDF.
LaTeX errors can cause the PDF not to render properly, or at all. Please see [Fixing LaTeX errors](/troubleshooting-and-support/fixing-latex-errors) for suggestions on understanding and fixing LaTeX errors.
I am seeing a Compile Timeout error instead of the PDF.
There are a number of potential causes when the compile process runs longer than the available time to produce the PDF. Please see [Fixing and preventing compile timeouts](/troubleshooting-and-support/fixing-and-preventing-compile-timeouts).
# Editor & PDF layout and sizing
You can adjust the placement and size of the components within the Overleaf editor window.
## Layout options
The following image shows the Layout options menu with a checkmark next to the currently active option; here, it is the default setting of **Split view**:
The remainder of this article demonstrates each of the four options and the functionality they provide.
### Split View (the default)
This default option uses a single browser tab to display the LaTeX editor and PDF preview. This arrangement works well if you have a large display screen with sufficient space to organize your work. If you are using a laptop connected to a large external screen, the [#open-pdf-in-a-separate-tab](#open-pdf-in-a-separate-tab "mention") option, displaying the LaTeX editor and PDF preview in separate browser tabs, can be a more convenient configuration.
Layout default
### Editor only and PDF only
If you wish to temporarily hide the PDF preview or LaTeX text editor, you can use the layout modes of Editor only or PDF only and easily switch between them as required.
Besides the [#layout-options](#layout-options "mention") menu, there are other ways to switch between the **Split view**, **Editor only**, and **PDF only** modes, depending on your current mode.
#### Small arrow
In Split view, you can hide the PDF (switch to Editor only) using the small arrow to the right of the source code.
In Editor only, you can show the PDF (switch to Split view) using the same small arrow:
#### Switch modes button
In PDF only, you can switch to Editor only using the button in the top-right corner of your screen.
In Editor only, you can switch to PDF only using the button in the top-right corner of your screen.
### "Open PDF in a separate tab"
This layout option uses separate browser tabs for the Overleaf text editor and PDF preview, making it possible to work with Overleaf on two screens; for example, viewing the PDF preview on a laptop screen with the LaTeX editor displayed on a second, much larger, external screen—providing a convenient way to edit the LaTeX text.
{% hint style="success" %}
Tip: Having the PDF preview displayed on a separate screen can be useful during video presentations, enabling attendees to focus on the PDF without becoming distracted by the source code, which is on another (unshared) screen.
{% endhint %}
#### Jumping to the code or PDF location in separate tabs
Even with the PDF preview and code editor in separate tabs, perhaps on separate screens, you can still use the “Show in Code” location or “Show in PDF” location features (provided by [SyncTeX](https://learn.overleaf.com/learn/MLTeX_EncTeX_and_SyncTeX_TeX_extensions)).
#### To jump to PDF location:
1. In the code editor tab, select "Show in PDF".
2. Navigate to your PDF tab to see the content scroll to the corresponding location.
#### **To jump to code location:**
1. In the PDF tab, either select "Show in code" or double-click the content.
2. Navigate to your code editor tab to see the content scroll to the corresponding location.
Note that the location is more accurate by double-clicking instead of selecting the "Show in code" button. In this example, double-clicking correctly highlights the chapter title "Background" in the LaTeX code, versus the subsequent content.
## Resizing
To hide the file list or preview panes altogether, click on the thin panels at the side of the vertical divider bars. You can restore the file list and preview panels by clicking on the respective arrow buttons again.
Resizing, hiding and restoring the file list, source code and preview panels
# Moving between the editor and PDF
Using Overleaf's jump-to-location features
Overleaf enables you to go from a location in the typeset PDF to the corresponding location in your LaTeX source code, and vice-versa. These **jump-to-location** features are based on a standard utility called **SyncTeX** and enabled by special features in the Overleaf PDF viewer.
## Using Jump-to-location
You can either:
* Double-click on the PDF which causes Overleaf’s editor to scroll to the corresponding location in the source code
* Use the arrow keys that sit on the divider between the source code panel and the preview panel, to jump from source-to-preview, or preview-to-source:
## SyncTeX
The [SyncTeX](https://github.com/jlaurens/synctex/) extension has been available since 2008 and continues to be actively developed by its creator, Jérôme Laurens. It is widely used, including by Overleaf, and is supported by all TeX engines in use today.
Overleaf includes SyncTeX as part of the PDF compilation process, allowing it to write out a special [generated file](/navigating-in-the-editor/generated-files) with extension `output.synctex.gz` which provides the mapping between locations in the .tex file and in the PDF. The Overleaf editor and PDF viewer are SyncTeX aware, and can make use of this file to provide the jump-to-location feature.
## Troubleshooting and known limitations
I don't see the jump-to-location arrows.
If you don’t see those arrows, or double-clicking the PDF doesn’t work, you need to make sure your project’s PDF viewer is set to “Overleaf” and not “Browser”.
The jump-to-location seems to have stopped working.
This may indicate that the SyncTeX file `output.synctex.gz` needs to be regenerated. Please click on **Recompile** and try again.
If the PDF-to-code (left) arrow works but not the code-to-PDF (right) arrow, ensure that [the Main document](/getting-started/recompiling-your-project/the-main-document) isn't set to "None".
The jump-to-location is not accurate.
A lack of accuracy in the jump-to-location feature can be caused by:
* Changes in the source since the previous compile. As mentioned above, jump-to-location relies on files that are generated when the project compiles. Recompiling your project may help.
* SyncTeX is only accurate to the level of lines of code, not positions of individual characters. You can increase the accuracy of SynTeX (and error reporting) by breaking your source code into more lines. A single line end in LaTeX source does not create a new paragraph in the compiled document.
* Two column and multi-column layouts can result in less accurate results in jump-to-location.
An error "Couldn't find the corresponding source file" was shown.
Some causes of this error are:
* SyncTeX struggles with bibliographies because the formatted text in the PDF is generated from an intermediate `.bbl` file, rather than being pulled directly from your `.tex` source.
* The main `.tex` document of an Overleaf is not located at the top-level of the project (i.e. not in a folder). Please see [The Main document](/getting-started/recompiling-your-project/the-main-document).
* Using `\input` or `\include` with a preceding `./` on your file paths. For example a usage like`\include{./chapters/intro}` can cause SyncTeX to fail, the preferred syntax omits the leading `./` , as in:`\include{chapters/intro}.`
* Spaces in file names, or unexpected characters such as`()[]`, or other symbols can cause problems of SyncTeX and other tools. Be sure not to include spaces or special characters in file names.
# Selecting and managing files
The file outline helps you navigate within a selected LaTeX file using the file's headings.
You can view the logical structure of your `.tex` file using our File Outline feature. This displays most standard LaTeX sectioning elements in a sidebar to allow quick navigation within the open `.tex` file. The File Outline is displayed at the bottom of the left pane, which also contains the file tree.
This feature displays the outline for the file you have open in the editor, not your entire project. If you have a multi-file project, a new outline will be displayed when you open a different file in the editor.
{% hint style="info" %}
Note that the File Outline doesn't currently display section headings included via `\input`, `\include` or `\import` commands.
One workaround for this is to use these commands after a [supported heading command](#supported-heading-commands). For example, using `\chapter{Chapter One}` or `\include{chapter1.tex}` will display "Chapter One" in the file outline, instead of just using `\include{chapter1.tex}`, which is not displayed in the File Outline.
{% endhint %}
## Expanding and collapsing the File Outline and File Tree
Use the caret to the left of "File Outline" or "File Tree" to expand or collapse the area. You can also resize the File Outline by clicking and dragging the handle up or down.
## Navigating within your files using the File Outline
With longer `.tex` files, you may want to quickly jump to another section heading within the file. The File Outline feature allows you to do this. Click on the heading you'd like to jump to, and the cursor will move to that heading in the editing pane. The selected heading will be highlighted in the file outline list for reference as you're editing the file.
## Supported heading commands
The File Outline feature supports the standard [LaTeX section heading commands](https://www.overleaf.com/learn/latex/Sections_and_chapters#Document_sectioning):
* `\book` (from the memoir document class)
* `\part` (for book and report document classes)
* `\chapter` (for book and report document classes)
* `\section`
* `\subsection`
* `\subsubsection`
* `\paragraph`
* `\subparagraph`
Starred variants of these commands for unnumbered headings are also supported.
{% hint style="success" %}
If your `.tex` file doesn't contain every heading level, that's no problem; the File Outline will display your file's structure according to the heading levels that we detect within the file.
{% endhint %}
{% hint style="warning" %}
The File Outline feature doesn't run a full LaTeX engine, so not all LaTeX commands within section headings are supported.
In particular, the expansion of custom macros and math mode content won't be rendered in the File Outline list. Other non-standard usages, like multiple `\label`s following a sectioning command, or sectioning commands broken across multiple source lines, also won't be detected by the File Outline in all situations.
{% endhint %}
# Searching within a project
## Search and replace within the current file
This feature lets you find and replace text within an editable file displayed in the editor. This feature is not available for read-only files such as:
* text files [uploaded from an external URL](/managing-projects-and-files/adding-files-to-a-project/adding-a-file-from-a-url), including files stored on Google Drive, and `.bib` files (reference libraries) imported from [ReadCube](/integrations-and-add-ons/reference-manager-integrations/readcube), [Mendeley](/integrations-and-add-ons/reference-manager-integrations/mendeley), or [Zotero](/integrations-and-add-ons/reference-manager-integrations/zotero)
* text files that exceed 2 MB in size because the editor treats them as read-only
### How to access search and replace
To access search and replace, you can use a keyboard shortcut when your cursor is in the editor (Windows/Linux: **Ctrl**+**F**; macOS: **⌘**+**F**), or select **Search file** located above the editor. Either method displays a search panel located at the bottom of the editor.
### How to use search or search and replace
Overleaf will start to search as you type and highlight the first successful result. If you wish, you can configure your search by selecting one or more of the following options within the "Search for" field:
* Aa: **Match case**
* \[.\*]: **Regular expression**
* W: **Whole word**
* :align-left:**: Within selection**
Use the up and down arrows to go to the previous or next search result, respectively.
To replace the text of search results, enter the replacement text in the "Replace with" field and use one of the following methods:
* **Replace** updates an individual match and then highlights the next match.
* **Replace All** replaces all matches at once in the selected file.
## Project-wide search
The project-wide search feature allows you to search for text across all files in your project. To access project-wide search, select **Project search** in the left sidebar:
{% hint style="info" %}
You can also launch the project-wide search panel from within the file search panel by selecting **Search all project files** located to the right of the up and down arrows.
{% endhint %}
### How to use project-wide search
You can configure your search by selecting one or more of the following options, or proceed to search without selecting any.
* Aa: **Match case**
* \[.\*]: **Regular expression**
* W: **Whole word**
Type your search term in the "Search all project files..." field, and select **Search**. Any search results are listed and grouped by file. Select a search result to jump to the corresponding file location.
{% hint style="warning" %}
Files larger than 2 MB are excluded from project-wide search results.
{% endhint %}
# Editor display font
The font displayed in the Code and Visual Editors can be adjusted to help provide a better editing experience. Options for adjusting the font display can be found in the editor settings.
{% columns %}
{% column width="50%" %}
Option 1: Gear icon
{% endcolumn %}
{% column width="50%" %}
Option 2: File menu
{% endcolumn %}
{% endcolumns %}
Select the icon in the bottom-left corner of the editor, or go to **File** > **Settings**, then select **Appearance** in the Settings sidebar. This should bring you to the [Editor font size](#editor-font-size), [Editor font family](#editor-font-family), and [Editor line height](#editor-line-height) options.
## Editor font size
It is strongly recommended to primarily use the Editor font size option, rather than your browser view or zoom options, to adjust the font sizes. Font size changes are applied to both the Code and Visual editors. The options range from **10px** to **24px**.
{% hint style="success" %}
You can adjust the zoom level of your output PDF using controls in the preview panel itself. Please see [PDF viewer options and navigation](/navigating-in-the-editor/working-with-the-pdf-viewer/pdf-viewer-options-and-navigation).
{% endhint %}
{% hint style="warning" %}
Note that Overleaf is optimized only for an "actual size" or "100%" browser zoom level — thus, your browser's zoom level should only be adjusted *after* making changes to the editor font size.
{% endhint %}
## Editor font family
The Editor font family option sets the font family of the text in the Code Editor. You can select either **Monaco / Menlo / Consolas**, **Lucida / Source Code Pro**, or **OpenDyslexic Mono**.
{% hint style="success" %}
The OpenDyslexic Mono font family is provided in order to help make the Code Editor more accessible.
{% endhint %}
{% hint style="warning" %}
You may experience some cursor misalignments when your computer doesn't have suitable fonts or if you're working with certain languages such as Thai, Japanese, or Cyrillic. In these cases, you may want to try changing the font family setting here.
{% endhint %}
## Editor line height
The Editor line height option allows you to adjust how much space appears between lines of text or code that you write in the editor. You can select either **Compact**, **Normal**, or **Wide**.
# Generated files
Most of the time, generated files are only used by the LaTeX compiler and other tools, but in some cases they need to be accessed directly.
To view the list of files which are generated upon compilation of the project, such as `.aux`, `.log` and `.toc` files, you can click into **Logs and output files**:
and scroll down to **Other logs and files**.
This will provide you with the option of downloading selected files or all the files generated by the compiler.
## Downloading generated files along with the source
When you download the source files for your project using the standard options, the generated files are not included.
Some journals and repositories ask for the generated files to be included along with the source. Overleaf's **Submit to arXiv** option will produce a zip that includes both the source and the generated files. This option does not directly submit to arXiv, but rather produces a zip file in the format expected by arXiv, which can also be used for other journals and services that expect the same format.
### How to submit to a journal or service
1. Go to **File** > **Submit**, then choose a journal or service. There will be an option to download a `.zip` with the `.bbl` included.
2. Once you select the **Download project ZIP with submission files** button, it should show a "Compiling project, please wait" message. It may take a while to build, then download, the zip file.
3. Select the **Submit to \[journal or service]** button to be directed to the corresponding external website to upload your project ZIP.
## Including .bbl contents directly in the .tex file
Some publishers use article-submission systems that cannot process a separate .bib file. In such cases, the publisher’s guidelines might ask authors to paste the contents of the `.bbl` file (generated by BibTeX) into the article’s main `.tex` file.\
\
If BibTeX is used, the .bbl file produced by the Overleaf compile process can be downloaded (as described above), and its contents can be added to the .tex file to accommodate these submission systems.
### How to download a `.bbl` file
1. Select the **Logs and output files** button to the right of the Recompile button.
2. Scroll down and select the **Other logs and files** button in the bottom right.
3. In the menu that appears, select the `output.bbl` file to download it.
### How to paste a `.bib` file's contents into the project’s main `.tex` file
1. After you've [downloaded the `.bbl` file](#how-to-download-a-.bbl-file), copy the contents of the file.
2. Comment out the `\bibliography{}` line of your `.tex` file.
3. Paste the contents of the downloaded `.bbl` file.
4. [Recompile](/getting-started/recompiling-your-project).
# Keyboard shortcuts
Overleaf provides a number of keyboard shortcuts for common tasks. The table below lists the most common shortcuts. A more comprehensive list of keyboard shortcuts can be found in [this Overleaf project template](https://www.overleaf.com/articles/overleaf-keyboard-shortcuts/qykqfvmxdnjf).
For Mac users, the below commands will use the Cmd key instead of Ctrl. Some keyboard shortcuts in this list may not be available on non-US keyboards or in vim/emacs\
modes.
| Command | Operation |
| ---------------------------------- | ------------------------------------------------------------------------------------------------------------------------------------------------------- |
| Ctrl + F | Find and replace |
|
Ctrl + Enter or Ctrl + S
| Compile the project |
| Ctrl + Z | Undo |
| Ctrl + Y | Redo |
| Ctrl + Home | Go to the first line of the current file |
| Ctrl + End | Go to the last line of the current file |
| Ctrl + Shift + L | Go to a specific line (opens a dialog) |
| Ctrl + / | Toggle commenting for selected lines (Comment/uncomment selected text) |
| Ctrl + D | Delete the current line |
| Ctrl + A | Select all |
| Tab | Indent the selection |
| Shift + Tab | Un-indent the selection |
| Ctrl + U | Change the selected text to upper case |
| Ctrl + Shift + U | Change the selected text to lower case |
| Ctrl + B | Bold |
| Ctrl + I | Italics |
| Ctrl + Space |
Open the autocomplete menu, inside of \cite{...} search the bibliography (Use Ctrl + Space also on Mac, rather than Cmd + Space)
|
A more comprehensive list of keyboard shortcuts can be found in [this Overleaf project template](https://www.overleaf.com/articles/overleaf-keyboard-shortcuts/qykqfvmxdnjf).
# Vim and Emacs keybinding
Overleaf provides emulations that support some Vim and Emacs editing features.
The option to turn on the Vim or Emacs emulation modes can be found in the **Project menu** in the **Settings** section. This is a user-specific setting. There are three keybinding modes: None (the default), Vim, and Emacs.
Overleaf's Vim and Emacs keybindings are provided by an open-source code editor component. They are emulations, so not all Vim/Emacs bindings are fully supported, especially pre-existing browser shortcuts.
## Emacs
Overleaf's Emacs mode is a "loose approximation of actual emacs bindings" based on the one originally provided by the [CodeMirror 5](https://codemirror.net/5/) open source project. Please see: .
## Vim
Overleaf's Vim keybindings are provided through a project that is affiliated with CodeMirror, the [codemirror-vim](https://github.com/replit/codemirror-vim) project. Please see: .
## Troubleshooting
When using Vim I cannot switch back to normal mode from insert mode.
This problem can be caused by interference from the Chrome extension "Vimium." If you're using that extension, you may find that after inserting text you're unable to revert to normal mode—the standard commands ESC or CTRL-\[ may not work. Please disable this extension while using the Overleaf Vim emulator.
In Emacs, some commands such as Ctrl-N, Ctrl-T and Ctrl-W do not work.
Browsers often use key combinations that are also used by Emacs for some of their core functions, including Ctrl-N, Ctrl-T and Ctrl-W, to open or close windows or tabs. These events are intercepted before they are sent to Overleaf and unfortunately cannot reach the Emacs emulator.
# Providing custom Vim key bindings
Overleaf provides Vim and Emacs keybindings that can be switched on in the Project menu. However, as these keybindings are emulated by the editor (i.e., there is no actual Vim or Emacs interpreter running), it’s not possible to use Vim’s standard methods of adding new ones within Overleaf using Tampermonkey. Here we provide some methods which should help overcome this limitation.
## Caution regarding Tampermonkey and UserScripts
Please be advised that UserScripts and Tampermonkey are not officially supported by Overleaf and that custom scripts can interfere with Overleaf’s normal operations. If you are using such scripts and need to contact Overleaf for technical support, then we kindly ask you to disable any Tampermonkey scripts and check whether the situation improves. If disabling the scripts does not resolve your issue, please [contact us](https://www.overleaf.com/contact) for assistance.
## Tampermonkey UserScript
Please note that this is *not* an officially supported method and the interface may change in the future, hence the “`UNSTABLE_editor`” naming.
```
// ==UserScript==
// @name Overleaf Editor Custom VIM Keybindings
// @namespace http://tampermonkey.net/
// @version 0.1
// @match https://www.overleaf.com/project/*
// @grant none
// ==/UserScript==
(function() {
'use strict';
window.addEventListener("UNSTABLE_editor:extensions", (event) => {
const { CodeMirror, CodeMirrorVim, extensions } = event.detail;
// add custom keybindings - insert mode applies on insert
CodeMirrorVim.Vim.map("jj", "", "insert");
// normal mode applies while escaped
CodeMirrorVim.Vim.map("h", "j", "normal");
});
})();
```
# Creating a bibliography
LaTeX's powerful bibliography handling can automatically format and order citations and references. Overleaf features help make these features easy to use.
There are a variety of ways to create bibliographies within a LaTeX document, but most methods for including citations and a list of references require three main steps:
1. Include a file in your project that provides all the bibliographic data for the works you are going to cite. This is the .bib file. The .bib file has a special format that provides the raw bibliographic data without any specific style formatting.
2. Provide some instructions in your LaTeX document's preamble that describes what bibliography management system you are going to use. There are three different systems that are commonly used: bibTeX, natbib, and bibLaTeX.
3. Include citation commands within your text where you wish to cite works that are available in your .bib file. You must also include commands to print the bibliography at the appropriate location in your document.
The LaTeX compile process will check all of the citation commands, insert appropriately styled citations at those locations, and automatically generate a bibliography using the data in your .bib file.
## Creating the .bib file
Overleaf provides several features that allow you to work with .bib files more easily. You can upload or create your .bib file directly in Overleaf, or you can use a reference manager integration (premium feature) to automatically import or build your .bib file from data you have gathered in ReadCube, Zotero, or Mendeley.
{% content-ref url="/pages/2YwgNIrc3gvcpw8OhNIz" %}
[Working with .bib files](/citing-and-references/working-with-.bib-files)
{% endcontent-ref %}
{% content-ref url="/pages/FXCDAEIivxlL8ngdVeVD" %}
[Reference Manager integrations](/integrations-and-add-ons/reference-manager-integrations)
{% endcontent-ref %}
## LaTeX reference management systems
When it comes to bibliography management systems, there are three main options in LaTeX: **bibTeX**, **natbib**, and **bibLaTeX**. While all three make use of .bib files, they provide different commands, style, data type, and attribute options.
If you are using a template that was provided to you, the template will likely have a specific reference management system already selected. Please check the documentation for your template to find out which system it may be using.
If you are creating a project without a template or specific requirements, **bibLaTeX** is the recommended system to use, as it provides an easier and more flexible interface and a better language localization than the other two options.
Overleaf's [LaTeX learning documentation](https://www.overleaf.com/learn) provides overviews of how to use these systems.
## Writing and citing
LaTeX bibliography reference systems each provide various citation commands for you to use within your LaTeX document to indicate what works should be cited, where the citations should appear, and what type of citation is required.
A common feature of all citation commands is that they rely on **citeKeys**, which are unique identifiers for each work that is provided in your .bib file.
Overleaf's [LaTeX learning documentation](https://www.overleaf.com/learn) provides an overview of the citation commands and styles for bibLaTeX, natbib, and bibTex.
Overleaf provides autocompletion features as well as advanced reference search options (a premium feature) that help you find the right citeKey for a given reference.
{% content-ref url="/pages/gj5c8BOG1VHeqLYWYPAw" %}
[Adding citations and references](/citing-and-references/adding-citations-and-references)
{% endcontent-ref %}
# Working with .bib files
It's possible to include references in Overleaf using all of LaTeX's major bibliography management programs: biblatex, natbib, and bibtex. This article explains how to:
* manually create a new `.bib` file for storing your bibliography database
* upload an existing `.bib` file into your Overleaf project
* create a `.bib` file starting from an Overleaf template
{% hint style="success" %}
Users of Overleaf Premium can access features that allow them to link [Mendeley](/integrations-and-add-ons/reference-manager-integrations/mendeley), [Zotero](/integrations-and-add-ons/reference-manager-integrations/zotero), and [ReadCube](/integrations-and-add-ons/reference-manager-integrations/readcube) to their Overleaf account. By connecting these reference managers, you can easily create `.bib` files by bulk-importing reference libraries or using [advanced search](/citing-and-references/adding-citations-and-references) to find and import individual references.
{% endhint %}
## Creating your bibliography database
To create a new bibliography file in your Overleaf project, in the editor, click the **New File** icon:

An input box will appear for you to enter the name of the new file. The file should have the `.bib` extension. In this example it is called `mybibliography.bib`. Now click **Create**.

A new file will be listed in the left panel. Click it to edit its contents. Add your bibliography entries there.
Now you can import this `.bib` file in the main `.tex` file. See the next example.
```latex
\documentclass{article}
\usepackage[
backend=biber,
style=alphabetic,
sorting=ynt
]{biblatex}
\addbibresource{mybibliography.bib}
\title{Bibliography management: \texttt{biblatex} package}
\author{Share\LaTeX}
\date{ }
\begin{document}
\maketitle
\section{First section}
Using \texttt{biblatex} you can display bibliography divided into sections,
depending on citation type.
Let's cite! The Einstein's journal paper \cite{einstein} and the Dirac's
book \cite{dirac} are physics related items.
Next, \textit{The \LaTeX\ Companion} book \cite{latexcompanion}, the
Donald Knuth's website \cite{knuthwebsite}, \textit{The Comprehensive
Tex Archive Network} (CTAN) \cite{ctan} are \LaTeX\ related items; but
the others Donald Knuth's items \cite{knuth-fa,knuth-acp} are dedicated
to programming.
\medskip
\printbibliography
\end{document}
```


The command `\addbibresource{mybibliography.bib}` adds the created bibliography file to the document so you can use those references. See [Bibliography management in LaTeX](https://www.overleaf.com/learn/latex/Bibliography_management_in_LaTeX) for more information about bibliography management.
## Uploading your bibliography database
If you already have a bibliography file that you need to use in an Overleaf project, you can upload it. Click the **Upload** icon located on top of the left panel.

A dialog box will appear, you can either drag and drop the `.bib` file(s), or choose **select from your computer** to upload file(s) from your device.

Once the upload process is finished you can include the `.bib` file in your main `.tex` document.
## Using a template
The [Overleaf Gallery](https://www.overleaf.com/gallery) provides a large collection of templates, including several [bibliography-related](https://www.overleaf.com/gallery?addsearch=Bibliographies) templates:

For example, a Gallery search lists the entry [Multiple bibliographies with bibunits](https://www.overleaf.com/latex/examples/multiple-bibliographies-with-bibunits/ktgbztpwjnpb) which shows how to create multiple bibliographies/reference lists in the same document:

If you select **Open as Template**, Overleaf will create a new project which you can modify and use as a basis for your work:

## \[New Terminology] .bib support
Use the \[New Terminology] to check a file for...
* missing citations
* redundant citations
* unused citations
## Supported bibliography management systems
For more information about bibliography management in LaTeX see:
* [Bibliography management in LaTeX (using biblatex)](https://learn.overleaf.com/learn/Bibliography_management_in_LaTeX)
* [Bibliography management with natbib](https://learn.overleaf.com/learn/Bibliography_management_with_natbib)
* [Bibliography management with bibtex](https://learn.overleaf.com/learn/Bibliography_management_with_bibtex)
# Adding citations and references
This page explains Overleaf’s features for searching references within your project’s `.bib` files and reference managers linked to premium accounts. To learn how to link reference managers to your Overleaf account, visit our articles on [Mendeley](/integrations-and-add-ons/reference-manager-integrations/mendeley), [Zotero](/integrations-and-add-ons/reference-manager-integrations/zotero), and [ReadCube](/integrations-and-add-ons/reference-manager-integrations/readcube).
## How can Overleaf help to find and cite references?
Overleaf provides two styles of search to streamline finding and citing references:
* [Simple search](https://docs.overleaf.com/citing-and-references/adding-citations-and-references/searching-for-references#how-to-use-simple-search): available to all users, simple search lets you browse and filter a list of the citation keys contained in your project’s `.bib` file(s).
* [Advanced reference search](https://docs.overleaf.com/citing-and-references/adding-citations-and-references/configuring-advanced-reference-search): available to premium accounts via the project settings. It generates a list of references by searching your project’s `.bib` files and reference managers linked to your account.
Both search methods rely on Overleaf’s auto-completion to recognize citation commands as you type. Ensure auto-complete is enabled, or reference searching won’t work.
## How to enable Overleaf’s auto-complete
{% stepper %}
{% step %}
Select **Settings**.
Option 1: Gear icon
Option 2: File menu
{% endstep %}
{% step %}
Browse to **Editor** > **Auto-complete**, and ensure the toggle is set to enabled.
Overleaf's auto-complete setting
{% endstep %}
{% endstepper %}
## How to select a reference search style (premium feature)
Premium accounts can configure their projects to use **simple search** or **advanced reference search** via the **Reference search** option in the project settings.
{% stepper %}
{% step %}
Select **Settings**.
{% endstep %}
{% step %}
Select the Settings button to display the **Reference search settings** modal.
Overleaf's Reference search settings modal used to configure your search preferences
{% endstep %}
{% step %}
Use the drop-down menu to select your preferred **Reference search style**.
{% endstep %}
{% endstepper %}
## Further reading
If you’d like to further explore topics related to using bibliographies in LaTeX, the following Overleaf articles may be of interest:
* [How to link Mendeley to your Overleaf account](/integrations-and-add-ons/reference-manager-integrations/mendeley#how-to-link-mendeley-to-your-overleaf-account)
* [How to link Zotero to your Overleaf account](/integrations-and-add-ons/reference-manager-integrations/zotero#how-to-link-zotero-to-your-overleaf-account)
* [How to link ReadCube to your Overleaf account](https://app.gitbook.com/o/gVTOSUMkBnf8EicljJzB/s/VetOkhFZmAC8QCQK0Pi7/~/edit/~/changes/318/integrations-and-add-ons/reference-manager-integrations/readcube#how-to-link-readcube-to-your-overleaf-account)
* [Creating and Managing Bibliographies with BibTeX on Overleaf](https://www.overleaf.com/blog/532-creating-and-managing-bibliographies-with-bibtex-on-overleaf)
* [Using bibliographies on Overleaf](https://www.overleaf.com/learn/how-to/Using_bibliographies_on_Overleaf)
* [Bibliography management in LaTeX](https://www.overleaf.com/learn/latex/Bibliography_management_in_LaTeX)
# Configuring advanced reference search
{% hint style="info" %}
Advanced reference search is a [premium feature](/getting-started/free-and-premium-plans/premium-features). Overleaf premium features are available to participants in [Overleaf Commons](https://www.overleaf.com/for/universities), members of group [subscriptions](https://www.overleaf.com/for/groups), and owners of individual [subscriptions](https://www.overleaf.com/user/subscription/plans).
{% endhint %}
## How to configure advanced reference search
1. Select the project settings:
{% columns %}
{% column width="50%" %}
Option 1: Gear icon
{% endcolumn %}
{% column width="50%" %}
Option 2: File menu
{% endcolumn %}
{% endcolumns %}
2. Navigate to **Editor** > **Reference search**, and select **Settings** to display the **Reference search settings** window.

3. From the **Reference search style** drop-down menu, select **Advanced reference search** to display its configuration options.
Any reference managers linked to your account are listed with an option to include them in your reference searches. For convenience, we are showing [Mendeley](/integrations-and-add-ons/reference-manager-integrations/mendeley), [ReadCube](/integrations-and-add-ons/reference-manager-integrations/readcube), and [Zotero](/integrations-and-add-ons/reference-manager-integrations/zotero), but most users will have only one of these.
4. Select the reference manager(s) you want to include in your search. Some reference managers will have additional configuration options. At present, Mendeley doesn’t but ReadCube and Zotero do.
* To use Mendeley, go to the [next section](#configuring-advanced-reference-search-to-use-mendeley).
* To use Zotero, go to [Configuring advanced reference search to use Zotero](#configuring-advanced-reference-search-to-use-zotero).
* To use ReadCube, go to [Configuring advanced reference search to use ReadCube](#configuring-advanced-reference-search-to-use-papers).
{% hint style="info" %}
To learn how to link reference managers to your Overleaf account, read the pages on [Mendeley](/integrations-and-add-ons/reference-manager-integrations/mendeley), [Zotero](/integrations-and-add-ons/reference-manager-integrations/zotero), and [ReadCube](/integrations-and-add-ons/reference-manager-integrations/readcube).
{% endhint %}
### Configuring advanced reference search to use Mendeley
1. Select [Include results from your Mendeley account](#how-to-configure-advanced-reference-search-premium-feature).

2. You need to select the **Main bibliography file for this project**, an *editable* `.bib` file that Overleaf will update with any references you cite from Mendeley.
Depending on the number of editable `.bib` files in your project, Overleaf will handle this selection in one of three ways:
1. **Projects *****without***** an editable `.bib` file:** When you first cite a reference contained in a linked reference manager, including Mendeley, Overleaf will create a `.bib` file called `references.bib`. You’ll see that file name used in the notification message displayed each time a new reference is added to it.
2. **Projects with a single editable `.bib` file:** Overleaf will automatically select this file for you.
3. **Projects with multiple editable `.bib` files:** Overleaf will display a drop-down menu, allowing you to select one. If your project contains editable `.bib` files but you don’t select one, then Overleaf will select one for you.
{% hint style="success" %}
Overleaf will notify you each time a new reference is added to the `.bib` file chosen to contain references pulled-in from a linked reference manager.
{% endhint %}

3. Select **Close** to complete the setup for **advanced reference search** using the Mendeley reference manager.
{% hint style="danger" %}
Overleaf's advanced reference search option cannot bring in individual references from a Mendeley group. If you need to use references from a Mendeley group, the entire group library can be imported as a read-only .bib file as described [here](/integrations-and-add-ons/reference-manager-integrations/mendeley#groups-and-folders).
{% endhint %}
### Configuring advanced reference search to use Zotero
1. Select [Include results from your Zotero account](#how-to-configure-advanced-reference-search-premium-feature).
2. Overleaf provides a drop-down list of the libraries in your Zotero account.
**Note:** The following graphic shows how libraries are named and listed in Zotero and Overleaf’s drop-down menu.

3. Select the Zotero libraries you want to include in your reference searches.

4. You need to select the **Main bibliography file for this project**, an *editable* `.bib` file that Overleaf will update with any references you cite from Zotero.
Depending on the number of editable `.bib` files in your project, Overleaf will handle this selection in one of three ways:
1. **Projects *****without***** an editable `.bib` file:** When you first cite a reference contained in a linked reference manager, including Zotero, Overleaf will create a `.bib` file called `references.bib`. You’ll see that file name used in the notification message displayed each time a new reference is added to it.
2. **Projects with a single editable `.bib` file:** Overleaf will automatically select this file for you.
3. **Projects with multiple editable `.bib` files:** Overleaf will display a drop-down menu, allowing you to select one. If your project contains editable `.bib` files but you don’t select one, then Overleaf will select one for you.
**Note:** Overleaf will notify you each time a new reference is added to the `.bib` file chosen to contain references pulled-in from a linked reference manager

5. Select **Close** to complete the setup for **advanced reference search** using the Zotero reference manager.
### Configuring advanced reference search to use ReadCube
1. Select [Include results from your ReadCube account](#how-to-configure-advanced-reference-search-premium-feature).
2. Overleaf provides a drop-down list of the libraries in your ReadCube account.
3. Select the ReadCube libraries you want to include in your reference searches.

4. You need to select the **Main bibliography file for this project**, an *editable* `.bib` file that Overleaf will update with any references you cite from ReadCube.
Depending on the number of editable `.bib` files in your project, Overleaf will handle this selection in one of three ways:
1. **Projects *****without***** an editable `.bib` file:** When you first cite a reference contained in a linked reference manager, including ReadCube, Overleaf will create a `.bib` file called `references.bib`. You’ll see that file name used in the notification message displayed each time a new reference is added to it.
2. **Projects with a single editable `.bib` file:** Overleaf will automatically select this file for you.
3. **Projects with multiple editable `.bib` files:** Overleaf will display a drop-down menu, allowing you to select one. If your project contains editable `.bib` files but you don’t select one, then Overleaf will select one for you.
**Note:** Overleaf will notify you each time a new reference is added to the `.bib` file chosen to contain references pulled-in from a linked reference manager.
5. Select Close to complete the setup for **advanced reference search** using the ReadCube reference manager.
# Searching for references
## How to search for references in Overleaf
The following examples provide short video clips and step-by-step overviews that show how to use **simple search** and **advanced reference search**.
### How to use simple search
**Simple search** lets you browse and filter a list of the citation keys contained in your project’s `.bib` file(s). The following short video clip demonstrates **simple search** using the steps listed below.
{% embed url="" %}
1. Type a citation command such as `\cite`.
2. Start typing between `\cite`’s braces, using text that could appear in a citation key, such as `Knuth`.
3. Overleaf will automatically filter the list of citation keys to display keys containing Knuth. The results are listed under the heading FROM YOUR PROJECT to highlight the source of these references.

4. Select the desired citation key to complete the `\cite` command, such as `\cite{Knuth_textbook_1986}`. This completes the **simple search**.
### How to use advanced reference search (premium feature)
Before we explain how to select advanced reference search, and configure it, here is a short video showing how to use it. Our example is based on the steps listed below: searching for references containing the word `metafont`.
{% embed url="" %}
1. Type a citation command such as `\cite`.
2. Type your search term between `\cite`’s braces, using `metafont` as the search term—because it will likely appear in the reference title.

3. The search results list each reference under a heading showing where the reference was found; those headings are:
* FROM YOUR PROJECT
* FROM READCUBE
* FROM ZOTERO
* FROM MENDELEY
4. Select the desired citation key to complete the `\cite` command.
5. As shown in the video, a Mendeley reference with citation key `TeX1979` is selected and added to the project `.bib` file named `refmanagers.bib`.
### Benefits of advanced reference search
Advanced reference search allows you to search fields such as title and author rather than just the citation key:
* For `.bib` files it uses citation key, author, journal, title, year, and date.
* For reference managers, the searchable fields vary based on the features provided by each platform.
Additionally, **advanced reference search** lets you directly search linked reference managers and pull individual references into an Overleaf `.bib` file. This offers several benefits:
* All reference data added from a linked reference manager is fully editable by all collaborators.
* It avoids the need to refresh a linked file every time you add a new reference to your linked reference manager.
* The `.bib` file remains streamlined, minimizing file size and reducing compilation time by adding only the references used in your document.
# Library
Your Library provides a unified reference data repository for all your projects.
Your Library gives you one place to manage your reference data, shared across every project. Add an entry once, include it in any project using citation commands. When you cite an entry from the Library, the required data will be copied into your project .bib file.
When working on a project, you can quickly add references from your library to your project .bib file. Each of your project .bib files only contains the entries that are needed for the specific project
### Overview of how to use the Library
{% stepper %}
{% step %}
In the Library, add reference data by:
1. pasting BibTeX/BibLaTeX source from reference databases and journal websites,
2. entering DOIs to obtain full bibliographic data, or
3. uploading existing .bib files.
{% endstep %}
{% step %}
Within your projects, use citation LaTeX commands to automatically see references from your Library that you can add.
{% hint style="success" %}
Adding entries from the Library will add the corresponding reference data to your project .bib file.
{% endhint %}
{% endstep %}
{% endstepper %}
## Accessing your Library
You can access your Overleaf Library from the sidebar of your project dashboard at by clicking **Library**. The Library can also be accessed directly at .
{% hint style="info" %}
**Using a two-tab workflow**
When doing heavy literature review or initial setup, you can keep the Library open in one browser tab and your active project in another. This lets you quickly drop new papers into your Library and immediately cite them in your project without losing your place in the editor.
{% endhint %}
## Library benefits
The Library provides a new way to work with reference data. This short section describes a few reasons to consider using the Library and how to benefit from it.
* **Form-based or code-based data entry**: You can choose to add references using the form entry fields, paste pre-formatted BibTeX or BibLaTeX entries directly into the Library, or upload an existing `.bib` file.
* **Error prevention**: Using the Library ensures correct BibTeX or BibLaTeX syntax, avoids duplicate entries, and helps identify errors by keeping references discoverable and readable.
* **Support for flexible workflows**: Using the Library doesn’t stop you from directly editing a project `.bib` file or from importing references from Dimensions, ReadCube, Zotero, Mendeley, or other sources.
* **Large collections remain readable and editable**: Large `.bib` files can become difficult to maintain, and in some cases, exceed Overleaf's editable file limit. The Library features a search function that allows you to easily find specific references even in large reference data collections.
* **Smoother compiling**: A large project \``.bib` file with unused entries can increase the time the LaTeX compiler takes to parse and search for references. A smaller, well-maintained project `.bib` file that draws selected references from the Library helps projects compile more quickly and reliably.
* **A continuous workflow**: Unlike a standard project `.bib` file that might get buried after a paper is complete, the Library exists independently within an Overleaf account. This means you can continually save, organize, and tweak references during a literature review, even before creating a new project to write in.
* **An accessible knowledge hub**: The Library is designed to act as a central hub for reference data, built to add references from popular databases and publisher sites using their provided BibTeX or BibLaTeX formats. Because it isn't tied to any single document, the Library serves as the perfect place to collect interesting papers between semesters, during lab meetings, or while reading on the weekend. When it is time to start writing, all reference data is waiting and ready to be cited.
* **A LaTeX-first approach**: The Library stores all references natively in BibTeX or BibLaTeX format. This allows for LaTeX-aware validation and error correction, helping to ensure that references are displayed accurately in LaTeX documents without the need for complex formatting workarounds.
## BibTeX and BibLaTeX
Reference data used in LaTeX projects is stored in BibTeX format, and can also use BibLaTeX conventions for types and fields. You can choose to work directly with the underlying BibTeX and BibLaTeX structure, or use the form editor to hide the code details when adding, editing, or managing your reference data.
This example reference entry shows the BibTeX code for a book, and illustrates typical BibTeX and BibLaTeX format:
```bibtex
@book{austen1813pride,
author = {Austen, Jane},
title = {Pride and Prejudice},
year = {1813},
publisher = {T. Egerton},
address = {London},
}
```
All entries begin with an `@` symbol, followed by an entry type (for example, `@book`). After the entry type is an opening brace `{`, the citation key, and a comma. This is followed by a series of key-value pairs that provide the reference data for the work, all wrapped up with a closing brace `}`.
In a project, reference data is collected together in BibTeX or BibLaTeX format in one or more `.bib` files. The `.bib` files act as databases for your references. You access this data in your LaTeX documents using a citation command together with the citation key for the reference that you wish to cite.
When you bring references into your project `.bib` file, you can again work with the raw format in the **Code Editor** or use the **Visual Editor** when working with your `.bib` file.
To learn how to cite and create lists of references in LaTeX, please see Overleaf's [LaTeX learning documentation](https://www.overleaf.com/learn), which provides overviews of how to use the BibLaTeX, BibTeX, and natbib (based on BibTeX) referencing systems.
## Adding reference data to the Library
There are several options for adding data to the Library. You can paste references in from sources like Google Scholar, arXiv, Crossref, and many others. You can also paste in entries from your existing `.bib` files, upload entire `.bib` files, or enter data manually in an easy to use form. Use the **Add** button at the top right of the Library page to see a list of options for adding references.
When pasting in BibTeX or BibLaTeX code or Digital Object Identifiers (DOIs), click the **Preview** button to check the reference, then **Save**.
Adding and previewing a single reference
### Adding multiple entries
You can paste many entries from an existing bib file into the "Add reference" dialog. After clicking the Preview button, you will have the opportunity to select which entries you wish to add to your Library.
Adding and previewing multiple references
If you have an existing `.bib` file that you wish to include in your Library, you can choose the Upload `.bib` file option from the Add button menu. When adding a bib file, you will be provided with options for which entries to add.
{% hint style="warning" %}
**Troubleshooting missing entries when pasting or uploading a `.bib` file**
When confronted with syntax errors in a bib file, the Library may skip over entries that are missing a bracket or that have other errors. Please check your original source file for errors if you are missing entries when importing.
{% endhint %}
### Digital Object Identifiers (DOIs)
You can add the data for a reference to the Library simply by providing its Digital Object Identifier (DOI). DOIs provide a compact, permanent way to point to publications, or publication data, on the internet.
Journal pages and websites that do not directly or easily provide BibTeX data directly will often provide DOIs for resources they host. The Library provides an **add by DOI** option that will allow you to add all the reference data for a given source to the Library simply by providing its DOI.
When providing a DOI, you can either provide just the identifier itself (recommended), or the full URL at doi.org.
* An example DOI URL: `https://doi.org/10.47397/tb/47-1/tb145wright-ltx-talk`
* the DOI itself : `10.47397/tb/47-1/tb145wright-ltx-talk`
If the Library fails to find the publication data at doi.org for a value that you have provided, you'll see a warning "Some or all DOIs could not be resolved" after clicking on the "preview" option.
A standard DOI is made up of a prefix (which always begins with `10.`) and a suffix, separated by a slash (e.g., `10.1038/nature123`). The suffix may be quite long, but ensure it does not include any spaces or end in punctuation
{% hint style="warning" %}
**Troubleshooting: DOI could not be resolved issues**
If the Library cannot resolve your DOI, verify that your entry matches the standard format. First, to simplify the input, remove any web addresses like `https://doi.org/`. Next, ensure that the DOI is correctly formatted. A standard DOI always begins with `10.`, and should not include spaces or end in punctuation.
{% endhint %}
## Using the Library in projects
You don't need to memorize your Library citation keys or constantly switch back to the Library to find titles. The Overleaf editor's autocomplete feature will look up entries in the Library for you as you type.
* Users with **simple reference search** enabled can pull references directly from the Library using citation keys, which can be partially typed within a citation command and will be auto-completed.
* Users with **advanced reference search** enabled can pull references from the Library using citation keys, titles, or author names within a citation command. For all these values, partial inputs will be automatically completed, making it easy to locate the correct reference to be cited.
To cite from the library, you must enable Overleaf's auto-complete in the editor settings. You can configure your reference search options in your settings as well. Please see[ Adding citations and references](/citing-and-references/adding-citations-and-references) for more information on these options.
{% content-ref url="/pages/gj5c8BOG1VHeqLYWYPAw" %}
[Adding citations and references](/citing-and-references/adding-citations-and-references)
{% endcontent-ref %}
### The main .`bib` file
If your project has no `.bib` file, the first time you cite something from your Library, a new `references.bib` file will be added to your project. This file will be set as your **main `.bib` file**, and will receive any bib entries that are cited from your Library.
If your project has several `.bib` files, you can select one of the editable `.bib` file to be the main `.bib` file that will be used to receive new Library reference entries. Clicking on the Settings icon in the bottom left of the editor, or selecting the Settings option from your project's File menu will allow you to configure the main `.bib` file for your project.
{% hint style="info" %}
The main `.bib` file selection only affects the Library behaviour and does not influence which file is used at compile time for your references. The `.bib` file where references are found by the compiler must be set by using the appropriate LaTeX commands in your source.
{% endhint %}
### The `.bib` file Visual Editor
When working with `.bib` files in your project, the **Code Editor** view of your `.bib` file presents a traditional plain text interface for directly editing the BibTeX or BibLaTeX coded entries of your bib.
The Code Editor
The **Visual Editor** for `.bib` files provides a view that is more like the view provided by the Library, including form-based entry and editing options, as well as the same set of options for adding and managing entries that are available within the Library.
The Visual Editor
## Configuring Library options
There are three important configuration options that affect how the Library works in your project.
1. **Autocomplete must be enabled.** When you type a citation command (such as `\cite`) and begin to provide an argument, Overleaf will autocomplete the citation key based on possible entries found in your Library and `.bib` files. Providing options for you to select requires having autocomplete enabled.
2. **A main `.bib` file must be selected.** The Library needs to be told which `.bib` file in your project should be used to receive reference entries that are cited from the Library.
3. **A reference search style should be chosen.** Simple reference search will search for references in your Library based on citation keys only. Advanced reference search (a premium feature) will search across citation keys, author names, and titles.
## Managing your Library
You can easily edit your references using the form view. Selecting a reference in the Library brings up the form, allowing you to correct errors and add or remove fields.
{% hint style="info" %}
Editing a reference in your Library will not update project `.bib` files where that reference has already been cited. To update an entry in an existing project, you must remove and re-add the citation in that specific project, or edit the reference directly in the `.bib` file where it is used.
{% endhint %}
### Validation
Syntax mistakes and missing field values are major problems encountered when working directly with BibTeX or BibLaTeX. The Library helps to address this by ensuring correct syntax and by providing feedback about missing values or problems with your entries.
When you add items to your Library, it will check for
* duplicate citation keys,
* malformed citation keys, and
* missing required fields.
The Library provides indicators for missing required fields in the list of entries, with more details about the missing data shown in the card for the highlighted entry.
A Library entry displaying a warning for a missing required field
#### Citation key validation and generation
A citation key cannot include commas, spaces, or specific control and delimiter characters like `{`, `}`, `#`, `%`, `~`, `\`, or parentheses `( )`, because BibTeX and LaTeX use these symbols to parse syntax, separate fields, or process commands.
If a citation key is removed or left blank the Library will generate a citation key based on the author and year fields. A generated citation key can be edited afterwards to follow your preferred conventions. The Library will not replace existing valid keys with new values.
{% hint style="warning" %}
While the Library will warn you about duplicate citation keys when adding references, it does not currently block the addition of duplicates. It is currently the user's responsibility to ensure that libraries are free from duplicate entries or from entries that share the same citation key.
{% endhint %}
## Deleting Library entries
You can delete entries in your library, this will not affect project `.bib` files where the entry has been used. Deleting entries from the Library will move them to your account's **Trash**, rather than deleting them permanently right away. Library entries that are moved to the Trash can be restored back to the Library within 30 days.
{% hint style="danger" %}
Entries that are left in the Trash for more than 30 days will be deleted permanently and cannot be restored.
{% endhint %}
### Moving an entry to the Trash
To move an entry out of the Library and into the Trash, select the entry within the Library and choose the delete option shown at the top of the entries list.
Selected entries in the Library and the Delete option
### Restoring or permanently deleting an entry
To view references that have been moved to the Trash, in the project dashboard, click on the Trash button in the side bar.
The Library and Trash buttons in the project dashboard side pane
The Trash can contain both projects and references. Click on the **References tab** to see any references that have been moved to the Trash.
Once selected, you may restore a trashed reference, or delete it permanently.
The Trash with the References tab selected
## Exporting references
You can export selected references to a `.bib` file. This allows you to use your Library entries as references in local LaTeX projects, add your Library entries to other reference management tools, and share, or back up your Library reference data.
Use the download option for selected references to export a `.bib` file containing these references.
Downloading entries from the Library
## Library FAQ
Is the Library a reference manager, like ReadCube, Zotero, or Mendeley?
You can think of the Library as a purpose-built, simplified reference manager designed specifically for LaTeX workflows. It provides a central repository where you can easily sort, manage, and pull references directly into your Overleaf projects.
However, there are some key differences between the Library and standalone reference managers:
* No PDF or note storage: The Library is strictly for managing references (your BibTeX or BibLaTeX entries). It is not a repository for full-text PDFs or personal research notes, which are features often offered by external tools.
* LaTeX-driven formatting: The Library does not natively translate your references into different citation styles (such as APA or IEEE). Because the Library is integrated directly into your LaTeX projects, this formatting is handled seamlessly by BibTeX, BibLaTeX, or natbib during the LaTeX compile process.
How big can my Library get?
You can add up to 100MB of reference data to your Library.
How does the Library work with an external reference manager?
While you can easily import your existing `.bib` files into the Library, it currently operates independently and does not actively sync back and forth with external managers like Zotero or Mendeley.
Is there a browser extension that I can use to add references to the Library when I am on other sites?
Many reference managers provide browser extensions for scraping reference data from journal sites. Overleaf does not directly provide a browser extension that provides this functionality. There are a number of existing extensions that do provide BibTeX data from journal sites or from other reference data sources, such as Google Scholar. Many sites that provide reference data do offer a BibTeX output format directly.
I am not able to cite items that are in my Library, what should I do?
Please check the Library configuration options (link to above). If you are still having trouble, please [contact us](https://www.overleaf.com/contact).
Can I move data from project .bib files to my Library?
You can copy and paste references from .bib files into your Library, or download them from your projects and upload them to your Library. Currently there is not a way to move individual references directly from a project bib file to the Library.
# Available BibTeX styles
Overleaf supports BibTeX styles and packages available in TeX Live. Here’s a specific list of the `.bst` files that are already installed on Overleaf’s servers (so you don’t have to add them specifically to your project):
**Base styles**
* acm.bst
* unsrt.bst
* abbrv.bst
* siam.bst
* alpha.bst
* apalike.bst
* ieeetr.bst
* plain.bst
**abntex2**
* abntex2-num.bst
* abntex2-alf.bst
**abstyles**
* aplain.bst
* aabbrv.bst
* aalpha.bst
* anotit.bst
* aunsnot.bst
* aunsrt.bst
**achemso**
* achemso.bst
* biochem.bst
**adfathesis**
* adfathesis.bst
**adrconv**
* adrbirthday.bst
* adrfax.bst
* adrconv.bst
**afthesis**
* thesnumb.bst
**aguplus**
* agufull.bst
* agufull04.bst
* agu04.bst
* agu.bst
**aiaa**
* aiaa.bst
**aichej**
* aichej.bst
**ajl**
* ajl.bst
**ametsoc**
* ametsoc.bst
**amsrefs**
* amsry.bst
* amsra.bst
* amsrn.bst
* amsru.bst
* amsrs.bst
**amscls**
* amsalpha.bst
* amsplain.bst
**aomart**
* aomplain.bst
* aomalpha.bst
**apacite**
* apacann.bst
* apacite.bst
* apacitex.bst
* apacannx.bst
**apalike2**
* apalike2.bst
**ascelike**
* ascelike.bst
**babelbib**
* bababbrv-lf.bst
* babunsrt-fl.bst
* bababbr3-lf.bst
* babalpha-fl.bst
* bababbr3.bst
* babplai3-fl.bst
* babplai3.bst
* babalpha-lf.bst
* babplai3-lf.bst
* babplain.bst
* babunsrt-lf.bst
* babalpha.bst
* bababbr3-fl.bst
* babunsrt.bst
* bababbrv-fl.bst
* babplain-fl.bst
* babamspl.bst
* bababbrv.bst
* babplain-lf.bst
**besjournals**
* besjournals.bst
**bibexport**
* export.bst
* expkeys.bst
* expcites.bst
**bib-fr**
* unsrt-fr.bst
* siam-fr.bst
* alpha-fr.bst
* abbrv-fr.bst
* unsrtnat-fr.bst
* abbrvnat-fr.bst
* apalike-fr.bst
* plain-fr.bst
* ieeetr-fr.bst
* plainnat-fr.bst
**bibhtml**
* alphahtmldater.bst
* alphahtml.bst
* alphahtmldate.bst
* abbrvhtml.bst
* plainhtml.bst
* plainhtmldater.bst
* unsrthtml.bst
* plainhtmldate.bst
**bgteubner**
* bgteuabbr2.bst
* bgteuabbr.bst
* bgteupln3.bst
* bgteupln.bst
* bgteupln2.bst
**cascadilla**
* cascadilla.bst
**cell**
* cell.bst
**chembst**
* ChemCommun.bst
* ChemEurJ.bst
* InorgChem.bst
* JAmChemSoc.bst
* cv.bst
* JAmChemSoc\_all.bst
**chem-journal**
* pccp.bst
* jcc.bst
* jpc.bst
* revcompchem.bst
**chet**
* chetref.bst
**chscite**
* chscite.bst
**chicago**
* chicago.bst
**chicago-annote**
* chicago-annote.bst
**cmpj**
* cmpj.bst
**cnbwp**
* abbrvcnb.bst
**computational-complexity**
* computational-complexity/cc.bst
* computational-complexity/cc2.bst
**confproc**
* newapave.bst
**datatool**
* databib.bst
**din1505**
* alphadin.bst
* natdin.bst
* abbrvdin.bst
* plaindin.bst
* unsrtdin.bst
**dinat**
* dinat.bst
**directory**
* address-ldif.bst
* address-vcard.bst
* email-html.bst
* address-html.bst
* email.bst
* birthday.bst
* address.bst
* letter.bst
* phone.bst
**disser**
* gost705s.bst
* gost705.bst
**dk-bib**
* dk-alpha.bst
* dk-apali.bst
* dk-unsrt.bst
* dk-plain.bst
* dk-abbrv.bst
**dlfltxb**
* dlfltxbbibtex.bst
**dtk**
* dtk.bst
**dvdcoll**
* dcbib.bst
**economic**
* regstud.bst
* worlddev.bst
* aer.bst
* ecca.bst
* ier.bst
* apecon.bst
* agecon.bst
* aertt.bst
* ecta.bst
* cje.bst
* jss2.bst
* erae.bst
* oega.bst
* jpe.bst
* itaxpf.bst
* ajae.bst
* jae.bst
* tandfx.bst
**elsarticle**
* elsarticle-harv.bst
* elsarticle-num-names.bst
* elsarticle-num.bst
**fbs**
* fbs.bst
**figbib**
* figbib1.bst
* figbib.bst
**finbib**
* finplain.bst
**francais-bst**
* francais.bst
* francaissc.bst
**frankenstein**
* achicago.bst
**gatech-thesis**
* gatech-thesis-losa.bst
* gatech-thesis.bst
**germbib**
* gerapali.bst
* gerabbrv.bst
* geralpha.bst
* gerplain.bst
* gerunsrt.bst
**gloss**
* glsplain.bst
* glsshort.bst
**gost**
* gost2008s.bst
* ugost2008.bst
* gost2008l.bst
* gost2008.bst
* ugost2008ls.bst
* gost2003.bst
* ugost2008n.bst
* ugost2008ns.bst
* ugost2003s.bst
* gost2008ns.bst
* ugost2003.bst
* ugost2008s.bst
* gost780.bst
* gost2008ls.bst
* ugost2008l.bst
* gost780s.bst
* gost2003s.bst
* gost2008n.bst
**gustlib**
* plunsrt.bst
* plalpha.bst
* plplain.bst
* plabbrv.bst
**harvard**
* dcu.bst
* kluwer.bst
* jphysicsB.bst
* jmr.bst
* agsm.bst
* apsr.bst
* nederlands.bst
**hc**
* hc-de.bst
* hc-en.bst
**ieeepes**
* ieeepes.bst
**IEEEtran**
* IEEEtranN.bst
* IEEEtranS.bst
* IEEEtran.bst
* IEEEtranSA.bst
* IEEEtranSN.bst
**ijmart**
* ijmart.bst
**ijqc**
* ijqc.bst
**imac**
* imac.bst
**index**
* xagsm.bst
* xplain.bst
**inlinebib**
* inlinebib.bst
**iopart-num**
* iopart-num.bst
**jneurosci**
* jneurosci.bst
**jurabib**
* jurabib.bst
* jurunsrt.bst
* jureco.bst
* jox.bst
**jurarsp**
* jurarsp.bst
**kluwer**
* klunum.bst
* klunamed.bst
**ksfh\_nat**
* ksfh\_nat.bst
**listbib**
* listbib.bst
**mciteplus**
* IEEEtranMN.bst
* apsrmpM.bst
* apsrevM.bst
* IEEEtranM.bst
**minitoc**
* fr-mtc.bst
* en-mtc.bst
**mslapa**
* mslapa.bst
**multibib**
* mbplain.bst
* mbunsrtdin.bst
**multibibliography**
* chronological.bst
**munich**
* munich.bst
**natbib**
* abbrvnat.bst
* unsrtnat.bst
* plainnat.bst
**nature**
* naturemag.bst
**nddiss**
* nddiss2e.bst
**opcit**
* opcit.bst
**pbibtex**
* jabbrv.bst
* jname.bst
* jplain.bst
* tipsj.bst
* junsrt.bst
* jorsj.bst
* tieice.bst
* jipsj.bst
* jalpha.bst
**perception**
* perception.bst
**persian-bib**
* acm-fa.bst
* ieeetr-fa.bst
* chicago-fa.bst
* asa-fa.bst
* unsrt-fa.bst
* plainnat-fa.bst
* plain-fa.bst
**pnas2009**
* pnas2009.bst
**przechlewski-book**
* papalike.bst
**psu-thesis**
* psuthesis.bst
**resphilosophica**
* resphilosophica.bst
**revtex**
* apsrmp4-1.bst
* aipauth4-1.bst
* apsrev4-1.bst
* aipnum4-1.bst
**revtex4**
* apsrev.bst
* apsrmp.bst
**rsc**
* angew\.bst
* rsc.bst
**sageep**
* sageep.bst
**sapthesis**
* sapthesis.bst
**savetrees**
* savetrees.bst
**seuthesis**
* seuthesis.bst
**shipunov**
* rusnat.bst
**sort-by-letters**
* alpha-letters.bst
* siam-letters.bst
* frplainnat-letters.bst
* abbrv-letters.bst
* apalike-letters.bst
* plain-letters.bst
* plainnat-letters.bst
**spie**
* spiebib.bst
**stellenbosch**
* usmeg-a.bst
* ussagus.bst
* usmeg-n.bst
**swebib**
* sweunsrt.bst
* sweplnat.bst
* sweabbrv.bst
* sweplain.bst
* swealpha.bst
**texsis**
* texsis.bst
**thuthesis**
* thubib.bst
**tugboat**
* ltugbib.bst
**udesoftec**
* udesoftec.bst
**uestcthesis**
* uestcthesis.bst
**unamthesis**
* UNAMThesis.bst
**urlbst**
* abbrvurl.bst
* unsrturl.bst
* alphaurl.bst
* plainurl.bst
**vak**
* vak.bst
**vancouver**
* vancouver.bst
# Collaborating in Overleaf
Overleaf allows multiple authors to collaborate on manuscripts in real time. This allows coauthors to work on an article at the same time, team members to work on group projects together, reviewers to provide immediate feedback, and students to interact with instructors within their shared documents.
Overleaf provides various collaboration features, including project sharing, track changes, commenting, and collaborator chat.
{% content-ref url="/pages/1dKw6Xecary3htw3O397" %}
[Sharing a project](/collaborating/sharing-a-project)
{% endcontent-ref %}
{% content-ref url="/pages/zx7YL5eACxdzP31jXelH" %}
[Track changes](/collaborating/track-changes)
{% endcontent-ref %}
{% content-ref url="/pages/PlBTl6Lzf2KuM8dkH8QE" %}
[Commenting](/collaborating/commenting)
{% endcontent-ref %}
The technology that powers the simultaneous editing in Overleaf is called [Operational Transformation](https://en.wikipedia.org/wiki/Operational_transformation) or OT for short. Your edits on Overleaf are sent back to the server every few seconds and saved. If two or more people edit the file at the same time, the server is able to "rebase" each change on top of the other changes, so that all of the clients end up at the same version. To notify clients of changes made by other clients, we use [WebSocket](https://en.wikipedia.org/wiki/WebSocket), a technology that allows servers to push updates to connected clients.
# Sharing a project
## Link sharing
“Link sharing” allows a project owner to share their projects via different types of links:
* View Link: Anyone with a *view link* can access and read the associated Overleaf project.
* Edit Link: Anyone with an *edit link* is allowed to edit the associated Overleaf project—*if they already have an Overleaf account*; otherwise, they'll need to create an account first. If the number of editors already in the project has reached the allowed limit, any user joining the project with an edit link will join with view-only permissions.
To access link sharing:
1. Click on the **Share** button at the top right corner of the project:
2. Click **Turn on link sharing**:
3. The shareable *edit* and *view* URLs will be displayed:
4. To let someone access the project, simply send them the appropriate URL. Note that users must have an Overleaf account to **edit** a link-shared project.
### Are my Overleaf projects private?
Yes, every project you create is automatically private. Other Overleaf users can't see your projects in Overleaf unless you deliberately share them with others via the Share menu.
When link sharing is enabled, Overleaf creates a unique token used only for the link to that project. It is almost impossible to guess the token, and hence the link to your project is known only to you.
{% hint style="warning" %}
If you turn link sharing on, please note that if you publish the link to your project on a website or somewhere public, anybody can use the link, and the website where your link is posted might even be included in search engine results.
{% endhint %}
For more information, please see the Privacy Policy tab on our [Terms of Service](https://www.overleaf.com/legal) page.
## Inviting collaborators via email
If you know the email address of your collaborators, you can invite them to the project via email. To share a project with someone:
1. Click on the **Share** button at the top right corner of the project:
2. Enter the email address of the user you would like to share the project with:
3. Choose whether you would like the collaborator to have view-only access, review access (edits become suggestions), or whether they will be allowed to edit the project.
4. Click **Invite**.
Your collaborator will now receive an email inviting them to join the project. Once they have logged into their account, they will be able to accept the invite and collaborate on the project. The **Share Project** window will update to show that they have accepted the request and joined the project. If they do not receive an email:
* Make sure the email address you are using is correct.
* Try resending the email by clicking **Resend** in the **Share Project** window.
* Check the spam folder of the email address as sometimes emails can end up there by mistake.
## Number of collaborators allowed
Adding more than one collaborator per project (editor or reviewer) is a [premium feature](/getting-started/free-and-premium-plans/premium-features). Overleaf premium features are available to users whose organization or university has an [Overleaf Commons](https://www.overleaf.com/for/universities) subscription, members of [group subscriptions](https://www.overleaf.com/user/subscription/plans#group), and owners of [individual subscriptions](https://www.overleaf.com/user/subscription/plans). The number of collaborators you are allowed to invite will depend on the plan you are part of. Visit our [plans page](https://www.overleaf.com/user/subscription/plans) to view the different plans available.
# Commenting
The commenting feature in Overleaf makes it easy to review and discuss your LaTeX documents directly within the editor.
## The basics
Comments in Overleaf allow users to add comments tied to specific lines of code in the editor. These comments appear in a sidebar and can be viewed, replied to, and resolved by all collaborators with access to the project.
### Accessing the comment feature
Highlight some text within the editor to comment on, once you have done so the 'Add comment' button appears. Select it and the review panel will open on the left hand side, there you can type your comment.
## Using comments
Once you or your collaborators have created a comment, you can resolve the comment by clicking on the checkmark ✓ attached to the comment. If you are looking to edit or delete your comment select the ellipsis menu , and select 'Edit' or 'Delete'.
You may also access the list of resolved comments in your project by clicking on the resolved comments icon () within the review panel.
While viewing the resolved comments you are also able to delete the thread of comments by clicking on the trash icon (), or re-open previously resolved comments by clicking on the 'Re-open' icon ()
## Collaborative commenting
Collaborative commenting in Overleaf provides a streamlined way for teams to review and discuss a LaTeX document without making direct, permanent edits. This feature facilitates targeted feedback, allows collaborators to reply and resolve discussion threads, and ensures all project members can see, track, and manage input efficiently, keeping the document clean while collaboration is active.
### Mentions
Flag something for a specific collaborator by mentioning them directly in a comment. Type `@` and start typing their name (or email address) to prompt a list of collaborators.
## Notifications
{% hint style="info" %}
Email notifications on project activity must be enabled in your [Account Settings](https://www.overleaf.com/user/notification-preferences).
{% endhint %}
You can manage notification emails per project through the Project Settings (File > Settings > Project Notifications) for the following types of activity:
* **All project activity** - You’ll be notified about *all* comments (and [tracked changes](/collaborating/track-changes)).
* **Mentions and replies only** - You'll be notified about mentions, replies, and activity on your comments and tracked changes.
{% hint style="warning" icon="timer" %}
Notifications are not real-time, instead they are bundled in ten minute increments to avoid inbox overload.
{% endhint %}
# Track changes
## Introduction
Track Changes is a [premium feature](/getting-started/free-and-premium-plans/premium-features). Overleaf premium features are available to participants in [Overleaf Commons](https://www.overleaf.com/for/universities), members of [group subscriptions](https://www.overleaf.com/for/groups), and owners of individual [subscriptions](https://www.overleaf.com/user/subscription/plans). All collaborators invited to a project owned by an Overleaf account with this premium feature will be able to use Track Changes in that project. The Track Changes feature is not available through the discontinued Personal plan.
This article shows how to use Track Changes. You can use Track Changes to observe changes made by some, or all, co-authors or those you have invited to review, or proofread, your work. At a glance you’ll see any revisions which you can also comment upon to suggest further changes, ask for clarifications, request sources and much else besides.
You can leverage Track Changes and/or comments as a way to remind yourself of any follow-up work required based on your co-authors’ edits and contributions. Comments can be replied to, resolved (archived) and permanently deleted—see the article [Commenting](/collaborating/commenting) for some video clips showing how to use Overleaf’s commenting features.
## Accessing Track Changes
Track Changes can be accessed by switching to reviewing mode. To switch modes, click the icon at the top right of the Overleaf editor toolbar and choose from the options that appear.
* If you have edit access, you can switch between Editing and Reviewing.
* If you only have review or view access, you won't be able to change your mode.
Image showing how to change editing mode on Overleaf
### Configuring whose changes will be tracked
To force another collaborator’s changes to be tracked, the project owner can update their [sharing permissions](/collaborating/reviewing-and-reviewers).
## How to accept or reject all tracked changes
Follow these steps to accept (or reject) all tracked changes contained in a part, or whole, of your document.
1. Select the section of text containing the set of tracked changes you want to accept or reject. To accept or reject *all* tracked changes, select the entire document text using `ctrl+A` (Windows) or `cmd+A` (Mac).
2. After the text is selected, the option to **Accept selected changes** or **Reject selected changes** will appear, as shown in the following example:
Image showing how to accept or reject tracked changes
3. Select **Accept selected changes** or **Reject selected changes** to display a pop-up window asking you to confirm or cancel your choice.
Image showing how to accept or reject tracked changes
{% hint style="warning" %}
If you make a copy of your project, all tracked changes are automatically applied in the copied version. They will no longer be shown as tracked.
{% endhint %}
## Notifications
{% hint style="info" %}
Notifications on project activity must be enabled in your [Account Settings](https://www.overleaf.com/user/notification-preferences).
{% endhint %}
You can manage notification emails per project through the Project Settings (File > Settings > Project Notifications) for the following types of activity:
* **All project activity** - You’ll be notified about *all* tracked changes (and [comments](/collaborating/commenting)).
* **Mentions and replies only** - You'll be notified about mentions, replies, and activity on your comments and tracked changes.
{% hint style="warning" icon="timer" %}
Notifications are not real-time, instead they are bundled in ten minute increments to avoid inbox overload.
{% endhint %}
# Reviewing and reviewers
Change tracking in Overleaf is done in reviewing mode. If a collaborator on a project is a Reviewer, all their changes will be tracked.
Want to collaborate on your Overleaf project? This page will walk you through what a Reviewer is on Overleaf. We’ll show you how to use Reviewing to track changes and how to invite collaborators as reviewers so they can provide comments and suggestions without directly editing your content. This helps keep your project organized and makes collaboration easier!
## Current editing mode
The icon in the top-right corner of the Overleaf editor shows your current editing mode. For the project owner, and anyone with edit access, the default here will be Editing. This means you have full access to modify the project. Other modes are Reviewing, the default for those with review access, and Viewing, for those with read-only access.
## Reviewer permissions
Reviewing is the default mode for reviewers and can be alternated between for those with edit access.
* Collaborators who are “Reviewers” can only make and respond to comments and make tracked changes. They cannot change to Editing.
* Collaborators who are “Editors” have the same restrictions as "Reviewers" when in Reviewing **but** can switch to Editing as needed.
* Project Owner sets reviewer permissions for collaborators.
### Changing your mode
To switch modes, click the icon at the top-right of the Overleaf editor and choose from the options that appear.
* If you have edit access, you can switch between Editing and Reviewing.
* If you only have review or view access, you won’t be able to change your mode.
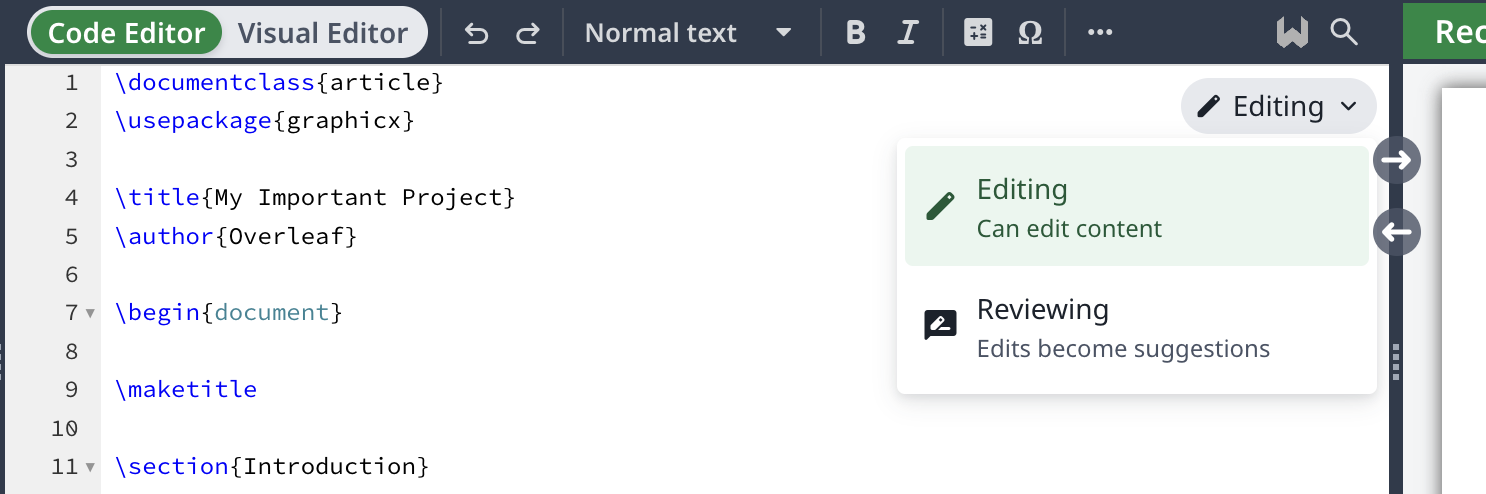
Remember:
* Switching to Reviewing automatically turns on Track Changes for you. To turn them off, switch back to Editing.
* You might also want to switch to Reviewing when you’re finished with a project—to avoid accidentally changing the content. Your changes will still be tracked.
### Changing a collaborator’s mode
When [sharing a project](/collaborating/sharing-a-project) you can set the mode of the collaborator. This can be done when the invite is sent or after they have joined the project.
#### **Invitation access**
When you invite a collaborator to your project, you have the option to choose their level of access when sending the invitation. To make them a Reviewer, select **Reviewer** from the drop-down menu next to the **Invite** button.

### **Changing an existing collaborator to a Reviewer**
To change the permissions of someone who is already collaborating on your project, go to **Share**. Find the collaborator you want to change and select **Reviewer** from the drop-down menu next to their email address.

## Frequently Asked Questions
Can I turn Track Changes on for a collaborator?
Yes, by switching their access to **Reviewer**. They can then only suggest tracked changes and add or respond to comments.
Can I use this for all collaborators?
The Reviewer role is currently only available for named collaborators. This means you can set a collaborator as a Reviewer when inviting them using their email, but not using link sharing. After a user has joined via link sharing, it is possible to update them to be a Reviewer.
Can I change myself from being a Reviewer?
The project owner has control over how others can interact with their work. You will need to contact them to change your access.
Can a Reviewer add/create files?
No, they can only make tracked changes and add comments.
Is the Reviewer role available on the free plan?
Yes, you can assign your one invited collaborator as a Reviewer but they will only be able to comment.
# Transferring project ownership
{% hint style="warning" %}
Only the project owner can transfer ownership of a project (unless the project is created by a [managed account](/accounts-and-security/understanding-managed-accounts)). Owner-only capabilities, such as the ability to add collaborators, turn link sharing on or off, and to delete the project are immediately disabled for the previous owner and enabled for the new owner.
{% endhint %}
With Overleaf you can easily transfer the ownership of a project to a collaborator.
## How can I transfer the ownership of a project?
1. As the owner, open the project you’d like to transfer, then click **Share** on the top bar.
2. This will open the **Share Project** modal, which will list any collaborators on the project. If none show, you will have to [invite them first.](/collaborating/sharing-a-project)
3. Click on the share permissions with the contributor you want to transfer project ownership to and choose **Make owner**.
4. You will then be prompted to change or cancel the ownership. If you’re sure you wish to continue with the transfer ownership, select **Change owner**.
{% hint style="warning" %}
The ownership change is immediate. Owner-only capabilities, such as the ability to add collaborators and turn link sharing on/off, are immediately disabled for the previous owner and enabled for the new owner.
{% endhint %}
5. After you’ve selected **Change owner**, you will get an email at your designated email address informing you of the change.
6. The new owner will also receive an email informing them of the change and will be able to click through and open the project on Overleaf.
***
## Will transferring project ownership affect collaborator access?
This depends on which Overleaf plan(s) the previous and new project owners have. The table below explains possible scenarios:
| Previous owner’s subscription | New owner’s subscription | Changes for collaborators |
| ---------------------------------------------------------------------------- | ---------------------------------------------------------------------------- | ----------------------------------------------------------------------------------------------------------------------------------------------------------------------------------------------- |
| Free | Free | No change—one edit access collaborator and unlimited view-only collaborators are allowed. |
| Standard or Group Standard | Free | The number of edit-access collaborators will decrease from 10 to 1. All collaborators will be made view-only and the new owner will be able to give only one collaborator edit access. |
| Professional, Group Professional, or Overleaf Commons (institutional access) | Free | The number of edit-access collaborators will decrease from unlimited to one. All collaborators will be made view-only and the new owner will be able to give only one collaborator edit access. |
| Free | Standard or Group Standard | The number of edit-access collaborators will increase from 1 to 10. The new owner will be able to invite up to 10 collaborators with edit access. |
| Free | Professional, Group Professional, or Overleaf Commons (institutional access) | The number of edit-access collaborators will increase from one to unlimited. The new owner will be able to add as many collaborators with edit access as they want. |
# Integrations and add-ons
There are several integrations and tools that you can link with Overleaf to gain access to even more features for your projects:
{% columns %}
{% column %}
{% content-ref url="/pages/1IZe4Tza3eYCxQnm89hw" %}
[Git integration and GitHub synchronization](/integrations-and-add-ons/git-integration-and-github-synchronization)
{% endcontent-ref %}
{% content-ref url="/pages/orq07mETjk35wpWyXjd3" %}
[Dropbox](/integrations-and-add-ons/dropbox)
{% endcontent-ref %}
{% content-ref url="/pages/FXCDAEIivxlL8ngdVeVD" %}
[Reference Manager integrations](/integrations-and-add-ons/reference-manager-integrations)
{% endcontent-ref %}
{% content-ref url="/pages/Q7l7ySuJJ0GxHgytDaKq" %}
[R code (knitr)](/integrations-and-add-ons/r-code-knitr)
{% endcontent-ref %}
{% endcolumn %}
{% column %}
{% content-ref url="/pages/05UZz0ABm11dDd8vkILe" %}
[AI features](/integrations-and-add-ons/ai-features)
{% endcontent-ref %}
{% content-ref url="/pages/WChVnswsd2qYciVPSSaa" %}
[Grammarly](/integrations-and-add-ons/grammarly)
{% endcontent-ref %}
{% content-ref url="/pages/v9tPkAJmqZaYHmGe5whu" %}
[Google Drive](/integrations-and-add-ons/google-drive)
{% endcontent-ref %}
{% endcolumn %}
{% endcolumns %}
# Git integration and GitHub synchronization
There are two ways to use Overleaf with Git:
Overleaf's /pages/LkfRdRBq0aPYa9ndHCYq is a premium feature for Overleaf Cloud users and is also available for Overleaf Server Pro (version 4.0 and later). The Git integration allows you to clone your Overleaf project to a local repository, treating your Overleaf project as a remote repository that changes can be pushed to and pulled from.
Overleaf's /pages/bs10Ycm54dTldcQlcwSp is a premium feature for Overleaf Cloud users. The GitHub synchronization feature allows you to link your Overleaf projects directly to a GitHub repository and keep them in sync.
# Git integration
{% hint style="info" %}
Overleaf's Git integration now uses **main** as the branch name. Older cloned repositories may continue to be using the **master** branch name, but all recently cloned repositories use **main**.
{% endhint %}
For an overview of some other cloning strategies, please see [Advanced Git operations](/integrations-and-add-ons/git-integration-and-github-synchronization/git-integration/advanced-git-operations).
### **Overleaf Cloud**
If you're using Overleaf Cloud and your Overleaf project URL looks like:
```
https://www.overleaf.com/project/1234567
```
Then the Git URL to use to clone the project will be:
```
https://git.overleaf.com/1234567
```
And the command used to clone the project into a local Git repository will be:
```
git clone https://git.overleaf.com/1234567
```
### **Overleaf Server Pro (version 4.0 or later)**
{% hint style="info" %}
Note: The Git-bridge integration is not enabled by default in Server Pro. Please see our [Git Integration](https://github.com/overleaf/overleaf/wiki/Git-Integration) guide for instructions on how to enable it.
{% endhint %}
If you're using Overleaf Server Pro and your Project URL looks like this:
```
https:///project/1234567
```
Then the Git URL used when cloning the project will be:
```
https://git@/git/1234567
```
And the command used to clone the project into a local Git repository using the Git command line will be:
```
git clone git@/git/1234567
```
{% hint style="info" %}
Note: You may be prompted for a password. Please see: [Git integration authentication tokens](/integrations-and-add-ons/git-integration-and-github-synchronization/git-integration/git-integration-authentication-tokens)
{% endhint %}
## Git commits and the Overleaf Git integration
Overleaf has an internal [History system](/writing-and-editing/history-and-versioning) that allows simultaneous collaboration within an Overleaf project. This isn't the same as Git, so the Overleaf Git integration is essentially a translation from Overleaf's history and versioning mechanism to Git. This allows many Git-enabled use cases, but it doesn't allow you to work within Overleaf as if it was a complete Git implementation.
### **When are commits created?**
When you issue a `pull` or `fetch` command, if no commit exists for the current project state, a new commit is created dynamically. When you `push` files from your local repository to the Overleaf remote, a commit is created at that time as well, which will be visible in any future clones you make of the Overleaf project. When you or others are editing in Overleaf, commits will not be automatically generated until needed.
### **Forcing commits**
If you'd like to force a commit to be created at a particular point in Overleaf history, you can do so by [labeling a version](/writing-and-editing/history-and-versioning#labeling-a-project-version) in the Overleaf history. The labeled version will get its own commit hash even if you don't do a Git pull right away. A commit will only be created from a label if there have not been any other commits made more recently than the Overleaf history point that is being labeled.
### **Tracking authorship**
The just-in-time nature of commits from the Overleaf Git integration means that if there have been multiple changes on the Overleaf side before a commit is generated, the author of the most recent change will be listed as the author of the commit.
When working with coauthors, it is helpful to create a label (generating a commit) after each collaborator has completed a significant update—this creates a sequence of commits visible in Git that most closely reflects the changes that are happening in Overleaf.
## Known limitations
Branches
The Overleaf Git system does not support branching. New clones of an Overleaf project will use main as the branch name (older clones may be using master).
Symlinks
The Overleaf Git system does not handle symlinks. A symlink can be pushed into an Overleaf project, but will be converted to a regular file, and will overwrite the local symlink the next time the project is pulled.
Tags
The Overleaf Git system does not support tagging.
File permissions
The Overleaf Git system does not preserve execute permissions. To work around this, you can run git config core.fileMode false in your local clone of the repository. Then you can reset the execute permissions on any affected files. This way they won't be modified again with subsequent Git operations.
Git LFS
Overleaf projects do not support Git Large File Storage.
Git submodules
Overleaf projects can act as Git submodules within other repositories, but cannot contain other Git submodules. To reference files from other projects, it is suggested to use the add from another project feature.
Renaming folders
If a user renames a folder, and pushes the change to Overleaf, the project will retain an empty folder with the old name, in addition to the new folder. (For example, renaming images/ to img/ will leave two folders in the project: img/ containing the image files, and images/, which will be empty. This can cause problems when a user renames a folder, and creates a new file with the same name as the old folder, in one commit. The Overleaf Git system will reject these commits. In this case we recommend splitting the commit up into two parts, and deleting the remaining folder.
Renaming files and moving files
A file rename in your local repository becomes a delete and create on the Overleaf side. This can result in loss of metadata associated with a file on the Overleaf side, causing the deletion of tracked changes and comments. It is not recommended to move or rename files on the Git side that have Overleaf tracked changes or comments.
Track Changes and comments
Unfortunately, pushes from Git to Overleaf can result in the loss or displacement of track changes and comments. Consequently, we do not recommend mixing active use of Git and the use of track changes and/or comments.
## Troubleshooting
### **Repository not found errors**
If you are seeing a Repository not found error, it's likely that the wrong URL is being used. The correct URL can be found by clicking the **Git** option inside **Integrations** on the lefthand side within the project. For Overleaf cloud, Git integration is a premium feature, so it will only be available if the project owner has a paid subscription to Overleaf or has been granted access to the feature (by participating in early beta testing, for example).
### **Authentication failed errors**
Please see [Git integration authentication tokens](/integrations-and-add-ons/git-integration-and-github-synchronization/git-integration/git-integration-authentication-tokens).
### **Rate limits**
Git Bridge rate limiting does not generally occur when Git operations are executed manually. Some Git clients can be configured to attempt to automatically poll remotes for changes, which can lead to rate limiting errors some cases. Generally disabling any automated polling or reducing the frequency of Git operations should solve these issues.
### **Failure to push references**
A failure to push some reference to the remote project can be caused by [exceeding the file size or number limitations of a project](/getting-started/free-and-premium-plans/plan-limits) or by including unsupported file types (symlinks, or LFS, for example.) Please review the known limitations listed above to identify any problem files in the commit.
In some cases, increasing the postBuffer setting can address failures to push references from your local repository to the Overleaf project.
First, you can check your current setting with the command:
```
git config http.postBuffer
```
If there's no output, that means that the default value of 1MB is used.
Next, try the command:
```
git config --global http.postBuffer 10485760
```
which will set the value to 10 MB instead.
Now you can try pushing the commit (to either the original project or the new one). If that doesn't work, you can return to your previous setting, or remove the setting with:
```
git config --global --unset http.postBuffer
```
### **Timeouts**
Git commits that include a large number of changes can potentially lead to timeouts. If you encounter a timeout, please try breaking the commit into smaller changes. If the problem persists, consider setting the postBuffer to 10 MB as described above.
---
[Next Page](/llms-full.txt/1)


