Loading...
Loading...
Loading...
Loading...
Loading...
Loading...
Loading...
Loading...
Loading...
Loading...
Loading...
Loading...
Loading...
Loading...
Loading...
Loading...
Loading...
Loading...
Loading...
Loading...
Loading...
Loading...
Loading...
Loading...
Loading...
You can create a group in Overleaf when you buy a group subscription.
It's important to note that the person who buys the group subscription is set as the admin for the group. You can give other members manager privileges, but there is only one admin. See .
To create a group on Overleaf, you’ll just need to purchase a group subscription. You can explore the available subscription options on the . These plans cater to different team sizes and needs, offering flexibility whether you're a small group or a large organization.
For organizations that require a purchase order (PO), please note there is a minimum requirement of 5 user seats to qualify. Payments can be made via debit/credit card or PayPal for smaller groups or teams.
If you need a custom number of seats, or help with a PO, please . Our team will be able to help you tailor a solution that fits your specific requirements.
This page explains how to add and remove users from your Overleaf group
Group administrators and managers have access to reports about group subscription use.
To view Group Metrics, click the View Metrics link. The date range for the metrics defaults to the last 30 days, displayed by day. You can change this to any date range, displayed by day, week, or month, by clicking on the date.
Please mouse over the (?) for tooltips, and mouse over the graphs for additional information.
Use the Download CSV button at the top of the page to download the data behind the graphs.
You can manage your group from the Subscription page when you're logged into Overleaf.
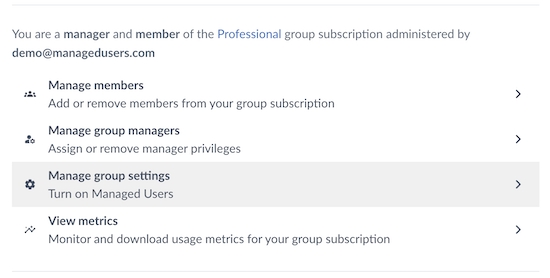
As the admin of your Overleaf group, you can access a range of features and settings that allow you to manage your subscription and users effectively.
To access your subscription admin, log in to Overleaf and navigate to the . You can find this by clicking the Account button when logged in to Overleaf.
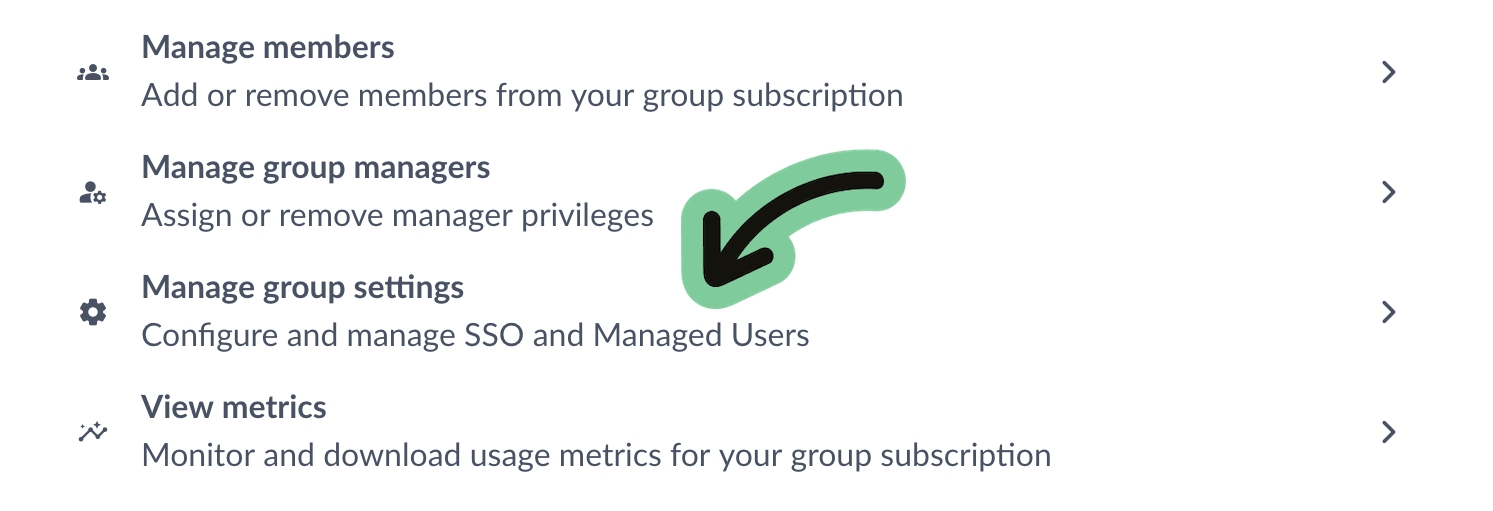
From the Subscription page you'll be able to:
Manage group members, including .
Manage group settings—including SSO and Managed Users for Pro groups
Monitor and download usage metrics
If any of the users you add have personal Overleaf subscriptions, please let them know they’ll need to cancel their plans if they no longer want to be charged for them.
To access group member management, click Manage Members on the Subscription page.
To add a single user to the group, enter the user’s email address in the Add more members field. Then, click Add.
To add multiple users, copy and paste a list of email addresses separated by commas. Then, click Add.
To remove users, tick the box next to the email address(es) of the user(s) you wish to remove, then click Remove from group.
To download a list of group members, click Export to CSV.
To access group manager management, click the Manage Group Managers link. Use the same steps to add and remove group managers as you did to add and remove group members. Group Managers must be current Overleaf account holders.
All Group Managers have the same ability to manage users, view metrics, and add and remove managers. Managers do not need to be members, so do not necessarily consume a license.
There is only one Group Admin. This is the person who owns the group subscription and receives billing notices and metrics emails. Please contact us at [email protected] if you need to change the Group Admin.
This plot shows the number of unique Overleaf projects edited at least once by users in your group during the time period selected (day, week or month).
This plot shows the total length of editing sessions, in hours, per time period (day, week or month). This is how long the users in your group are spending on Overleaf.
This plot shows the number of unique users within your group that started at least one Editing Session on a given day, week, or month. An Editing Session starts when a user opens a project, and lasts until there is 30 minutes of inactivity.
This plot shows the number of projects with at least one Editing Session. The different colours show the breakdown of the total length of Editing Sessions on each of those projects over the past year.
Click the dots in the legend to toggle on/off the display of the category. Double click a dot to show only that category.
An Editing Session starts when a user in your group opens a project, and lasts until there's 30 minutes of inactivity. Activity includes moving the cursor, typing and clicking.
This plot shows the number of editing sessions per time period (day, week or month).
This plot shows how many new projects the users in your group created on Overleaf per time period (day, week or month).
This plot displays the average number of collaborators per project. Collaborator count is the number of distinct users that had at least one Editing Session during the time period (day, week or month).
To be included, at least one collaborator must belong to your group, and projects must have had at least one Editing Session. Internal collaborators are those who are part of the same group. Click the dots in the legend to toggle on/off the display of the category.
This plot shows the number of projects that had more than one collaborator. A collaborator is a user that had at least one Editing Session during the time period.
The colours represent the different number of collaborators. To be included, at least one collaborator must belong to your group.
This shows the number of projects that had more than one collaborator belonging to your group.
A collaborator is a user that had at least one Editing Session during the time period. The colours represent the different number of collaborators
Group Standard
For teams and small departments. Premium features for all group members, including real-time track changes, project history, and much more.
Group Professional
All the benefits of our Group Standard plan, plus:
Single Sign On (SSO)
Managed User Accounts
Unlimited collaborators per project


Subscription administrators can easily purchase additional licenses for their group or upgrade their plan.
Only the group administrator can buy more licenses for a group subscription. When an administrator does buy more licenses for the group, an invoice will be generated automatically and emailed to the administrator when the transaction is completed.
If you are a group administrator, to purchase additional licenses click the Buy more licenses button. After entering the number of licenses you want to purchase, you'll see a preview of the cost.
Only the administrator of a group can upgrade the plan. When an admin upgrades their group, an invoice will be generated automatically and emailed to the lead administrator when the transaction is completed.
If you are a group administrator, you can upgrade from a Standard group to a Professional group by clicking Upgrade Plan. A cost preview will be provided before you confirm the upgrade.
Please note that only group subscriptions that were purchased on the Overleaf website can upgrade directly from a Standard plan to a Professional plan using this option. Please if you wish to upgrade the group you administer and do not see this option available to you.
Some administrators may not see the upgrade and add license options described here. This can happen if the group was not purchased through the Overleaf website. If you are the administrator of a group and do not see these options, please and let us now how you would like to update your group subscription.
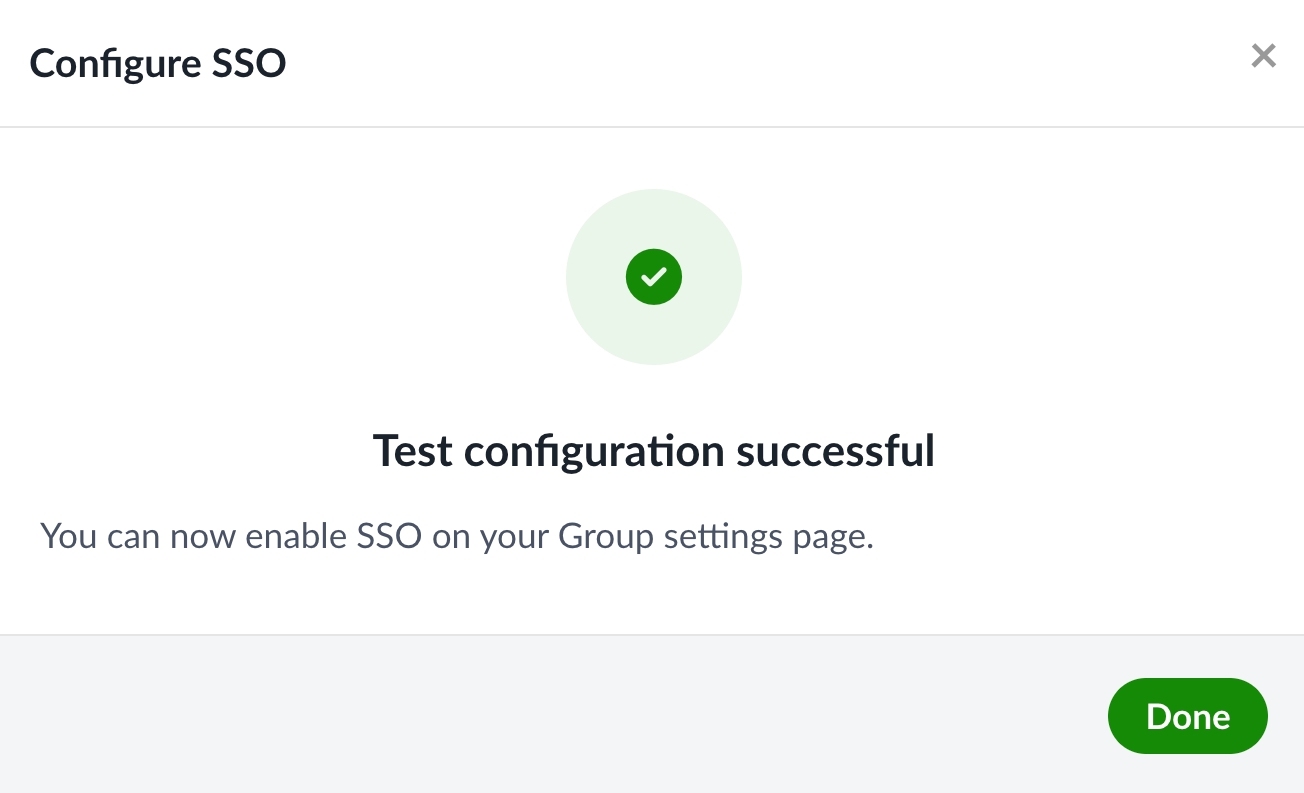
When you have finished the configuration steps and have completed a successful test, you can return to your subscription’s settings page and enable SSO. You can also wait and enable SSO later.
Once SSO is enabled, your team members will receive emails that include a link for them to follow that will allow them to connect their Overleaf account to their SSO identity in your IdP. If they are already logged in to Overleaf, they will see a notification in their Overleaf dashboard letting them know that they can now connect and log in with SSO.
More information for your team members can be found on our . If your team members are managed users, you may want to share our .
Before you set up Overleaf group SSO, make sure you can answer, "yes," to the following questions.
Are you the administrator of an Overleaf Group Professional plan? If you're not the administrator, you'll need to work with the administrator to set up SSO. Only the administrator of the group can access the SSO configuration page.
Group subscription administrators can access and download logs of key subscription lifecycle events. These audit logs can assist with troubleshooting subscription level issues, providing information about single sign-on (SSO) enablement, user enrolment, and other high-level subscription lifecycle events.
Group subscription audit logs can be accessed by the group administrator from their .
All available logs can be exported in CSV format within a .zip file. Each page (of 100 log entries) will be saved as a separate file, with a timestamp as the file name.
Most Overleaf subscriptions are set to automatically renew at the end of their term. You can check the status of your subscription by visiting your while signed in to your Overleaf account.
If your subscription has ended, you can start a new subscription by visiting the .
For subscriptions that are manually billed, our Success team will usually reach out to remind you about the renewal process and assist with any required steps.
Do you have a high-level understanding of SAML-based SSO? While this documentation provides step-by-step instructions, it's not a tutorial on SAML-based SSO. For a better understanding of the concepts mentioned here, you may wish to consult additional tutorials and documentation.


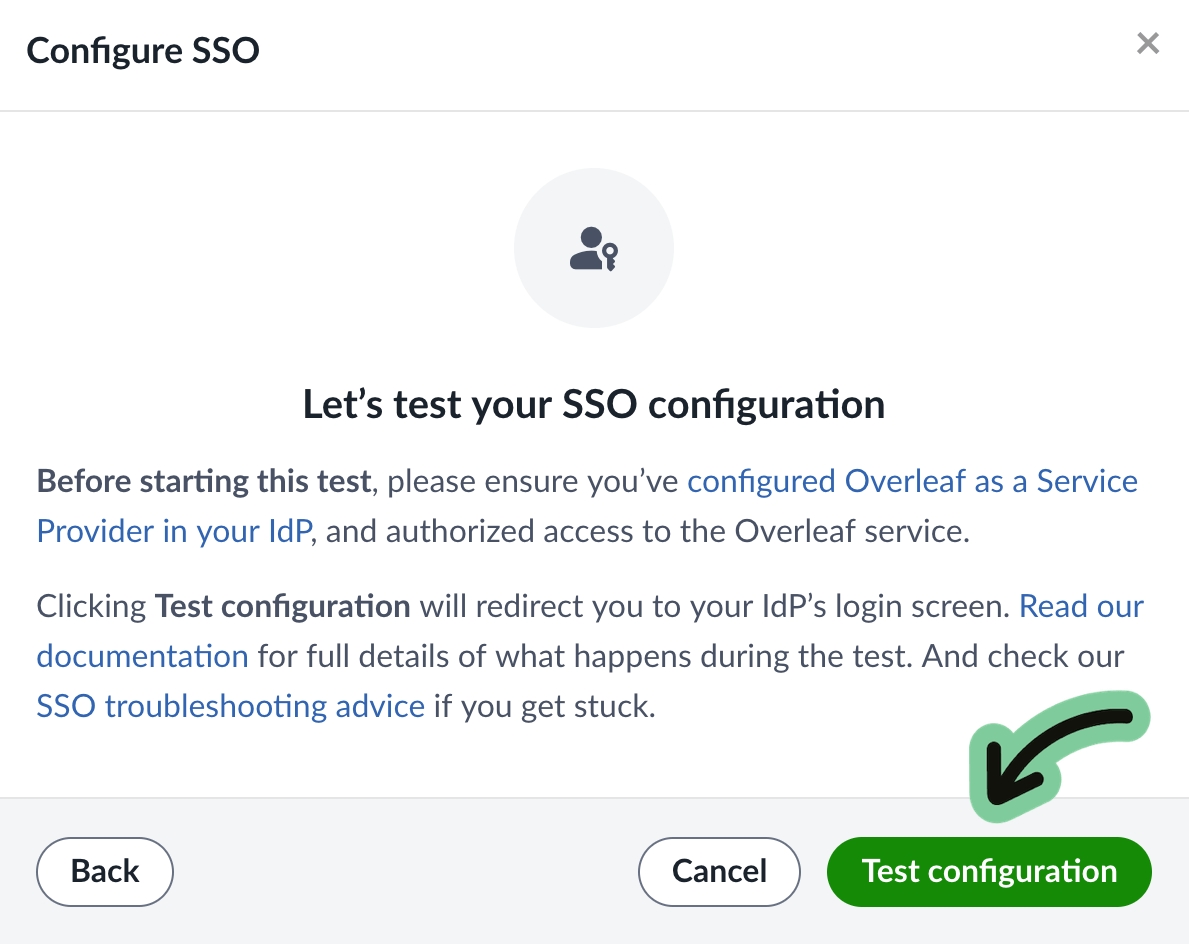
Testing the trust relationship and configuration that has been set up between your IdP and Overleaf involves logging in through your IdP through the testing interface provided by Overleaf. The user account for this test does not need to be invited to the Overleaf group subscription.
Any valid user account in your IdP can be used to test the SSO setup in Overleaf. No data will be saved for this test account, and no Overleaf account will be created for the test user during the testing phase.
To proceed with the test, click the button on the test screen to be redirected to your IdP to log in.
If after clicking on Test configuration you arrive at your IdP login screen, provide the username and credentials for your test user and log in as usual.
If you do not see your login page, but see some form of error, don't panic! Errors are not uncommon at this stage. Please see our .
After logging in, you may see a screen that reports a successful test. If so, that’s great—you can now enable SSO for your team.
If you see an error or a warning from the Overleaf test validation page saying that something went wrong, please see .
If you're having trouble, please review the . Fixing problems may require adjusting the configuration in your IdP and in Overleaf. If you are unable to complete the test, please .
Overleaf makes it easy to access invoices for your subscription payments. You can view, download, and manage all billing documents directly from your account.
Sign in to your Overleaf account Visit Overleaf and log in to your account.
Go to the Subscription page Navigate to your , where you can view your subscription details.
View your invoices
Click on the View your invoices button.
Here, you’ll find a list of past payments, including invoices.
Click on the invoice you wish to view or download.
Download or print a copy Click the Print or PDF button on the invoice page.
If your subscription is manually billed (for example, via Purchase Order), invoices will be sent to the designated billing contact via email. For any issues or if you need additional copies, please contact the .
Ensure your for seamless subscription renewals.
If you need help understanding an invoice, or if there are discrepancies, contact our .
Some Overleaf features can be enabled or disabled for group subscriptions on request.
Subscription administrators can request that certain Overleaf features be disabled or enabled for members of their subscription. In order to request a change in availability of any of the features described on this page, please get in touch with our support team.
Overleaf Chat
enabled for all groups
Overleaf Chat is a standard feature that is available to all Overleaf users unless disablement is requested by the group administrator.
AI Assist
enabled at the free level by default for all groups that have not enabled Managed Users disabled for Professional groups with Managed Users
AI Assist features have both free and premium tiers. When enabled at the group level, the free tier is available to all group members. Only members who have subscribed to the AI Assist add-on can use the premium AI Assist features.
This page outlines what a group administrator needs to do to allow users to link their Overleaf accounts to their single sign-on identities.
Each user needs to complete the actual linking process individually, but group administrators need to make sure that everything is ready for users to do this.
Check that your users have identities in your Identity Provider, and that your users are authorized to use the Overleaf application that has been defined in your IdP.
Set up SSO for your group following .
Enable SSO for your group in your Group subscription settings.
With the information from your IdP gathered in , you will be able to configure the Overleaf side of the trust relationship and identify the attributes that your IdP will be sending Overleaf when your team members log in.
The group administrator can configure and enable SSO on an Overleaf Professional subscription.
The SSO configuration page is accessible from the group administrator’s subscription page in their Overleaf account: .
The SSO configuration is saved while it is being tested. Once SSO is enabled, certificates can be added and removed while the rest of the configuration is locked. If any other part of the configuration other than certificates needs to be updated, it will be necessary to temporarily disable SSO. There are additional instructions for .
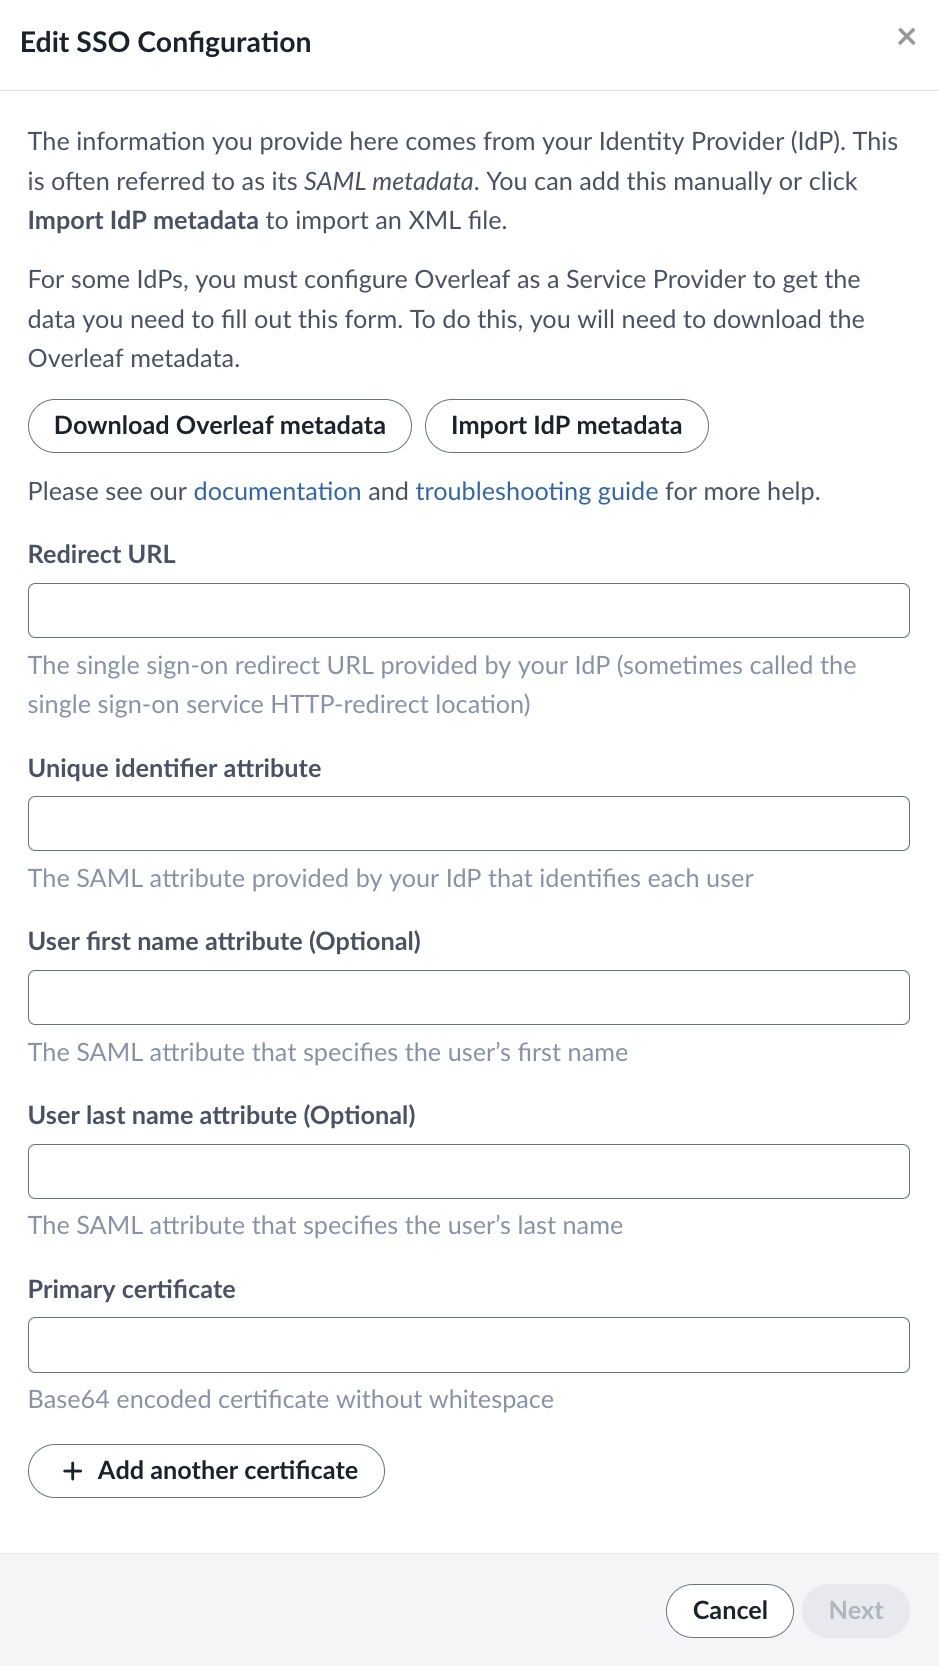
Please provide information from your IdP on the Edit SSO configuration page.
Keeping your billing information up-to-date ensures uninterrupted access to your Overleaf subscription. You can easily update your payment details or billing information through your account settings.
Sign in to your Overleaf account Go to and log in to your account.
Dropbox Synchronization
enabled for all groups
Dropbox Synchronization is a premium feature that is available on all group plans unless disablement is requested by the group administrator.
Make sure that your users are added as group members.
Once SSO is enabled for your group, existing group members will receive an email notification letting them know to log in and link their SSO identities to their Overleaf accounts.
Once a user has linked their SSO identity to their Overleaf account, they can use the Overleaf SSO page to log in to their account. Providing their Overleaf primary email address at the Overleaf SSO page will redirect them to your IdP’s login.
If you're the administrator of a Group Professional plan that has enabled Managed Users, then turning on SSO will make it the exclusive login option for users in your group (provided their account is managed).
No. Changing or canceling your plan won’t affect your projects, the only change will be to the features available to you. You can see which features are available only on paid plans in the comparison table.
Redirect URL
The Redirect URL is an endpoint provided by your IdP. This is sometimes called the Single Sign On Service HTTP-Redirect location. This might be a generic endpoint that is used for all services, or it may be one that is specifically generated by your IdP for Overleaf. This can usually be found in your IdP’s SAML metadata XML file. This URL is sometimes called the “SAML Endpoint” or “SSO URL”.
Unique Identifier
The Unique Identifier is an attribute or claim that you release to Overleaf which allows us to identify each user. The values sent for this attribute must be unique, persistent, and non-reassignable. You should be able to find the name of this attribute as a released claim in your IdP under the Overleaf service definition.
User first name attribute
The optional first name attribute will be used to initialize the Overleaf account for users who register through SSO. If the user has already provided this data to Overleaf, the attribute values sent will not be used. Users can update their first name in their Overleaf Account Settings. You should be able to find the name of this attribute as a released claim in your IdP under the Overleaf service definition.
User last name attribute
The optional last name attribute will be used to initialize the Overleaf account for users who register through SSO. If the user has already provided this data to Overleaf, the attribute values sent will not be used. Users can update their last name in their Overleaf Account Settings. You should be able to find the name of this attribute as a released claim in your IdP under the Overleaf service definition.
Primary certificate
You only need to provide the Primary Certificate.
In most cases, the certificate can be found as a “signing” X509Certificate element within the IdP metadata.
This certificate can also be provided from a .pem file. If your IdP provides the signing certificate in .pem file format, simply paste the contents of the file into this field.
The option to provide additional certificates is to allow for a smooth changeover when an existing certificate expires.
Once you've provided all the configuration data on this page, the SSO configuration in your IdP and Overleaf is ready to be tested.
Navigate to the Subscription page Visit your Subscription page to view and manage your subscription details.
Edit payment information
If you’re paying via credit/debit card or PayPal:
Click on the Update your billing details button.
Enter your new payment details and save your changes.
For manually billed accounts (such as Purchase Orders), please contact the to update your billing details.
Verify your changes After updating your information, check that your subscription status is active and the next billing date is correctly listed on your Subscription page.
If you need to change your Overleaf plan, you can switch to a different plan that better fits your needs. Whether you're upgrading to access additional features or downgrading to a smaller plan, the process is straightforward with the help of our Support and Sales teams.
Upgrade your plan: Move to a plan with more features or seats, such as upgrading from a Standard to a Professional plan, or adding additional licenses.
Downgrade your plan: Switch to a plan with fewer features or seats if your current plan no longer meets your requirements.
To switch plans, please . Our team can assist you with:
Identifying the best plan for your needs.
Managing the transition from your current plan to the new plan.
Ensuring any billing adjustments are handled appropriately.
Plan changes will usually take effect immediately.
If you're in the middle of a subscription term, the cost of the new plan will be pro-rated based on the remaining time of your current plan.
If you're switching to a manually billed subscription, additional steps may be required. Our team will advise you on this.
Find answers to common questions about Overleaf Group SSO.
The table on this page outlines the roles and permissions available within an Overleaf group.
Role
Permissions
Admin
Overall responsibility for the group, including billing.
Can add and remove members and managers.
Can view group metrics.
Can set up Group SSO (Pro plans only)
Group manager
Can add and remove members and managers.
Can view group metrics.
Does not automatically receive a premium subscription.
Must add themselves as a group member to access premium features.
Group member
Automatically receives access to premium features (either Standard or Professional, depending on the group type).
Overleaf Group single sign-on (SSO) allows your team members to easily and securely log in to their Overleaf account, authenticating with your Identity Provider (IdP). Our group SSO uses SAML 2.0, allowing it to integrate with a wide variety of Identity Providers (IdPs), including Microsoft Entra/Azure, Okta, Shibboleth, Jumpcloud, and many others.
For your Identity Provider (IdP) to recognize Overleaf as a trusted service, you must set up Overleaf as a Service Provider (SP). This involves taking information from Overleaf’s SAML metadata and providing it as part of a service definition within your IdP.
In some IdPs, this process is referred to as adding an application or configuring a resource. Whether this is called adding or configuring a service provider, application, or resource, the process involves taking Overleaf’s metadata and providing it to your IdP by uploading it or pasting it into provided fields.
This requires you to log in to your IdP and update its configuration. If you do not have access to your IdP, you will likely have to work with a member of your IT Services team to complete this step.
This page is for administrators of Overleaf Group Professional plans who are testing their The page has information about troubleshooting SSO issues reported by group members.
Testing the consists of four different phases, and it is possible for problems to occur at any stage. The chart below summarizes what is happening at each stage of the testing flow, and identifies some issues which may occur.
Can set up Managed Users (Pro plans only)
Does not automatically receive a premium subscription.
Must add themselves as a group member to access premium features.
To complete this step, you'll need to provide information about Overleaf to your Identity provider. This usually involves creating an application in your system for Overleaf, and uploading or copying some of the data from Overleaf’s SAML metadata file.
Some IdPs allow you to complete a part of the service provider configuration by uploading an XML file that contains the SAML metadata, or by providing a URL to the metadata file. If those options are available, you can provide the XML file provided at this URL: https://www.overleaf.com/saml/group-sso/meta. You can also download the Overleaf Group Professional metadata from your Group subscription settings.
Note that the Overleaf metadata used to set up SSO for your team is not the same metadata that is published for higher-education consumers in UKAMF, Edugain, and other federations. Please be sure to use the metadata described here, and not metadata obtained from these federated sources.
Overleaf supports a Service Provider initiated SSO login process. Some IdPs allow you to configure an Identity Provider initiated login process. This isn't supported for logging in to Overleaf.
The following data from the Overleaf SAML metadata can also be directly added to the Overleaf service definition in your IdP.
entityID
This value is found in the entityID attribute of the EntityDescriptor element in the Overleaf group SAML metadata file
The entityID is a unique identifier for the Overleaf Group SSO service.
Some IdPs refer to this as the Audience URI, the Service Provider Issuer, the Audience Restriction, or the Relying Party Trust Identifier.
SAML signing certificate or X509 Certificate
This value is the X509Certificate element in the Overleaf group SAML metadata file.
Your (IdP) uses the Overleaf SAML signing certificate to verify the signature sent by Overleaf within its SAML authentication request.
This is sometimes referred to as the Signature Certificate, or Verification Certificate.
Assertion Consumer Service (ACS) endpoint
https://www.overleaf.com/saml/group-sso/callback
This value is the Location attribute of the AssertionConsumerService element in the Overleaf group SAML metadata file.
This is the endpoint that your IdP will post SAML responses to.
This URL is also known as the Single sign-on URL, the destination, recipient, callback URL, reply URL, or SAML Assertion Endpoint.
Other information about Overleaf that your IdP may request can include optional configuration of IDP-initiated logins and single log out. These are not currently supported.
You will need to send some data to Overleaf when users are authenticated. In some cases, your IdP may have existing attribute release policies or may offer the option to release all claims. Overleaf only requires a minimal set of data to be released.
Overleaf only requires one attribute: a unique, persistent, and non-reassignable identifier. We recommend a non-email unique identifier, as emails are not always persistent and often change when a user’s first or last name changes. A unique identifier (system id) that is formatted as an email is acceptable if it is unique, persistent, and non-reassignable.
This unique identifier is used by Overleaf to look up each user’s Overleaf account when they log in. In some cases, this is a UUID or System ID. End users will not see this Unique Identifier—it is used behind the scenes during the login process. When using Overleaf, users will identify their accounts using the primary email address that they register with Overleaf, but when logging in with SSO, it is actually the Unique Identifier that is used by the system to identify them.
The unique identifier can be released as the NameID or can be released under any attribute name.
Make a note of the attribute name for the unique identifier claim that is being released. You will need to provide this name to Overleaf in Step 2.
The optional first and last name attributes will be used by Overleaf to fill in the Account Settings of users who register for Overleaf accounts by signing in through SSO.
Make a note of the attribute names for the first and last name claims that are being released.
You must authorize access to the Overleaf service for at least one user that will be used to test the SSO trust relationship and attribute release.
You can choose to authorize all your team members at this point, or this can be done later. Users who are authorized to access Overleaf through Group SSO must also be invited to the group subscription on the Overleaf side.
The test user does not need to be invited to the Overleaf group subscription. Any valid user account in your IdP can be used to test the SSO setup in Overleaf. No data will be saved for this test account, and no Overleaf account will be created for the test user during the testing phase.
You will need to provide metadata from your IdP to Overleaf in Step 2. Some IdPs generate specific metadata for each Service Provider, while some use common endpoints and certificates for all Service Providers.
In many cases IdP SAML metadata is provided in the form of an XML file. Overleaf will require the single sign-on service HTTP Redirect location and the signing certificate used by your IdP for Overleaf in Step 2.
1
An Authentication Request is sent from Overleaf to your IdP.
Overleaf sends a SAML request to your IdP’s single sign-on redirect URL (provided to Overleaf in setup ) signed with Overleaf’s certificate (provided to your IdP in setup ).
A problem here looks like: An immediate problem after pressing the Test button may be caused by an issue at this phase. If you don’t see your IdP login screen, you have a problem in phase 1.
The wrong Redirect Endpoint URL was set in Overleaf (from your IdP).
A mistake was made providing Overleaf’s certificate to your IdP.
2
Login at your IdP.
Your IdP presents you with a log on screen. You log in using an account that is authorized to access Overleaf (configured in setup ).
A problem here looks like: An error shown by your IdP indicates a problem at this phase. If you don’t get back to Overleaf after logging in, you have a problem in phase 2.
Overleaf is not registered as a service or app in your IdP.
Your user is not authorized to access Overleaf.
3
Your IdP sends an Authentication Response to Overleaf.
Your IdP sends a SAML response to Overleaf’s Assertion Consumer Service endpoint (provided to your IdP in ) using your IdP’s certificate (provided to Overleaf in setup ).
A problem here looks like: An unexpected error in Overleaf after logging in.
There is a mistake in the Overleaf ACS endpoint that was configured in your IdP.
A mistake was made in providing your IdP’s certificate to Overleaf.
4
Overleaf processes the response from your IdP.
Overleaf will check the SAML attributes released by your IdP (set up in ) and compare these with the attributes Overleaf is expecting (set up in setup ).
A problem here looks like: Overleaf received the authentication response from your IdP, but something is missing or different than expected.
The Unique Identifier was not released to Overleaf in your IdP.
The Unique Identifier has a different name than what was expected.
If there is a misconfiguration either in your IdP or in Overleaf, one or more of these steps might fail. Fixing the problem may require going back and adjusting the configuration either in your IdP or in Overleaf.
Clicking on the Test configuration button does not take you to a login screen.
Verify that the Redirect URL provided to Overleaf in Step 2 is the Single Sign On HTTP-Redirect URL from your IdP metadata.
Verify that Overleaf has been configured as a service provider in your IdP, that this configuration is enabled, and that it includes the signing certificate provided in Overleaf’s SAML metadata (https://www.overleaf.com/saml/group-sso/meta).
An access denied or similar error is shown by your IdP after you log in.
Verify that the test user that you are logging in with has been authorized to access Overleaf in your IdP. This may require creating a security group in your IdP and adding the user to the security group.
A server error is shown from Overleaf after you log in.
Verify that the Overleaf configuration is using the valid signing certificate provided by your IdP.
Verify that the Assertion Consumer Service endpoint provided to your IdP is the Assertion Consumer Service endpoint found in Overleaf’s SAML metadata (https://www.overleaf.com/saml/group-sso/meta).
Another exception or error is raised.
If you see a problem that is not identified on this page, please contact our support team. Be sure to let us know the email address associated with your Overleaf subscription administrator’s account, and describe the problem you're seeing. Including a screen capture of any error message or problem will help.
A validation warning is shown on the test results page.
Verify that the name you provided for the unique identifier matches the attribute name that was released in your IdP for Overleaf and that this matches the name of the attribute that was sent to Overleaf.
Below are some error codes that you might see in a phase 3 or phase 4 problem, along with some details about the problem and some possible remedies.
SAMLInvalidSignatureError
or
SAMLMissingSignatureError
This could be due to a certificate problem with the certificates that you have provided to Overleaf in setup . It could also be due to not setting the correct signing option for the responses sent to Overleaf in .
Check the metadata from your IdP and ensure that you are providing a valid X509 signing certificate. Your metadata may include several certificates, some could be out of date. You can add each available X509 signing certificate in Overleaf. We recommend that you remove outdated certificates from the configuration.
Also, verify that the responses and assertions returned by your IdP are signed. In Azure, for example, you can choose various signing options as described . Please ensure that you have chosen to sign both the SAML response and the assertion.
MISSING_EXTERNAL_USER_ID
or
INVALID_EXTERNAL_USER_ID
Overleaf did not find the Unique Identifier in the SAML that was sent in the Authentication Response.
Look at the SAML data shown to see if the Unique Identifier was sent under a different name. It can happen that IdPs will send this data under a different label. Change the configuration in Overleaf to match the name of the attribute that was sent.
If there is no attribute that includes the Unique Identifier, it may not have been released by your IdP. Back in the settings for the Overleaf service in your IdP, make sure that this attribute or claim has been released.
MISSING_FIRSTNAME_ATTRIBUTE
MISSING_LASTNAME_ATTRIBUTE
Overleaf did not find the first name attribute or the last name attribute that was specified in the group SSO setup.
Look at the SAML data shown to see if the missing attribute was sent under a different name. It can happen that IdPs will send this data under a different label. Change the configuration in Overleaf to match the name of the attribute that was sent.
If there is no attribute that includes the missing information it may not have been released by your IdP. Back in the settings for the Overleaf service in your IdP, make sure that this attribute or claim has been released
Our Managed Users feature gives you more control over your organization’s use of Overleaf. It ensures tighter management of user access and deletion and allows you to keep control of projects when someone leaves the organization.
If you enable Managed Users for your group, members of the subscription will not be able to:
Delete their account
Change their account email address
Have a secondary email address (or add a secondary address)
Link their account to ORCID
Start a new subscription or join another subscription using the same email address
Purchase or use AI features
Managed Users can only be enabled by a group subscription administrator. Once it's enabled, the administrator and group Managers will have admin rights over managed user accounts. Administrators and Managers will be able to:
Remove any member from the subscription
Delete any subscription members account
Reassign ownership of projects when the original owner’s account is deleted
Only Lead Administrators can enable Managed Users.
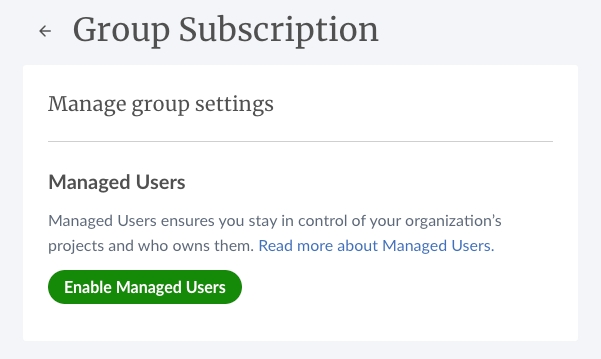
1. As the Lead Administrator for the group subscription, first, navigate to your subscription settings, then click Manage group settings.
2. Under Manage group settings, go to the Managed Users section and select Enable Managed Users.
3. You’ll be asked to confirm that you accept Overleaf’s terms and conditions. Once you’ve done this, you can click Enable Managed Users.
4. Clicking Enable Managed Users will automatically send invitations to all your existing group members to transfer the management of their accounts to you. The email they receive will clearly explain the differences between managed and unmanaged accounts, as well as how to keep their personal projects separate. This information is also available on the managed user accounts page.
1. You can review the managed status of your group members by going to your subscription settings and selecting Manage group members.
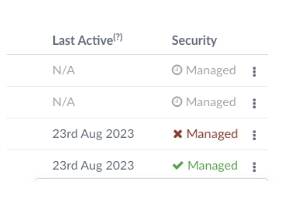
2. On the Member management page, you’ll see a table of subscription members and people invited to the subscription. Those that are managed will be clearly indicated in the Security column with a green tick and the word “Managed.”
3. If they’re already a subscription member, but haven't yet accepted your invitation to become managed, there will be a red cross. Those that have been invited to the subscription but haven't yet joined it will show as Pending invite, with a clock icon.
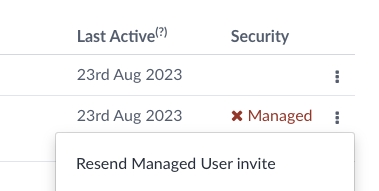
4. If a member doesn’t respond to your initial invitation to transfer management of their account, you can send them a reminder email by clicking the three-dot menu and selecting Resend Managed User invite.
You can find out how to invite new members to your group subscription in Adding and removing users and managers.
Depending on whether the person you’re inviting is an existing Overleaf user or a new user, they will either be asked to transfer management of their account or to register for an account that’s managed. In both cases, the concept of managed user accounts and what this means for them will be clearly explained to them in the email invitation to join the subscription.
Group Professional Administrators and Managers with Managed Users enabled have two options for removing user accounts from their group subscription:
Remove User (Non-Destructive): This action removes the user account from the group subscription, returning ownership of the account and projects to the original account owner.
Delete User (Destructive): This action deletes the user account and transfers ownership of the projects within that account to another designated managed user in the group.
This feature allows Group Pro Administrators and Managers to remove a user from a managed group in a non-destructive way.
When a managed user is removed:
They are removed from the group.
They are no longer a managed user.
They retain their existing account on the Overleaf free plan.
They retain ownership of projects currently owned by them. Any collaborators on those projects become read-only, but one collaborator can be given write permissions, in line with free plan limits.
They continue to have access to any projects shared with them.
They will no longer be able to log in with SSO (if enabled) and will need to set an Overleaf password.
This non-destructive option allows for the removal of a managed user from the group subscription while preserving the account holder's project ownership and access to shared projects.
Choosing this option would be useful when:
A user has joined the group using the wrong account or with an incorrect email address.
There is a need to offboard group members while allowing them to retain access to projects.
Exempt user accounts from SSO login.
1. To remove a user, go to "Your subscription" settings and select "Group members".
2. On the "Members management" page, you’ll see a table of subscription members. To remove a user, click the three-dot menu on the row of the table corresponding to that user and select "Remove user".
3. The next screen explains the implications of removing the user. As a final step, you’ll be asked to enter the email address associated with the account you’re removing. This is to ensure that you’re absolutely certain you want to remove the account from the subscription without it being deleted. Once you’ve entered the required information, click "Remove user".
This destructive feature enables Group Pro Administrators and Managers to delete a managed user account. Deleting an account removes the account from your group subscription and transfers ownership of any projects associated with the account to another managed user within the group.
When a managed user is deleted:
The account is removed from the group.
The account is permanently deleted from Overleaf.
The original account owner will lose access to all projects within the account.
Ownership of projects is transferred to another managed users within the group.
This functionality is particularly useful when a managed user leaves your group or organization. Deleting their managed account facilitates their removal from your group subscription. As part of this process, it is necessary to transfer ownership of any projects created by the departing user to another active managed user within the group so that you can retain access to those projects.
1. To delete a user, go to "Your subscription" settings and select "Group members".
2. On the "Members management" page, you’ll see a table of subscription members. To delete a user, click the three-dot menu on the row of the table corresponding to that user and select "Delete user".
3. The next screen explains the implications of deleting a user and asks you to select who you would like to transfer the deleted user’s projects to. As a final step, you’ll be asked to enter the email address associated with the account you’re deleting. This is to ensure that you’re absolutely certain you want to delete the account. Once you’ve entered the required information, click "Delete User".
4. You will then see a screen showing you the progress of the project transfer.
If you need help with any aspect of user management, please contact [email protected].
You can modify your SSO setup to complete tasks such as adding certificates, changing other aspects of your IdP configuration.
Within your members management page, you're able to see which members are linked to your SSO. Members will receive an email notification to authenticate with your SSO provider once SSO is enabled and they are also encouraged to do so after logging in. (Also see .)
Your members will now be required to link to your SSO provider. Once linked, they will have the option to log in via SSO or other login methods unless Managed Users is enabled. (See .)
Via the three-dot menu at the end of the row in the members table, there are options to help manage your members. For members who are not linked, you can send an email reminder to authenticate with your SSO provider.
For members who are linked, you can unlink them from your SSO provider so that they can reauthenticate. This action should only be taken when you need to correct the unique identifier associated with a specific user. See if the unique identifier needs to be corrected for all group members.
Below are some errors that your users might encounter when authenticating their Overleaf account with your SSO provider for the first time or when trying to log in via your SSO provider.
This email address isn’t set up for SSO. Please check it and try again or contact your administrator.
Members will see this message if they try to log in via SSO but their account is not yet authenticated with your SSO provider. They will need to log into their Overleaf account as they did before. After logging in, members will be directed to the SSO enrollment page. They can also authenticate with your SSO provider via their user settings page.
Sorry, you are trying to log in to X but the identity returned by your identity provider is not the correct one for this Overleaf account.
The email address they tried to log in with is not associated with the unique identifier from your IdP. The member will need to log out of your SSO provider and log in with the correct account.
Sorry, the information received from your identity provider is not signed (both response and assertion signatures are required). Please contact your administrator for more information.
This is a configuration problem within your IdP. The authentication request with your SSO provider failed because your SSO provider is no longer sending a signed response and assertion.
Your Overleaf Group SSO settings include an option to Unlink users. If you are migrating to a new IdP or changing the attributes that are being sent to Overleaf by your IdP, you may need to use the Unlink users option.
The Unlink users option removes the unique identifier from every group member’s account, essentially removing the login option via your SSO provider. This action requires each user to relink their Overleaf account to their SSO identity and they will receive an email notification to do so. There is also the option to unlink individual users to correct issues unique to specific users. See .
An administrator should unlink all members only if they are making a change to the IdP configuration that changes the name or the values of the Unique Identifier. All other aspects of the SSO configuration, including the Redirect URL and the Certificates can change without requiring the unlinking of users.
The certificates that IdPs use to sign the responses that they send to services expire after a certain period of time. It's important to keep the certificate that has been provided to Overleaf up to date. If your certificate has expired, your users will see an error when attempting to log in to Overleaf.
You can check on your certificate expiry dates in the SSO configuration section of your Group Settings.
Overleaf's SSO configuration page provides a way to ensure that certificates can be replaced without interrupting access to the Overleaf service.
Add the new certificate to Overleaf's SSO configuration page. You will now have two certificates configured: the original certificate and the updated new certificate.
You can keep these two certificates in place until you have completed the certificate change over in your IdP.
Once your IdP is using the new certificate, you can remove the original certificate in Overleaf.
You might sometimes need to change other aspects of the Identity Provider (IdP) configuration. This can happen if you're changing the solution that you're using for your IdP, for example. In cases like this, you will have to temporarily disable SSO access.
You can disable SSO via your group settings page. After disabling, you can click View configuration and then Edit to modify and test your new IdP configuration.
When SSO access is disabled, Overleaf users can log in to their Overleaf accounts using their email address and an Overleaf-specific password. Users will receive a notification by email when SSO access is disabled. Once SSO is enabled again, they can log in again via SSO without needing to re-link their Overleaf account to their SSO identity. If your configuration changed the unique identifier then you will need to Unlink users. See .