Remove user
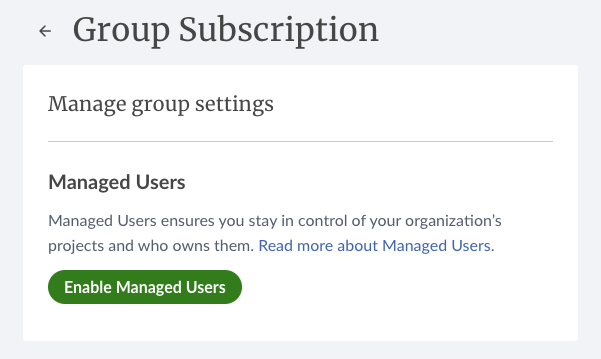
 2\. Under **Manage group settings**, go to the Managed Users section and select Enable Managed Users.
3\. You’ll be asked to confirm that you accept [Overleaf’s terms and conditions](https://www.overleaf.com/legal). Once you’ve done this, you can click Enable Managed Users.
2\. Under **Manage group settings**, go to the Managed Users section and select Enable Managed Users.
3\. You’ll be asked to confirm that you accept [Overleaf’s terms and conditions](https://www.overleaf.com/legal). Once you’ve done this, you can click Enable Managed Users.
 4\. Clicking **Enable Managed Users** will automatically send invitations to all your existing group members to transfer the management of their accounts to you. The email they receive will clearly explain the differences between managed and unmanaged accounts, as well as how to keep their personal projects separate. This information is also available on the [managed user accounts page](https://www.overleaf.com/learn/how-to/Understanding_Managed_Overleaf_Accounts).
## Reviewing the managed status of group members
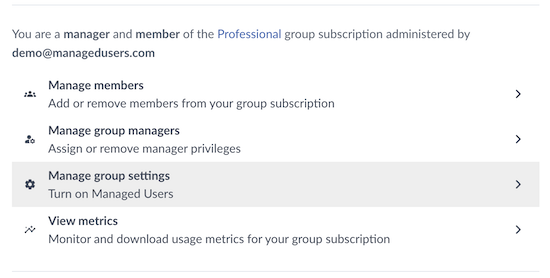
1\. You can review the managed status of your group members by going to your [subscription settings](https://www.overleaf.com/user/subscription) and selecting Manage group members.
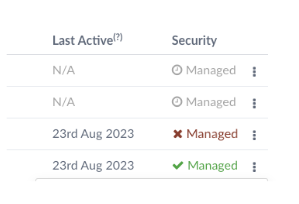
2\. On the Member management page, you’ll see a table of subscription members and people invited to the subscription. Those that are managed will be clearly indicated in the Security column with a green tick and the word “Managed.”
3\. If they’re already a subscription member, but haven't yet accepted your invitation to become managed, there will be a red cross. Those that have been invited to the subscription but haven't yet joined it will show as Pending invite, with a clock icon.
4\. Clicking **Enable Managed Users** will automatically send invitations to all your existing group members to transfer the management of their accounts to you. The email they receive will clearly explain the differences between managed and unmanaged accounts, as well as how to keep their personal projects separate. This information is also available on the [managed user accounts page](https://www.overleaf.com/learn/how-to/Understanding_Managed_Overleaf_Accounts).
## Reviewing the managed status of group members
1\. You can review the managed status of your group members by going to your [subscription settings](https://www.overleaf.com/user/subscription) and selecting Manage group members.
2\. On the Member management page, you’ll see a table of subscription members and people invited to the subscription. Those that are managed will be clearly indicated in the Security column with a green tick and the word “Managed.”
3\. If they’re already a subscription member, but haven't yet accepted your invitation to become managed, there will be a red cross. Those that have been invited to the subscription but haven't yet joined it will show as Pending invite, with a clock icon.
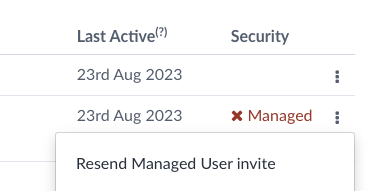
 4\. If a member doesn’t respond to your initial invitation to transfer management of their account, you can send them a reminder email by clicking the three-dot menu and selecting Resend Managed User invite.
 ## Inviting new users to your subscription
You can find out how to invite new members to your group subscription in [Adding and removing users and managers](/groups/user-management/how-to-add-and-remove-users.md).
Depending on whether the person you’re inviting is an existing Overleaf user or a new user, they will either be asked to transfer management of their account or to register for an account that’s managed. In both cases, the concept of managed user accounts and what this means for them will be clearly explained to them in the email invitation to join the subscription.
## Removing or Deleting Managed Users
Pro group Administrators and Managers with Managed Users enabled have two options for removing user accounts from their group subscription:
* **Remove User (Non-Destructive):** This action removes the user account from the group subscription, returning ownership of the account and projects to the original account owner.
* **Delete User (Destructive):** This action deletes the user account and transfers ownership of the projects within that account to another designated managed user in the group.
### Returning ownership of a managed account to the original account owner
#### What does this feature do?
This feature allows Group Pro Administrators and Managers to remove a user from a managed group in a non-destructive way.
When a managed user is removed:
* They are removed from the group.
* They are no longer a managed user.
* They retain their existing account on the Overleaf free plan.
* They retain ownership of projects currently owned by them. Any collaborators on those projects become read-only, but one collaborator can be given write permissions, in line with free plan limits.
* They continue to have access to any projects shared with them.
* They will no longer be able to log in with SSO (if enabled) and will need to set an Overleaf password.
#### When would I use this feature?
This non-destructive option allows for the removal of a managed user from the group subscription while preserving the account holder's project ownership and access to shared projects.
Choosing this option would be useful when:
* A user has joined the group using the wrong account or with an incorrect email address.
* There is a need to offboard group members while allowing them to retain access to projects.
* Exempt user accounts from SSO login.
#### How do I use this feature?
1\. To remove a user, go to "[Your subscription](https://www.overleaf.com/user/subscription)" settings and select "Group members".
2\. On the "Members management" page, you’ll see a table of subscription members. To remove a user, click the three-dot menu on the row of the table corresponding to that user and select "Remove user".
## Inviting new users to your subscription
You can find out how to invite new members to your group subscription in [Adding and removing users and managers](/groups/user-management/how-to-add-and-remove-users.md).
Depending on whether the person you’re inviting is an existing Overleaf user or a new user, they will either be asked to transfer management of their account or to register for an account that’s managed. In both cases, the concept of managed user accounts and what this means for them will be clearly explained to them in the email invitation to join the subscription.
## Removing or Deleting Managed Users
Pro group Administrators and Managers with Managed Users enabled have two options for removing user accounts from their group subscription:
* **Remove User (Non-Destructive):** This action removes the user account from the group subscription, returning ownership of the account and projects to the original account owner.
* **Delete User (Destructive):** This action deletes the user account and transfers ownership of the projects within that account to another designated managed user in the group.
### Returning ownership of a managed account to the original account owner
#### What does this feature do?
This feature allows Group Pro Administrators and Managers to remove a user from a managed group in a non-destructive way.
When a managed user is removed:
* They are removed from the group.
* They are no longer a managed user.
* They retain their existing account on the Overleaf free plan.
* They retain ownership of projects currently owned by them. Any collaborators on those projects become read-only, but one collaborator can be given write permissions, in line with free plan limits.
* They continue to have access to any projects shared with them.
* They will no longer be able to log in with SSO (if enabled) and will need to set an Overleaf password.
#### When would I use this feature?
This non-destructive option allows for the removal of a managed user from the group subscription while preserving the account holder's project ownership and access to shared projects.
Choosing this option would be useful when:
* A user has joined the group using the wrong account or with an incorrect email address.
* There is a need to offboard group members while allowing them to retain access to projects.
* Exempt user accounts from SSO login.
#### How do I use this feature?
1\. To remove a user, go to "[Your subscription](https://www.overleaf.com/user/subscription)" settings and select "Group members".
2\. On the "Members management" page, you’ll see a table of subscription members. To remove a user, click the three-dot menu on the row of the table corresponding to that user and select "Remove user".
Remove user
Remove user from the managed group
Delete user